Halloween Pumpkin Carving Contest · Starts October 1st · $500 in prizes
← Back to ideas
@ai_concepts
Sep 25, 2026
Expert Oogie Boogie Pumpkin with Burlap Texture and BugsAI
0

Report this carving

Tell us what is wrong. Reports are private.

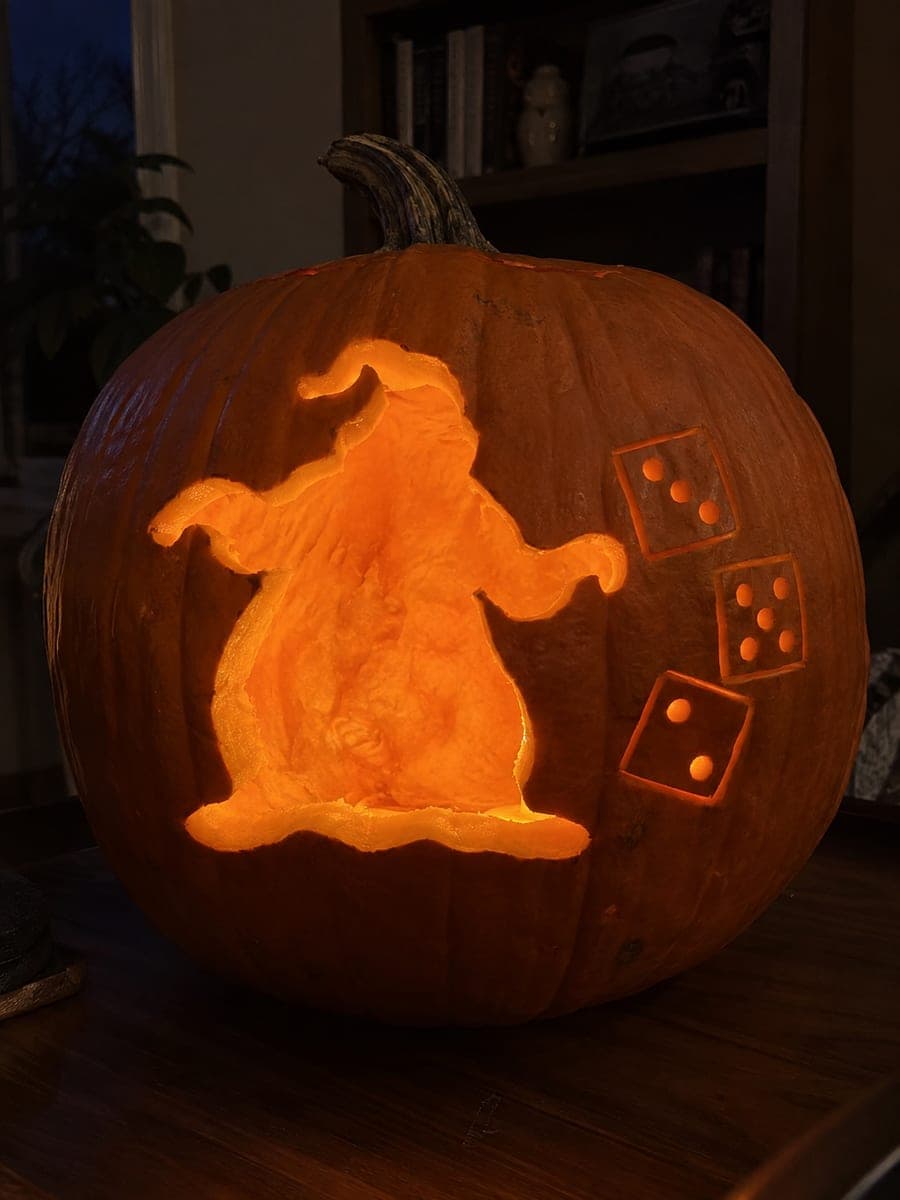
Expert Oogie Boogie Pumpkin with Burlap Texture and Bugs

Both broad arms connect to the side frames supporting Oogie Boogie's full body on this expert silhouette pumpkin carving idea, with teeth rooted to the lips, separate seam slots, shallow-backed burlap and dice outlines, and open insect silhouettes scattered throughout. The combination of full cuts and relief carving makes this one of the most technically demanding Nightmare Before Christmas pumpkin carvings in the batch. Work the insect silhouettes last so you can use the remaining rind bridges as a guide for how deep to carve the burlap texture.

No ratings yet · Sign in to rate
Comments (0)

  • No comments yet — be the first.

Save without an account. Sign in to like or comment.

Our tips for carving a similar design

Both broad arms anchored to the side frames hold up Oogie Boogie's entire body above, while teeth rooted to both lips and separate seam slots keep the face readable without freestanding pieces. The burlap and dice textures are achieved through shallow relief carving inside the glowing silhouette, and the insect silhouettes scattered throughout are individual small cut-throughs that add an extra layer of narrative. Work the insect silhouettes last so you can use remaining rind thickness readings from the large apertures to judge a safe depth limit for the burlap grooves.

From pumpkin to porch

  1. Plan and prep

    This design requires a plan before the first cut. Map out the arm connection points, the seam slot positions, and the insect locations on the stencil before transferring anything to the pumpkin. Scoop from the back and thin the walls to a consistent three-quarters of an inch. Transfer the full stencil with a pounce wheel, spending extra care on the burlap grid and insect positions.

  2. Cut the main body silhouette and arms

    Begin with the outermost body silhouette cuts, establishing both arm-to-frame connections before working inward. Use a medium carving saw at a steady pace. Confirm each arm connection is rigid before moving to the torso. Cut the large background panels flanking the body next to open up the main composition.

  3. Work the grin and seam slots

    Cut the grin using a fine detail saw, keeping every tooth rooted to both lips. Follow immediately with the short, separate seam slots using a narrow detail saw. The seam slots are purely decorative but are cut all the way through, so keep them short and well-spaced so they do not weaken the rind panels between them.

  4. Shallow-back burlap and dice textures

    Use a V-gouge for the burlap weave lines and a round gouge for the dice square outlines and pips. Work in a consistent direction for the burlap to simulate actual woven fabric. Keep all shallow work under half the rind thickness, checking by feel as you go. The remaining rind panels from the large aperture cuts give you a reference for how much material is still in place.

  5. Cut the insect silhouettes

    Use a fine detail saw or a small drill bit to open each insect silhouette, working from the largest insect to the smallest. These small through-cuts appear scattered across the design, so work methodically from one corner of the composition to the other to avoid missing any. Each insect should be fully cut through with clean edges.

  6. Light and final evaluation

    Place an LED tea light inside and inspect from across a dark room. The glowing silhouette, grin, seam slots, and insect shapes should all read simultaneously. If the burlap texture is too subtle, deepen a few lines selectively with a second gouge pass. Apply petroleum jelly to every cut and grooved surface and store the pumpkin cold when not on display.

Written with AI to match this design

Gather your supplies

Check things off as you get ready.

Work on a stable surface, keep your free hand out of the cutting path, and have an adult handle sharp tools.

Three levels of light

  • Leave intact

    The retained body, arm surfaces, and rind panels between seam slots and burlap grooves remain dark

  • Peel & shade

    Burlap weave grooves, dice outlines, and pips are shallow-backed to cream flesh for mid-glow texture across the body

  • Cut through

    Main body apertures, arm connection cutouts, seam slots, grin gaps, and all insect silhouettes are fully cut through

Learn the carving basics

Before you start cutting

How do I keep track of which insect positions have been cut when there are so many small shapes?

Number each insect on your stencil printout and check them off as you complete each one. Use a fine marker dot at each position on the pumpkin after transfer so the marks are visible even under bright work lighting. Cutting in a defined sequence from top-left to bottom-right also prevents double-cutting or missing a position.

The burlap weave and dice are both inside the glowing silhouette. How do I stop them from merging visually when lit?

The dice squares need to be slightly deeper and more precisely outlined than the burlap grooves so they stand out as geometric shapes against the organic texture. Complete all the burlap work first at a shallower depth, then add the dice outlines at a slightly deeper cut. The contrast in depth creates visual hierarchy when the light passes through.

How long will this pumpkin last given the extent of the carving?

Expert-level carving removes a significant amount of rind mass, which speeds drying considerably. Refrigerate the pumpkin during the day, display only for a few hours each evening, and coat all surfaces with petroleum jelly nightly. A well-maintained expert carving typically holds for five to seven days before shriveling becomes noticeable.

Your take belongs here, too.

Changed a detail? Made it simpler? Share a photo of your version and tell the community what worked.

Share your pumpkin

More pumpkins like this

You've reached the end · 8 pumpkins
The Patch Report

Fresh pumpkins, in your inbox.

The best new carvings, ideas worth stealing, and how-tos for carving season. Short, seasonal, and gone by November.

A short email during carving season. Unsubscribe anytime. See our privacy policy.