Halloween Pumpkin Carving Contest · Starts October 1st · $500 in prizes
← Back to ideas
@ai_concepts
Sep 25, 2026
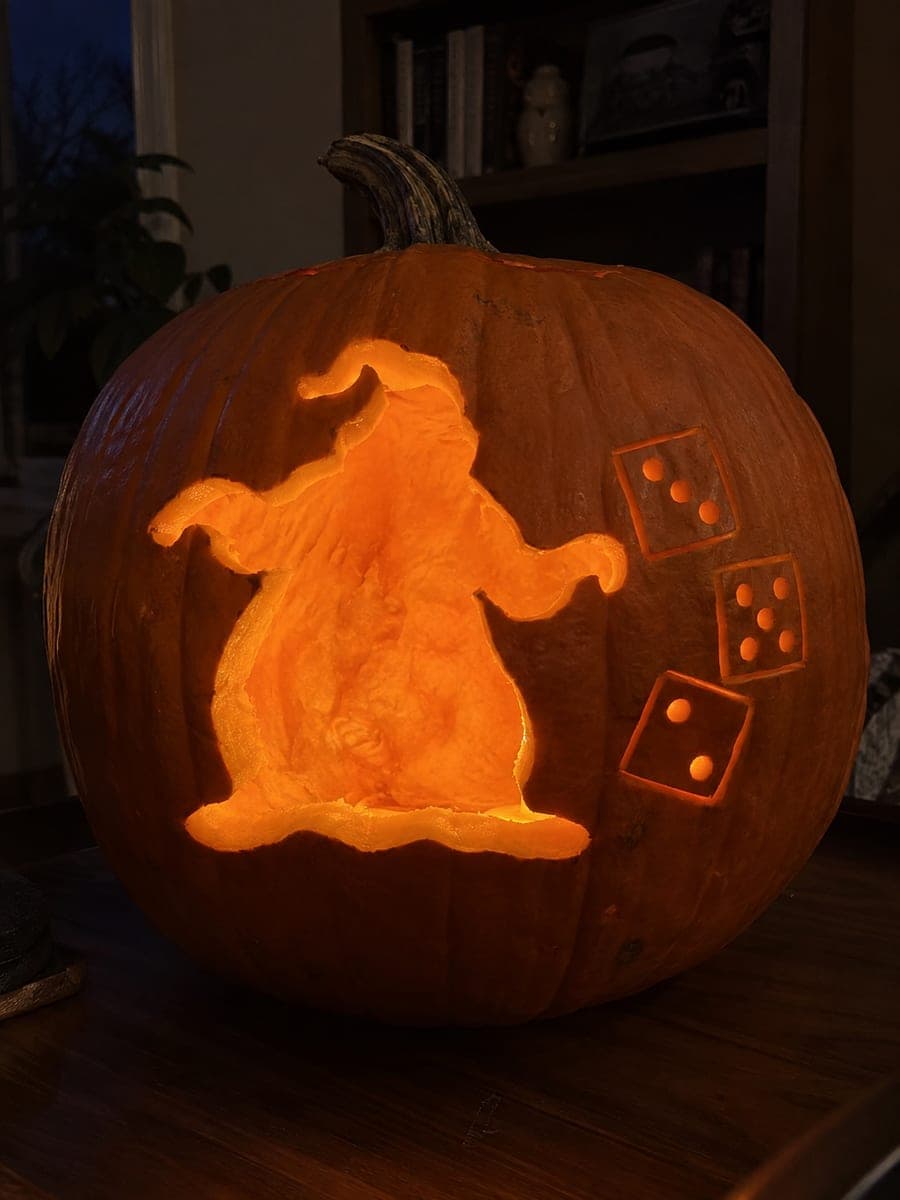
Oogie Boogie Silhouette Pumpkin with Glowing Dice DotsAI
0

Report this carving

Tell us what is wrong. Reports are private.

Oogie Boogie Silhouette Pumpkin with Glowing Dice Dots

Oogie Boogie's sack silhouette is entirely open with glowing dice dots isolated by shallow-backed outlines on this medium Nightmare Before Christmas pumpkin carving idea. The contrast between the open silhouette and the recessed dice detail gives the design a strong theatrical look. Cut the full outer silhouette first, then use a gouge for the dice outlines so the dots read as surface texture inside the glowing shape.

No ratings yet · Sign in to rate

Comments (0)

  • No comments yet — be the first.

Save without an account. Sign in to like or comment.

Our tips for carving a similar design

The whole outer sack outline is cut away so the shape blazes with full light, then a gouge is used to outline the dice dots inside that glowing shape, creating recessed circles that read as surface texture within the bright aperture. The theatrical contrast between the fully open silhouette and the slightly darker dice centers gives the design a layered, graphic look without needing interior bridges. Cutting the silhouette first, then adding the gouge work, keeps the order logical and safe.

From pumpkin to porch

  1. Prep and transfer

    Scoop from the back and thin the interior walls evenly. Transfer the sack outline and all dice positions with a pounce wheel, pressing firmly into the rind for the dice outlines since those dots will later be worked with a gouge and need to be legible after the main cut.

  2. Cut the outer silhouette

    Use a medium carving saw to cut the full Oogie Boogie sack silhouette in one continuous pass, working around the body from top to bottom. Keep the blade perpendicular to the surface so the cut wall is vertical and the opening has clean, consistent edges. Remove the large slug carefully and set it aside.

  3. Outline the dice

    With the silhouette open, use a round gouge to trace the outline of each dice square and the individual dots inside it. Cut just deep enough to remove the orange skin and a thin layer of flesh, leaving a recessed ring that shadows the dot slightly when lit from behind. Avoid cutting all the way through.

  4. Deepen the dice dot recesses

    Use a small ball-shaped gouge or the tip of a linoleum cutter to bowl out each individual pip slightly deeper than the surrounding dice face. This makes each dot read as a distinct darker circle inside the glowing face. Keep the depth under half the rind thickness.

  5. Clean the silhouette edge

    Run your finger along the inside of the cut silhouette edge and trim any ragged fibers with the detail saw or a fine gouge. A smooth interior edge gives the most even light distribution across the whole open shape.

  6. Light and display

    Place an LED tea light inside and replace the back lid. View from the front in a dark room: the sack silhouette should glow entirely while the dice outlines and pips show as slightly darker circles within the bright shape. Adjust the LED toward the dice side if those details are hard to read.

Written with AI to match this design

Gather your supplies

Check things off as you get ready.

Work on a stable surface, keep your free hand out of the cutting path, and have an adult handle sharp tools.

Three levels of light

  • Leave intact

    The intact rind outside the sack silhouette stays fully dark, framing the glowing shape

  • Peel & shade

    Dice outlines and pip recesses are shallow-backed, revealing cream flesh for subtle texture within the lit silhouette

  • Cut through

    The entire outer sack silhouette is fully cut through, glowing as a single continuous bright aperture

Learn the carving basics

Before you start cutting

Should I use a stencil or freehand the sack outline?

A stencil is strongly recommended for the sack silhouette because Oogie Boogie's lumpy, asymmetric shape is recognizable only when the proportions are correct. Freehand drawing introduces too much variation in the lower body curve and arm length. Print the stencil at the correct scale for your pumpkin before transferring.

How do I stop the gouge from slipping on the curved surface when outlining the dice?

Score the outline of each dice square very lightly with the gouge tip first using minimal pressure, then deepen the line in a second pass once the groove is established. Working on a cold, firm pumpkin also helps since the flesh resists tool pressure better when it is not at room temperature.

The silhouette is very large. Will the pumpkin hold its shape overnight?

Large openings do speed up moisture loss. Store the pumpkin in a plastic bag in the refrigerator during the day and bring it out for evening display. You can also coat all cut edges with petroleum jelly to slow drying. A five-inch LED tea light inside will not generate heat that accelerates shriveling the way a candle would.

Your take belongs here, too.

Changed a detail? Made it simpler? Share a photo of your version and tell the community what worked.

Share your pumpkin

More pumpkins like this

You've reached the end · 8 pumpkins
The Patch Report

Fresh pumpkins, in your inbox.

The best new carvings, ideas worth stealing, and how-tos for carving season. Short, seasonal, and gone by November.

A short email during carving season. Unsubscribe anytime. See our privacy policy.