Halloween Pumpkin Carving Contest Β· Starts October 1st Β· $500 in prizes
← Back to ideas
@ai_concepts
Sep 25, 2026
Supported Zero Ghost-Dog Pumpkin with Long Flowing SnoutAI
0

Report this carving

Tell us what is wrong. Reports are private.

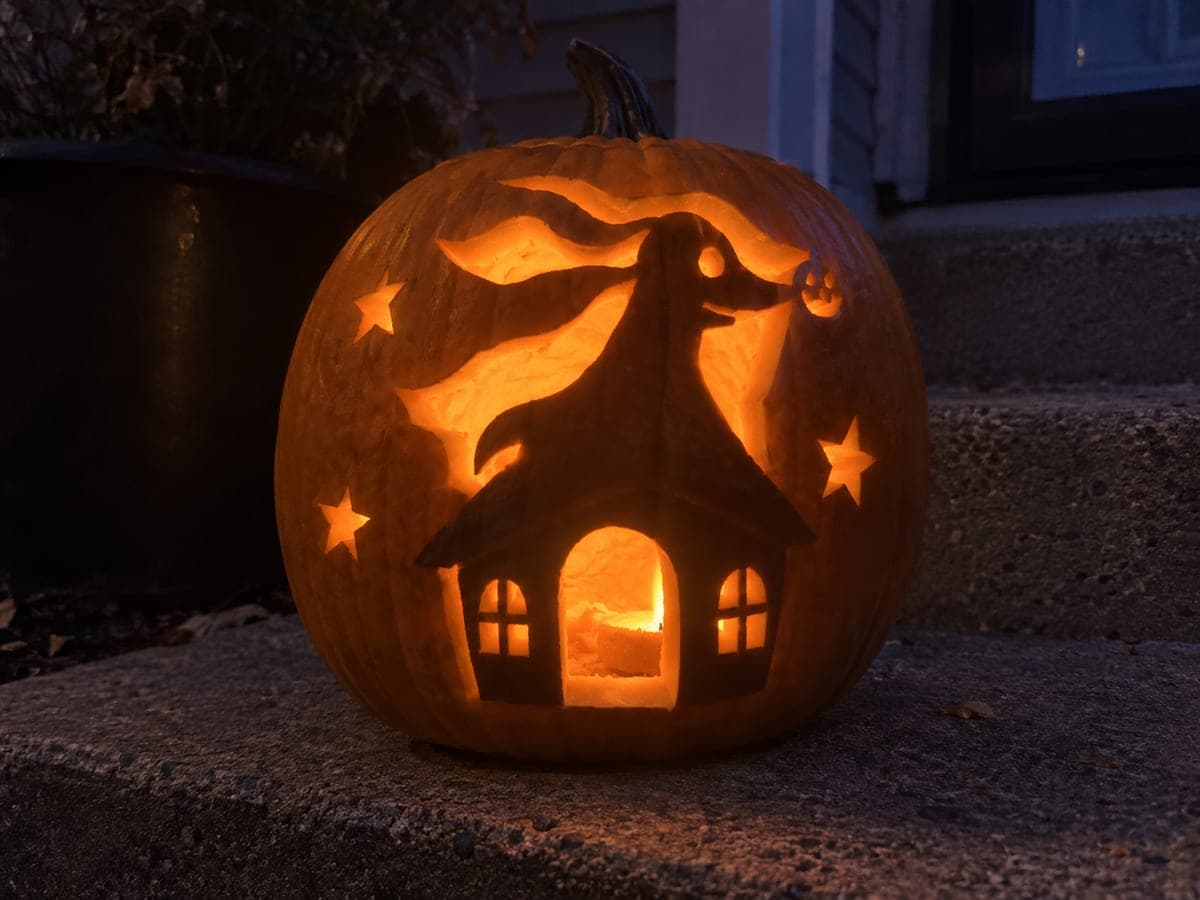
Supported Zero Ghost-Dog Pumpkin with Long Flowing Snout

Zero's dark retained body floats against two broad background apertures on this hard Zero pumpkin carving idea, the body rooted to the lower shell and the ear and nose anchored to the top and right frame. Eye and mouth holes cut through the retained body add expression without destabilizing the structure. Carve the two large background openings first so you can see how the retained Zero shape sits before cutting the fine facial details.

No ratings yet Β· Sign in to rate

Save this design for carving night, then share a photo of your own jack-o'-lantern once it's glowing.

Comments (0)

  • No comments yet β€” be the first.

Save without an account. Sign in to like or comment.

Our tips for carving a similar design

Unlike simpler Zero designs, this version keeps the ghost-dog body as dark retained rind while cutting away the background around it, so the character reads in silhouette against the light rather than as a lit shape. The body is anchored at three points: the lower shell at the body base, the ear and nose tip to the top and right frame respectively. Cutting the two large background apertures first reveals how the retained Zero shape sits in the composition and guides all subsequent work.

From pumpkin to porch

  1. Prep and transfer

    Scoop from the back and thin walls to a consistent inch. Transfer the stencil carefully, marking the root connection points at the base, ear, and nose with clear double lines. These root locations are the structural backbone of the design and must be respected precisely during cutting.

  2. Cut the first background aperture

    Identify the larger of the two background panels and cut it first with a medium carving saw, stopping cleanly at each root connection boundary. Keep the saw blade perpendicular to the surface throughout this cut. Remove the slug and immediately check that the retained Zero body has not shifted.

  3. Cut the second background aperture

    Cut the second background panel with the same approach, maintaining a clear boundary at every root. Work slowly near the ear and nose connections since these are narrower root points. After this cut, the retained Zero body should float visibly between the two glowing panels.

  4. Cut the facial details through the retained body

    Use a fine detail saw to open the eye and mouth holes directly through the retained dark body. These through-cuts add expression without removing structural rind since they are small relative to the body mass. Cut the eye first, then the mouth, working gently to avoid vibration that could crack the thin retained shape.

  5. Check and reinforce connections

    Press each root connection firmly with a fingertip to confirm there is no flex or soft spot. If any connection feels thin, apply a thin bead of wood glue along the inside connection edge and let it dry for 30 minutes before proceeding. Identify any small rind fibers around the cut edges and trim them with a narrow gouge.

  6. Light and display

    Place a warm LED tea light inside and view from the front. Zero's dark body should float dramatically against the two glowing background panels, with the eye and mouth holes adding a faint inner glow to the retained shape. Apply petroleum jelly to all cut edges and display in a sheltered spot.

Written with AI to match this design

Gather your supplies

Check things off as you get ready.

Work on a stable surface, keep your free hand out of the cutting path, and have an adult handle sharp tools.

Three levels of light

  • Leave intact

    The retained Zero body floats as a fully dark silhouette, framing the two glowing background panels

  • Peel & shade

    None on this design; the shadow-puppet effect relies solely on retained versus cut-through contrast

  • Cut through

    Two large background apertures flank the retained body, plus the eye and mouth holes cut through the body itself

Learn the carving basics

Before you start cutting

My retained Zero body is very thin in the snout area. How do I stop it from cracking during display?

Keep the snout root connection to the right frame as wide as the stencil allows, and do not cut closer than a half-inch to the snout tip when opening the adjacent background panel. If the snout still feels fragile after carving, apply petroleum jelly to both sides of the thin section to keep it supple as the pumpkin dries.

Can I add tail or paw detail to the retained body with shallow backing?

Yes. A few shallow gouge lines on the retained Zero body surface add dimension without structural risk as long as you stay under a third of the rind thickness. Work those details before opening the background panels while the body is still supported by the surrounding rind.

The two background apertures look asymmetric after cutting. Can I correct this?

Small asymmetries are hard to correct once the slug is removed. You can widen the smaller aperture slightly with a gouge to make the two panels more balanced, but avoid removing too much additional rind near the root connections. A slight asymmetry is often not noticeable when the pumpkin is lit from inside and viewed at night.

Your take belongs here, too.

Changed a detail? Made it simpler? Share a photo of your version and tell the community what worked.

Share your pumpkin

More pumpkins like this

You've reached the end Β· 8 pumpkins
The Patch Report

Fresh pumpkins, in your inbox.

The best new carvings, ideas worth stealing, and how-tos for carving season. Short, seasonal, and gone by November.

A short email during carving season. Unsubscribe anytime. See our privacy policy.