Halloween Pumpkin Carving Contest Β· Starts October 1st Β· $500 in prizes
← Back to ideas
@ai_concepts
Sep 25, 2026
Sally Stitched Face Pumpkin Carving from Nightmare Before ChristmasAI
0

Report this carving

Tell us what is wrong. Reports are private.

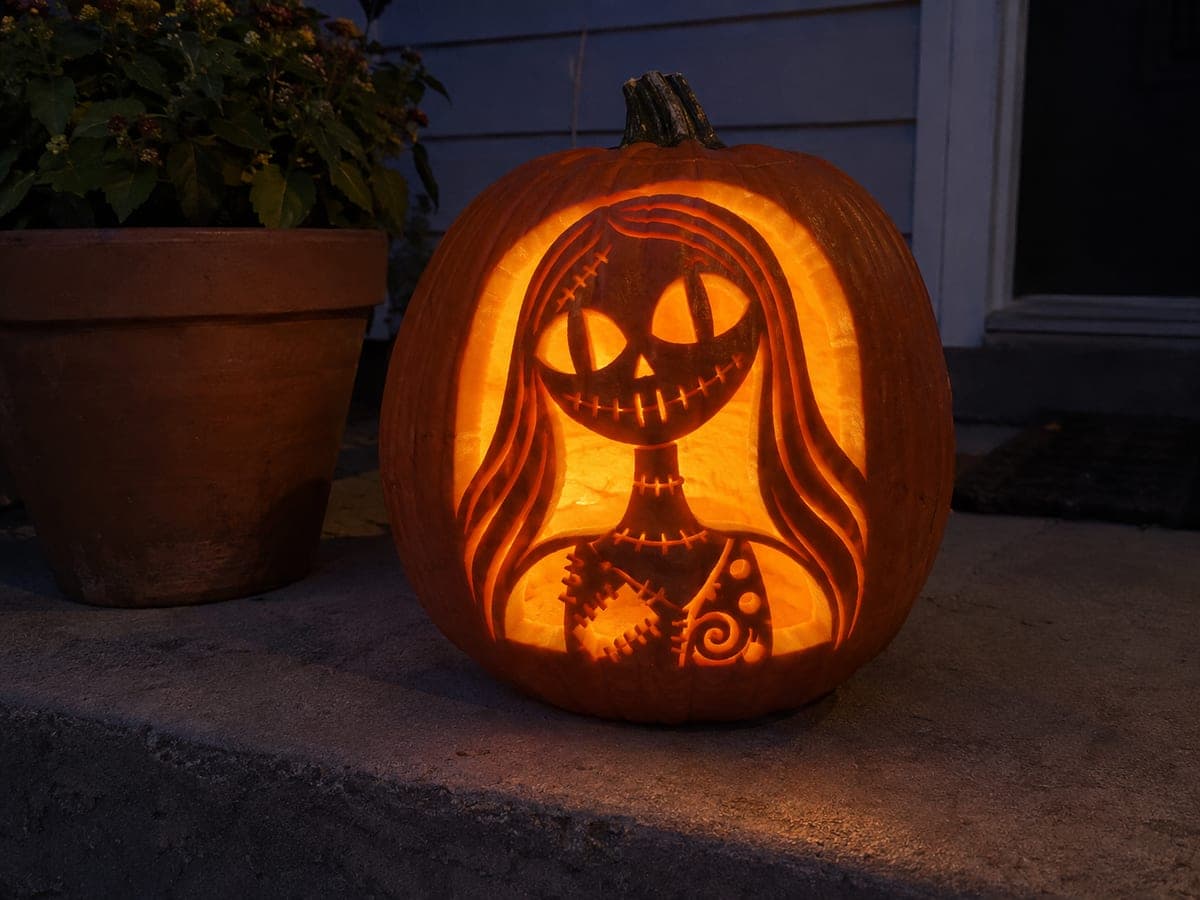
Sally Stitched Face Pumpkin Carving from Nightmare Before Christmas

Sally's gentle stitched face glows through this easy pumpkin carving idea with broad rooted vertical bar pupils, separate mouth holes, and stitch-slot cutouts that capture her ragdoll character. Hair detail lines are kept as shallow backed grooves so the design does not lose structural rind around the face. A warm amber candle inside emphasizes the stitch gaps and gives the face its soft, melancholy glow.

No ratings yet Β· Sign in to rate

Comments (0)

  • No comments yet β€” be the first.

Save without an account. Sign in to like or comment.

Our tips for carving a similar design

The design separates Sally's features into three distinct light levels: broad vertical-bar pupils that let diffuse light through, individual stitch-slot holes that scatter small dots of amber light, and shallow hair grooves that add texture without punching through the rind. Keeping the hair as grooves rather than cuts protects the structural rind around the face, so the whole design stays rigid even after the mouth and stitch holes are open. Start with the mouth holes to establish the lower face, then cut the pupils, and finish with the stitch slots.

From pumpkin to porch

  1. Prep and transfer

    Wash and dry the pumpkin thoroughly, then cut a wide lid at the back so you can scoop out pulp without disturbing the front. Remove all stringy flesh from the interior walls and thin any thick spots to about an inch with a large spoon. Tape the stencil to the front, secure all four corners, and trace every feature with a pounce wheel or pin tool before removing the paper.

  2. Carve the mouth holes

    Use a fine-tipped detail saw to cut the individual mouth slot holes first, working from the center slot outward to either side. Keep each slot narrow so the rind between them acts as a bridge. Remove each slug cleanly and confirm the opening reaches all the way through before moving on.

  3. Cut the stitch slots

    Work around the face cutting the short stitch-slot cutouts one at a time with the detail saw. These are small, so go slowly and keep the blade perpendicular to the surface to get clean straight walls. Blow out loose pumpkin dust as you go so you can see the next mark clearly.

  4. Cut the eye pupils

    Cut the two broad vertical-bar pupils, making sure the top and bottom of each bar stays rooted to the surrounding eyelid rind. A wider saw or a linoleum gouge is useful for shaping the flat bar profile. Test the fit of an LED tea light inside before finishing so you can see how the pupils glow.

  5. Groove the hair detail

    Switch to a V-gouge or a narrow linoleum cutter and trace the hair lines as shallow grooves, removing only the top layer of orange rind to reveal the cream-colored flesh beneath. Keep the depth consistent at about a third of the rind thickness so the lines glow faintly without risk of breaking through. Work in long, confident strokes following the hair direction shown in the stencil.

  6. Light and display

    Place a warm amber LED tea light (not a real candle) inside and replace the lid. View the design from a few feet away in a darkened room to check that the stitch slots, pupils, and hair grooves all read as intended. Adjust the LED position slightly if the light pools unevenly across the face. Apply a thin coat of petroleum jelly around all cut edges to slow moisture loss.

Written with AI to match this design

Gather your supplies

Check things off as you get ready.

Work on a stable surface, keep your free hand out of the cutting path, and have an adult handle sharp tools.

Three levels of light

  • Leave intact

    The eyelid rind surrounding the pupils and all the solid rind between stitch slots stays uncut and dark

  • Peel & shade

    Hair detail lines are shallow grooves that reveal cream-colored flesh for a faint mid-glow ring around the face

  • Cut through

    Broad vertical-bar pupils, individual stitch-slot holes, and separate mouth holes are fully cut through for bright amber light

Learn the carving basics

Before you start cutting

How do I keep the stitch slots evenly spaced?

Mark each slot position with a ruler and pounce wheel before cutting anything. Use a narrow piece of tape as a spacing guide between slots if the stencil lines are hard to see. Cutting them in order from the center outward also helps keep the spacing symmetric.

Will the hair grooves crack the rind over time?

Grooves weaken the rind less than full cuts, but all carved pumpkins dry out. Keep the pumpkin in a cool spot when not on display, and refresh the petroleum jelly on the grooves every couple of days. You can also mist the whole surface lightly with water each morning to slow shriveling.

The vertical bar pupils look too thick on my sketch. Can I narrow them?

Yes, but keep at least a half-inch of width at the top and bottom root so they don't snap under their own weight when the pumpkin dries. A narrower bar also lets less light through, which can actually make the pupils look more focused and character-accurate.

Your take belongs here, too.

Changed a detail? Made it simpler? Share a photo of your version and tell the community what worked.

Share your pumpkin

More pumpkins like this

You've reached the end Β· 8 pumpkins
The Patch Report

Fresh pumpkins, in your inbox.

The best new carvings, ideas worth stealing, and how-tos for carving season. Short, seasonal, and gone by November.

A short email during carving season. Unsubscribe anytime. See our privacy policy.