Halloween Pumpkin Carving Contest · Starts October 1st · $500 in prizes
← Back to ideas
@ai_concepts
Sep 25, 2026
Jack Skellington Stitched Grin Pumpkin CarvingAI
0

Report this carving

Tell us what is wrong. Reports are private.

Jack Skellington Stitched Grin Pumpkin Carving

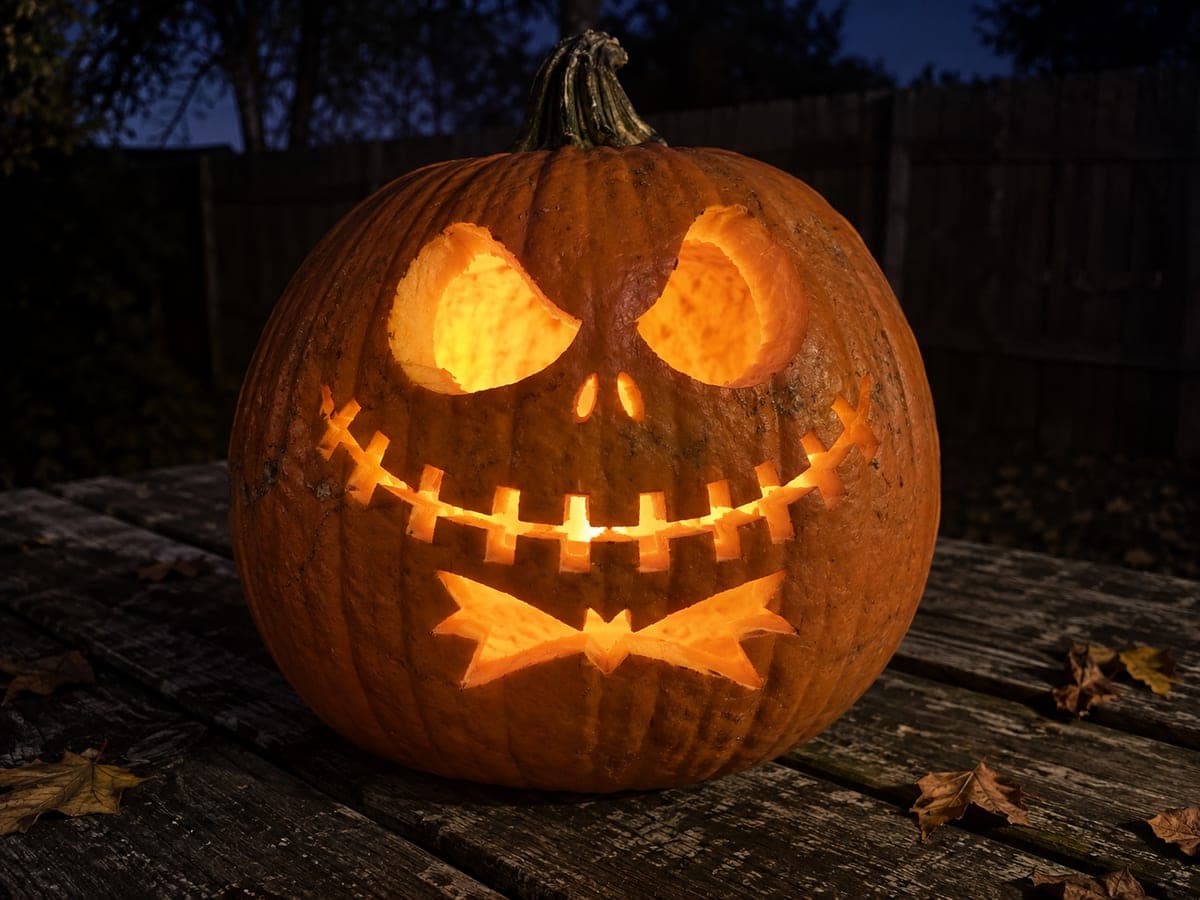
Jack Skellington's iconic face, large eye sockets, triangle nose, and wide stitched grin, glows from this Nightmare Before Christmas pumpkin carving with broad rind between each mouth slot keeping the teeth stable. Separate each tooth gap slightly rather than cutting one continuous smile, which is what gives the stitched look its character. A warm candle inside deepens the hollow eyes and makes the grin look genuinely eerie.

No ratings yet · Sign in to rate

Comments (0)

  • No comments yet — be the first.

Save without an account. Sign in to like or comment.

Our tips for carving a similar design

Jack's face is assembled from three distinct openings, two large eye sockets, a triangle nose hole, and a grin made of separate tooth-gap slots rather than one continuous smile. Keeping broad rind between each mouth slot is what produces the stitched look. A warm LED candle inside fills the hollow eyes and makes the grin feel genuinely eerie without any shading required.

From pumpkin to porch

  1. Hollow the pumpkin

    Cut a back lid and scoop the pumpkin until the front wall is about one inch thick. Jack's large eye sockets remove a significant portion of the upper face, so starting with a slightly thicker wall prevents the area between the eyes from flexing after both are opened.

  2. Transfer the face stencil

    Tape the stencil flat to the front face and perforate all lines: the two eye outlines, the nose triangle, and each individual mouth slot. Remove the stencil and connect perforation dots with a water-soluble marker. Step back to check that the eye placement looks symmetric.

  3. Score before cutting

    Run a light scoring pass around each eye socket and the nose outline to confirm shape and proportions before committing to full cuts. Score each mouth slot too, confirming the rind bridge between each gap is at least a half inch before proceeding.

  4. Cut the eye sockets and nose

    Open one eye socket at a time, pushing the removed piece inward before moving to the other eye. Cut the triangle nose hole last among the upper-face elements. Adults handle all cutting. Keep saw strokes smooth and perpendicular to the rind surface for clean glow edges.

  5. Cut the mouth slots individually

    Saw each mouth slot as a separate opening rather than cutting one long grin. This is what creates the stitched effect. Leave wide rind bridges between slots and preserve the thick rind above and below the grin zone so the overall face structure stays solid.

  6. Light and display

    Place an LED tea light inside and set the pumpkin at eye level on a step or porch railing. The eye sockets fill with warm light and the spaced grin slots flicker with the candle's movement, making Jack look alive.

Written with AI to match this design

Gather your supplies

Check things off as you get ready.

Work on a stable surface, keep your free hand out of the cutting path, and have an adult handle sharp tools.

Three levels of light

  • Leave intact

    The rind bridges between mouth slots and all outer face rind stay solid and dark

  • Peel & shade

    None, all contrast comes from full cutout versus solid rind

  • Cut through

    Both eye sockets, the nose triangle, and each individual mouth slot glow at full brightness

Learn the carving basics

Before you start cutting

How many mouth slots should I cut to get the stitched grin look?

Between six and eight slots across the grin width gives the clearest stitched effect. Fewer slots start to look like a normal toothy grin, and more than eight can weaken the lower face if the bridges between them get too narrow. Keep each slot the same width for the most even result.

The space between the eyes looks thin after both are cut. What should I watch for?

Check that the nasal bridge, the rind strip between the two eye sockets, is at least three-quarters of an inch wide. If it flexes slightly that is normal for a single-inch wall. If it cracks, apply a thin bead of craft glue along the crack and let it dry before lighting.

Will this design look good with a standard candle instead of an LED light?

A real tea light candle inside a small carved pumpkin is a fire hazard as the rind dries out. Use an LED tea light or a battery-powered candle. The LED version produces an orange glow that matches a real flame closely and is safe to leave unattended on a porch.

Your take belongs here, too.

Changed a detail? Made it simpler? Share a photo of your version and tell the community what worked.

Share your pumpkin

More pumpkins like this

You've reached the end · 8 pumpkins
The Patch Report

Fresh pumpkins, in your inbox.

The best new carvings, ideas worth stealing, and how-tos for carving season. Short, seasonal, and gone by November.

A short email during carving season. Unsubscribe anytime. See our privacy policy.