Halloween Pumpkin Carving Contest · Starts October 1st · $500 in prizes
← Back to ideas
@ai_concepts
Sep 25, 2026
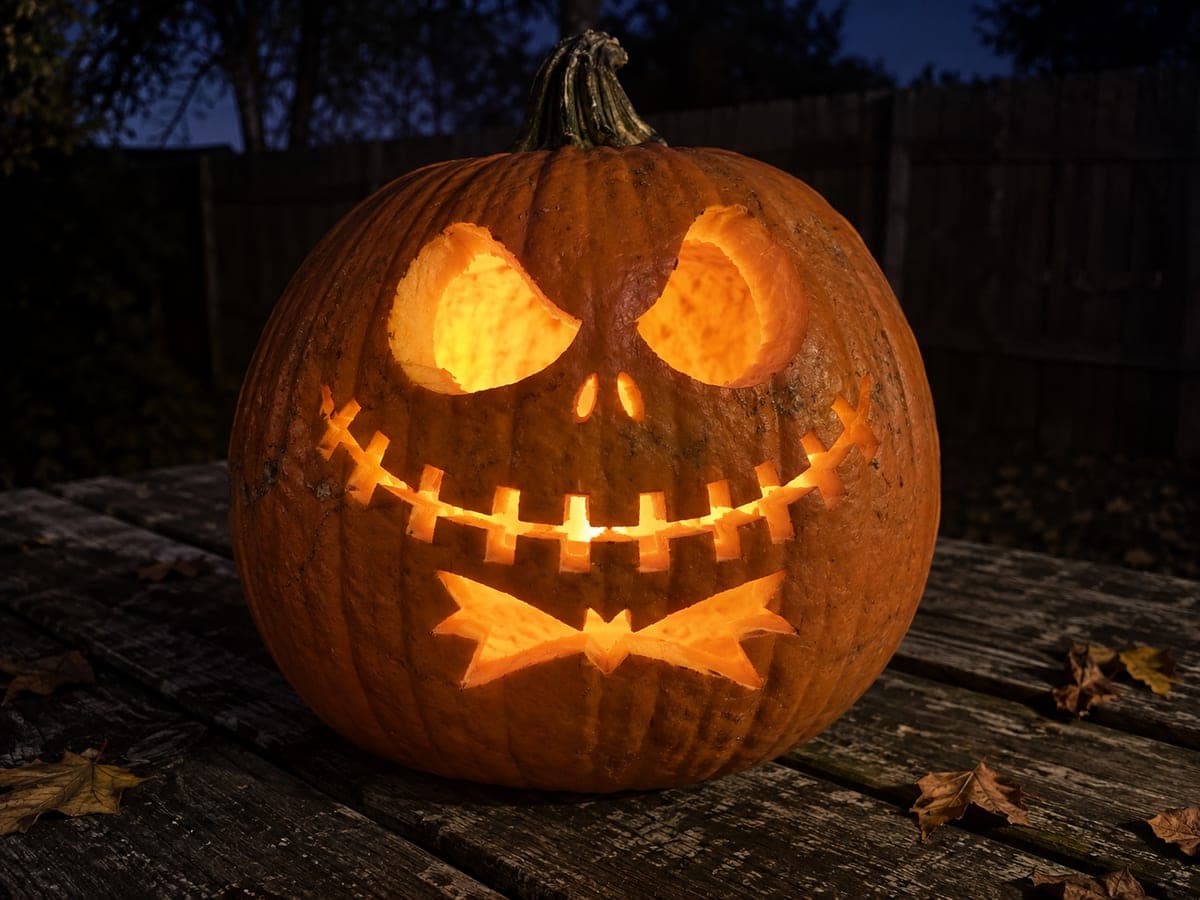
Supported Jack Skellington Head Pumpkin with Bat WingsAI
0

Report this carving

Tell us what is wrong. Reports are private.

Supported Jack Skellington Head Pumpkin with Bat Wings

Jack Skellington's head is retained in this hard pumpkin carving idea with a broad skull bridge at the top, a thick neck connecting to the bat bow tie, and a wide lower base keeping everything stable. Wing vein lines are scored as shallow grooves rather than full cuts so the bat wings stay solid. Light the finished Jack-O-Lantern with a battery tea light to avoid heat softening the shallow-grooved wing detail.

No ratings yet · Sign in to rate

Comments (0)

  • No comments yet — be the first.

Save without an account. Sign in to like or comment.

Our tips for carving a similar design

Jack's skull head is retained inside a surrounding open area, with a broad bridge at the top of the skull, a thick neck connecting down to the bat bow tie, and a wide lower base grounding the whole design. The bat wing tips also reach the outer frame as secondary supports. Wing vein lines are scored as shallow grooves rather than full cuts, which keeps the wing panels solid while adding visible detail. A battery candle is specified to preserve the shallow groove detail over the full display period.

From pumpkin to porch

  1. Hollow and check the neck width

    Scoop to three-quarters of an inch wall thickness. Measure the neck width in your stencil; it must be at least three-quarters of an inch. The neck is the single most critical structural point in the design, connecting the skull above to the bow tie below.

  2. Transfer the complete stencil

    Perforate all outlines: the outer frame, the skull silhouette, the bow tie, the facial feature openings, and all wing vein groove lines. Mark groove lines with a dashed marker and full-cut lines with a solid one so they are easy to distinguish during carving.

  3. Cut the outer frame background

    Open the rind around the outside of the retained piece first, removing background areas above the skull and to both sides. Work in sections, checking after each removal that the top bridge, neck, and wing-tip connections are all intact.

  4. Open the facial feature holes

    Cut the eye sockets, nose, and mouth slots through the retained skull. Use short, controlled saw strokes and keep the saw blade perpendicular to the rind surface. Adults handle all saw work. Leave wide rind bridges between mouth slots for the stitched grin effect.

  5. Score the wing vein grooves

    Using a linoleum gouge or V-tool, score the wing vein lines to half wall depth. Work from the bat body outward toward each wing tip in short pulling strokes. Do not cross the grooves over the full-cut edges of the bow tie outline.

  6. Light with a battery candle

    Insert a battery LED candle and adjust its position so light reaches both the face openings and the shallow wing vein grooves. The grooves catch the light at a mid-level glow that makes the bat wings look leathery. Avoid real flames, which dry the grooved rind faster.

Written with AI to match this design

Gather your supplies

Check things off as you get ready.

Work on a stable surface, keep your free hand out of the cutting path, and have an adult handle sharp tools.

Three levels of light

  • Leave intact

    The retained skull head, neck, and solid bat bow tie mass all stay dark

  • Peel & shade

    Wing vein groove lines are scored to half depth for a mid-level glow across the bat wings

  • Cut through

    The surrounding background frame, eye sockets, nose, and mouth slots all glow at full brightness

Learn the carving basics

Before you start cutting

The broad skull bridge at the top looks like it will block too much light. Can I narrow it?

Keep the skull bridge at least three-quarters of an inch wide. Narrowing it for the sake of more light risks a crack across the top of the skull when the eye socket cuts remove rind below it. The bridge actually reads as the top of Jack's flat skull, which is anatomically correct for his character design.

How deep should the wing vein grooves be?

About half the wall thickness is ideal. Use a thin skewer to test depth at each groove: the skewer should sink to half its length before stopping. Too shallow and the grooves do not catch light; too deep and the wing panels become fragile.

Do the bat wing tips need to actually touch the outer frame?

Yes, those tip-to-frame connections are secondary supports that prevent the wide bat wing panels from sagging as the rind dries. If your stencil's wing tips fall short of the frame, extend them with a marker line until they overlap the frame edge by at least a half inch before cutting.

Your take belongs here, too.

Changed a detail? Made it simpler? Share a photo of your version and tell the community what worked.

Share your pumpkin

More pumpkins like this

You've reached the end · 8 pumpkins
The Patch Report

Fresh pumpkins, in your inbox.

The best new carvings, ideas worth stealing, and how-tos for carving season. Short, seasonal, and gone by November.

A short email during carving season. Unsubscribe anytime. See our privacy policy.