Halloween Pumpkin Carving Contest · Starts October 1st · $500 in prizes
← Back to ideas
@ai_concepts
Sep 25, 2026
Painted Jack Skellington Skull Pumpkin with Bat Bow TieAI
0

Report this carving

Tell us what is wrong. Reports are private.

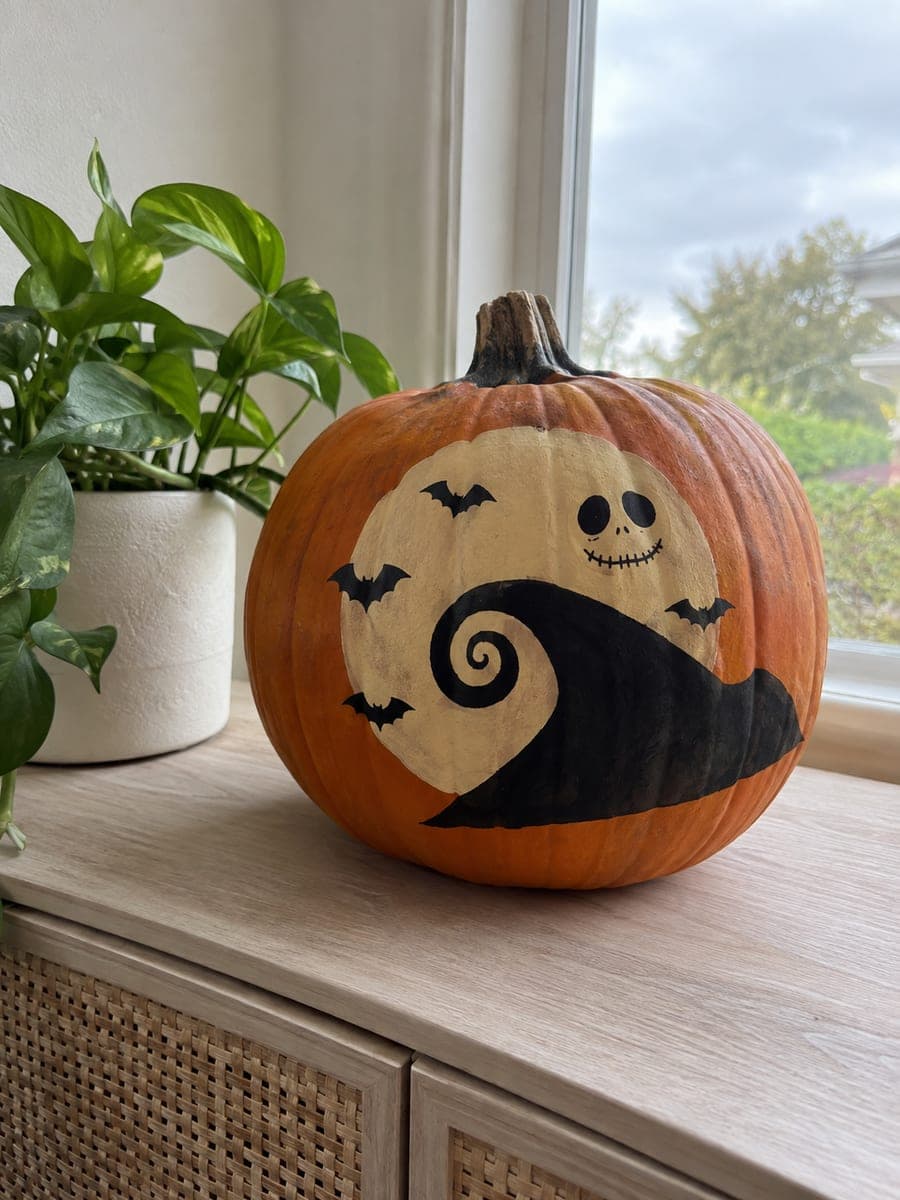
Painted Jack Skellington Skull Pumpkin with Bat Bow Tie

A flat cream circle, black face features, and a simple bat bow tie are painted directly onto an intact orange pumpkin for this no-carve Jack Skellington pumpkin idea. The bold two-tone design is instantly recognizable and dries in under an hour with standard craft acrylics. Use a compass or a bowl to trace the cream circle first so the skull proportions are centered before adding the face details.

No ratings yet · Sign in to rate
Comments (0)

  • No comments yet — be the first.

Save without an account. Sign in to like or comment.

Our tips for carving a similar design

A cream skull circle goes down first as the base layer, and Jack's black face features, eye sockets, nose, and grin marks, plus a simplified bat bow tie shape below, are painted directly over it. The design is entirely two-tone, cream and black on orange, which mirrors the film's graphic style and stays simple enough to complete in a single sitting. Tracing the cream circle with a compass or a round object first centers the skull proportions before any detail is added.

From pumpkin to porch

  1. Clean and dry the pumpkin

    Wipe the pumpkin with a damp cloth and let it air-dry for thirty minutes. A clean dry surface is essential for clean circle edges; any trace of wax or moisture makes the cream paint bead and spread unevenly.

  2. Trace and paint the cream skull circle

    Find a bowl or plate that is the right diameter for the skull face and trace its outline lightly in pencil on the pumpkin face. Fill the circle with cream craft acrylic using a flat brush. Apply two coats, letting the first dry before the second. The cream base should be fully opaque with no orange showing through.

  3. Add the face features in black

    Once the cream is dry, paint two large oval eye sockets in black using a medium flat brush. Paint a small triangle or oval nose below the eyes. For the grin, paint short horizontal black bars separated by narrow cream gaps to suggest the stitched teeth. Use a fine brush for the grin bars.

  4. Paint the bat bow tie below the skull

    Below the cream circle on the orange rind, paint a simple bat silhouette in black to suggest the bow tie. A central oval body, two swept-back wing shapes on each side, and a small notch at each wing tip is all the detail needed. Keep the bat proportions wider than tall so it reads as a bow tie rather than a flying bat.

  5. Add any fine accent marks

    A few tiny white or cream dots along the grin line suggest the stitching thread. A very thin cream line tracing the skull circle's edge gives it a slight relief feel. Both are optional and the design reads clearly without them.

  6. Seal and display

    Brush or spray matte varnish over all painted areas once dry. Display indoors or on a covered porch. The cream skull glows softly under ambient light and the two-tone palette is immediately recognizable to anyone who has seen the film.

Written with AI to match this design

Gather your supplies

Check things off as you get ready.

Work on a stable surface, keep your free hand out of the cutting path, and have an adult handle sharp tools.

Three levels of light

  • Leave intact

    The orange rind surrounding the skull circle and below the bat bow tie stays bare as the natural background

  • Peel & shade

    None, the shell is fully intact

  • Cut through

    None; use a nearby candle lantern or indoor lamp to illuminate the painted design

Learn the carving basics

Before you start cutting

How do I get the cream skull circle perfectly round on a curved pumpkin surface?

Place the pumpkin on a flat surface and choose a bowl or lid whose diameter matches the skull size you want. Hold it firmly against the pumpkin face and trace around it with a pencil. The circle will look slightly elliptical when viewed from the side because of the pumpkin's curve, but it appears round from straight on, which is the normal viewing angle.

The grin looks like a plain smile rather than stitched teeth. How do I fix it?

The stitched look comes from the gaps between each bar being as wide as the bars themselves, and all bars being the same height. Repaint any sections where the bars merged by covering them with cream and repainting the black bars with precise spacing. A liner brush with a fine tip gives the most control on this detail.

Can I add the spider Mr. Zero to the design without it becoming complicated?

A tiny ghost dog is very small at pumpkin scale and can be painted with a single cream oval body and four cream oval legs using a toothpick tip. Keep it small, about a quarter inch wide, and place it near one of the bat wing tips. At that size it reads as an Easter egg detail for fans who look closely.

Your take belongs here, too.

Changed a detail? Made it simpler? Share a photo of your version and tell the community what worked.

Share your pumpkin

More pumpkins like this

You've reached the end · 8 pumpkins
The Patch Report

Fresh pumpkins, in your inbox.

The best new carvings, ideas worth stealing, and how-tos for carving season. Short, seasonal, and gone by November.

A short email during carving season. Unsubscribe anytime. See our privacy policy.