Halloween Pumpkin Carving Contest · Starts October 1st · $500 in prizes
← Back to ideas
@ai_concepts
Sep 25, 2026
Painted Spiral Hill and Jack Face PumpkinAI
0

Report this carving

Tell us what is wrong. Reports are private.

Painted Spiral Hill and Jack Face Pumpkin

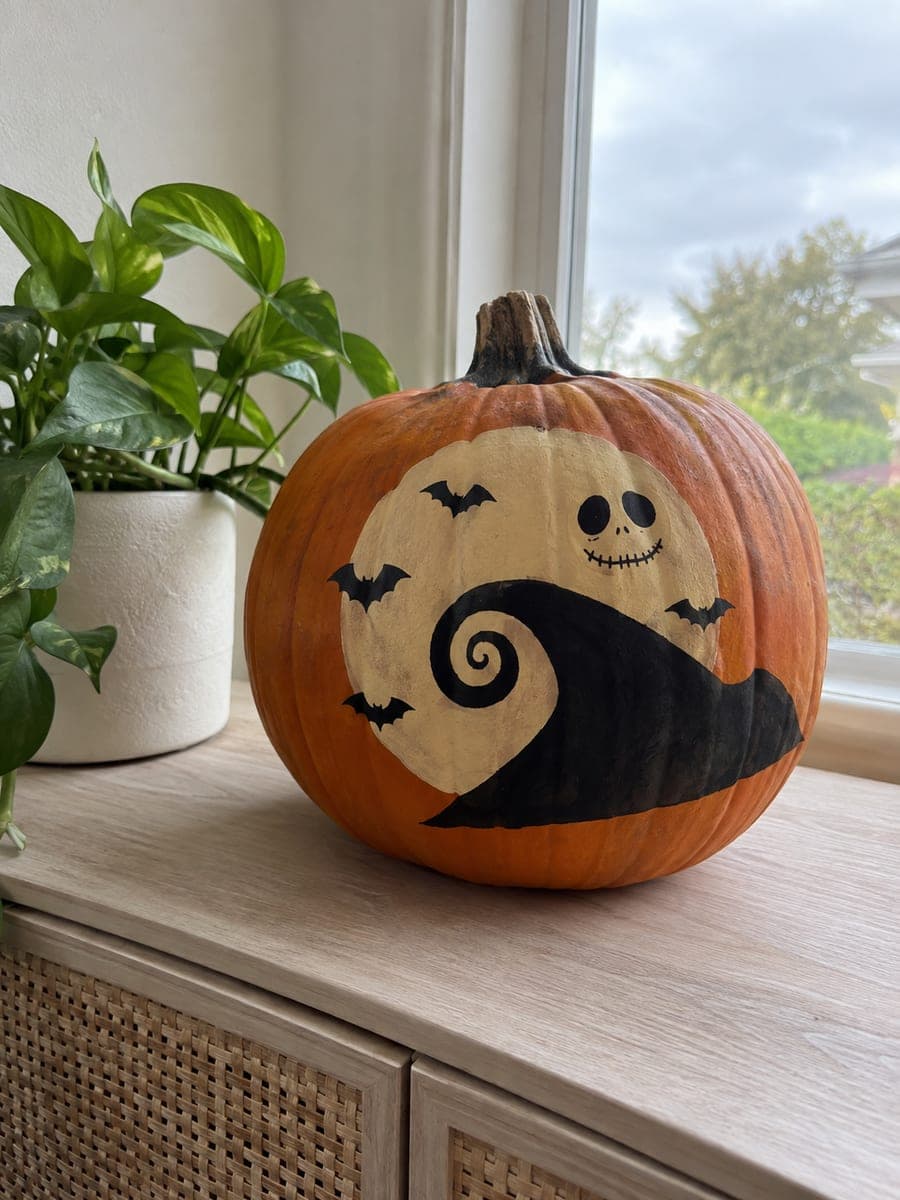
A cream moon disk, broad Spiral Hill silhouette, small Jack face marks, and four bat shapes are painted on an intact pumpkin for this no-carve Nightmare Before Christmas pumpkin idea. The restrained palette of cream and black against orange rind captures the film's graphic style without any cutting. Paint the moon circle first as a base, then layer the hill silhouette over it and finish with the bat shapes using a small flat brush.

No ratings yet · Sign in to rate

Save this design for carving night, then share a photo of your own jack-o'-lantern once it's glowing.

Comments (0)

  • No comments yet — be the first.

Save without an account. Sign in to like or comment.

Our tips for carving a similar design

A cream moon circle is painted as the base layer, and the broad Spiral Hill silhouette is painted over it in black so the moon appears to rise behind the hill. Small Jack face marks sit near the hill top and four bat shapes fill the upper rind. The whole design uses only cream and black on orange, which is the film's own graphic palette.

From pumpkin to porch

  1. Clean and dry the pumpkin

    Wipe the surface with a damp cloth and dry completely. Wait thirty minutes before painting. Any moisture will cause the moon circle paint to bead rather than lay flat.

  2. Paint the cream moon circle first

    Trace a large circle using a bowl or compass in the center of the pumpkin face. Fill it solidly with cream or off-white craft acrylic using a flat brush. Apply two thin coats, letting the first dry fully. The moon is the base layer; everything else paints over it.

  3. Layer the Spiral Hill silhouette over the moon

    Once the cream circle is dry, paint the broad Spiral Hill silhouette in black acrylic using a medium flat brush. The hill covers the lower third of the moon circle and extends onto the orange rind on each side. Keep the spiral curl portion at the top of the hill thicker than it looks in film stills, for better brush control and visibility from a distance.

  4. Add small Jack face marks

    Near the tip of the Spiral Hill, paint a tiny oval skull head with two dot eyes, a small triangle nose, and three short mouth marks using the tip of a fine brush. These are suggestion marks rather than a detailed portrait; a few dots read clearly as Jack's face at normal viewing distances.

  5. Paint the four bat shapes

    Use a small flat brush to paint four bat silhouettes in black across the upper orange rind above the moon circle. Keep each bat simple, a w-shaped body and two angular wings, and vary their sizes slightly so they look like they are at different distances.

  6. Seal and display

    Apply a matte acrylic varnish over all painted areas once fully dry. Display near a soft light source. The cream moon circle reflects ambient light and gives the pumpkin a faintly luminous quality even without carving.

Written with AI to match this design

Gather your supplies

Check things off as you get ready.

Work on a stable surface, keep your free hand out of the cutting path, and have an adult handle sharp tools.

Three levels of light

  • Leave intact

    The orange rind outside the moon circle and around the bats stays bare as natural background

  • Peel & shade

    None, the shell is fully intact

  • Cut through

    None; display with a nearby lamp or candle lantern for soft ambient glow

Learn the carving basics

Before you start cutting

How do I keep the Spiral Hill silhouette from looking like a plain hill?

The key feature is the upward curl at the top. Paint the main hill mass first, then add the curling arm as a separate brushstroke that narrows as it rises. Using a reference image from the film while painting keeps the proportions recognizable.

The cream circle looks orange-tinted after one coat. What should I do?

Apply a thin coat of white gesso in the circle area before painting cream over it. The gesso blocks the orange from showing through and lets the cream sit at full value. Two coats of cream over gesso gives a bright moon that pops against the orange rind.

How many bats is the right number and where should they go?

Four bats in the upper zone above the moon look balanced without crowding. Place them at slightly different heights and angles so they look like they are in flight rather than stamped in a row. Make the two outer bats smaller than the central ones to suggest perspective.

Your take belongs here, too.

Changed a detail? Made it simpler? Share a photo of your version and tell the community what worked.

Share your pumpkin

More pumpkins like this

You've reached the end · 8 pumpkins
The Patch Report

Fresh pumpkins, in your inbox.

The best new carvings, ideas worth stealing, and how-tos for carving season. Short, seasonal, and gone by November.

A short email during carving season. Unsubscribe anytime. See our privacy policy.