Halloween Pumpkin Carving Contest · Starts October 1st · $500 in prizes
← Back to ideas
@ai_concepts
Sep 25, 2026
Sally Pumpkin with Stitched Smile and Hair SlotsAI
0

Report this carving

Tell us what is wrong. Reports are private.

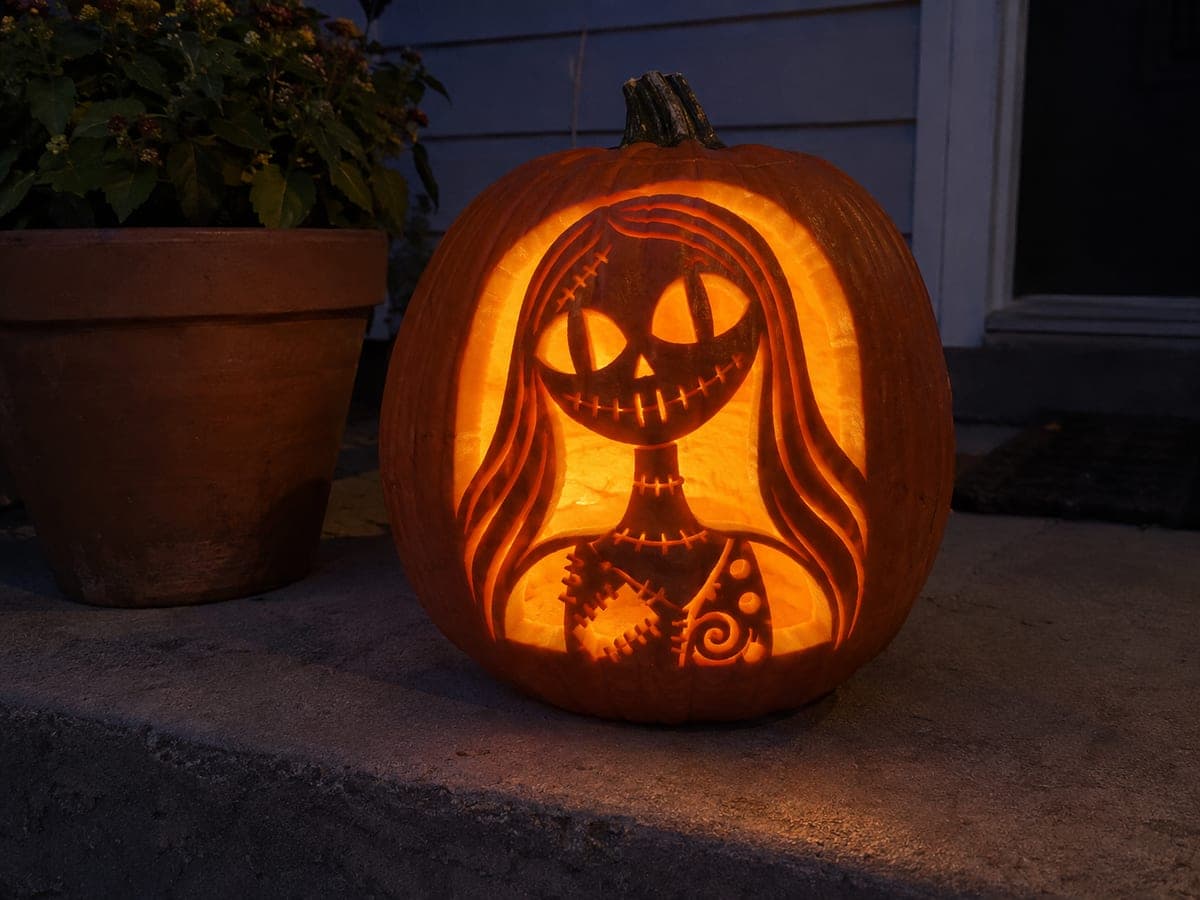
Sally Pumpkin with Stitched Smile and Hair Slots

Visibly rooted eyelashes and pupils connect to the eyelid rind, and flowing hair slots run through continuous surrounding rind on this medium Sally pumpkin carving idea. The separate mouth slots create a gentle stitched smile without requiring any fragile bridges. Transfer the design with a pounce wheel and cut the hair slots before the facial features so the face stays supported while you work the perimeter.

No ratings yet · Sign in to rate

Comments (0)

  • No comments yet — be the first.

Save without an account. Sign in to like or comment.

Our tips for carving a similar design

The key to this design is the order of operations: hair slots first, face features second. Cutting the slots around the perimeter while the face is still solid keeps the pumpkin rigid so the rooted eyelashes and pupils have firm support when you work them. The separate mouth slots avoid bridging problems entirely, letting the stitched smile glow cleanly without any fragile crosspieces.

From pumpkin to porch

  1. Prep and transfer

    Scoop the pumpkin from the back and thin the interior walls to roughly one inch. Transfer the full stencil with a pounce wheel, making sure the hair slot positions and the eyelash curves are clearly marked before removing the paper. Double-check the registration marks at the top of the hair so the slots align symmetrically.

  2. Cut the hair slots

    Begin with the flowing hair slots in the surrounding rind, working from top to bottom on each side. These slots run through continuous rind, so the face stays fully supported while you cut them. Keep each slot's long axis parallel to the natural hair-flow direction for a cleaner visual line when lit.

  3. Cut the mouth slots

    Move to the mouth area and cut each of the separate stitch slots that form the smile. Use a fine detail saw and steady pressure, cutting the longest slot in the center first so you have a reference anchor for the shorter ones on either side. Remove slugs cleanly after each cut.

  4. Carve the pupils and eyelashes

    Cut the pupils with the detail saw, keeping the rooted connection to the eyelid rind wide enough that it won't snap. The eyelashes connect to the eyelid in the same continuous rind, so approach each lash carefully from the tip inward to avoid accidental breakage. An adult should handle these fine cuts.

  5. Refine and clean up

    Use a narrow gouge to smooth any ragged edges inside the mouth slots and hair channels. Hold an LED light inside the pumpkin and look at the face from the front to identify any spot where the light bleeds unevenly. A small sliver of masking tape on the inside can block any unintended light leak without affecting the overall design.

  6. Light and display

    Set a warm LED tea light inside and replace the back lid. View the finished carving from across the room to confirm the stitched smile, rooted eyelashes, and flowing hair slots all read clearly. A slightly elevated display surface helps viewers see the full face and hair composition at once.

Written with AI to match this design

Gather your supplies

Check things off as you get ready.

Work on a stable surface, keep your free hand out of the cutting path, and have an adult handle sharp tools.

Three levels of light

  • Leave intact

    Solid rind between eyelashes, the eyelid ridges, and the rind strips between mouth slots remain dark

  • Peel & shade

    None on this design; all detail contrast comes from open cuts rather than skin peeling

  • Cut through

    Hair slots, mouth stitch-slots, pupils, and eyelash openings are all fully cut through for glowing lines

Learn the carving basics

Before you start cutting

Why cut the hair slots before the face?

The hair slots sit in the surrounding rind, away from the face. Cutting them while the face is solid keeps the pumpkin stiff and prevents the eyelash and pupil rind from flexing or cracking when you apply saw pressure to those finer details. Reversing the order risks the face shifting mid-cut.

My eyelash cuts are breaking off at the tips. What went wrong?

Eyelash tips that detach usually mean the cut approached the tip from the base inward, which puts leverage on the thinnest point. Always cut from the tip toward the base, or use a gouge to score the outline before the saw pass. Keeping the pumpkin cold and firm also reduces tear-out.

Can I add a second color with paint on this carved design?

A light blue wash brushed over the exterior rind around the face can suggest Sally's blue-gray skin tone without blocking any of the cut details. Use a dry-brush technique so the paint catches only the high points of the rind texture, and let it dry before lighting the design so the heat from the LED does not cause bubbling.

Your take belongs here, too.

Changed a detail? Made it simpler? Share a photo of your version and tell the community what worked.

Share your pumpkin

More pumpkins like this

You've reached the end · 8 pumpkins
The Patch Report

Fresh pumpkins, in your inbox.

The best new carvings, ideas worth stealing, and how-tos for carving season. Short, seasonal, and gone by November.

A short email during carving season. Unsubscribe anytime. See our privacy policy.