Halloween Pumpkin Carving Contest · Starts October 1st · $500 in prizes
← Back to ideas
@ai_concepts
Sep 25, 2026
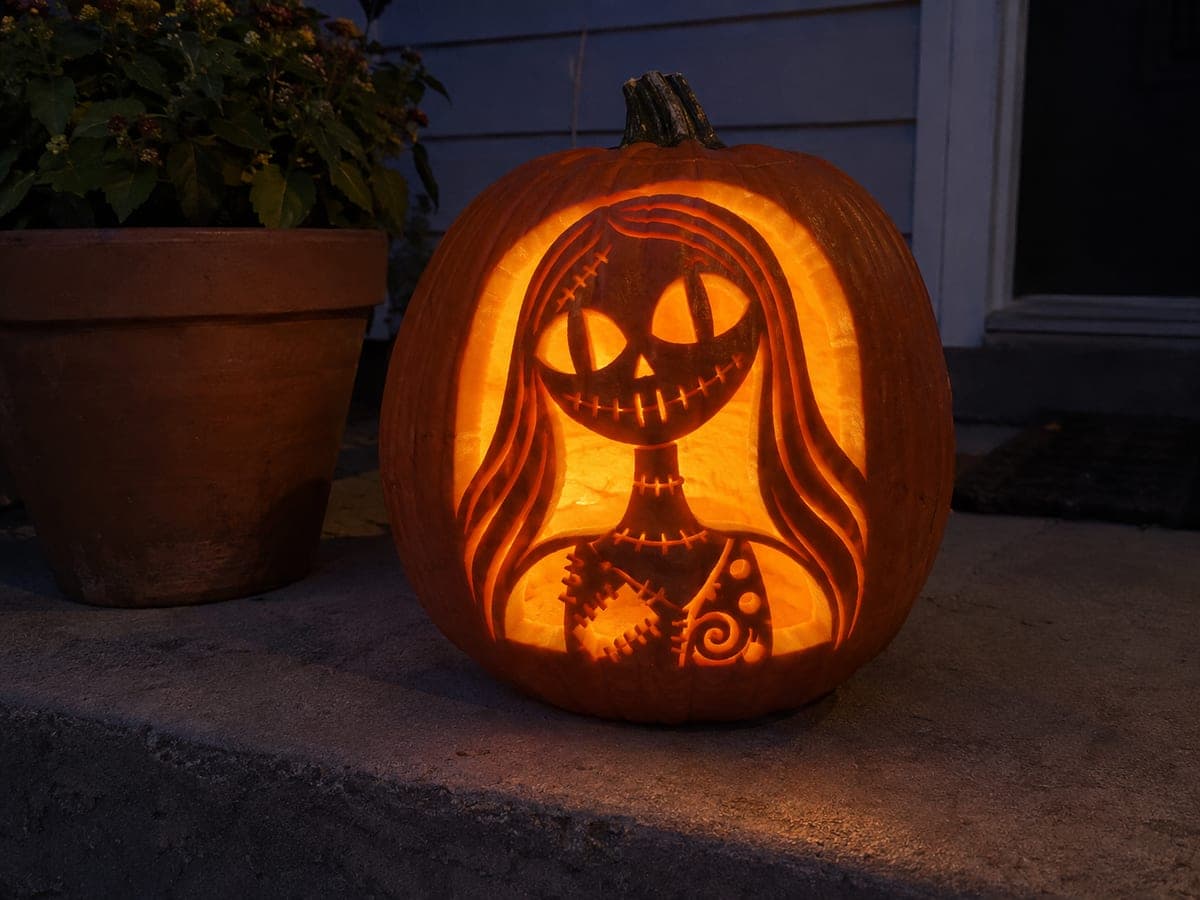
Sally Portrait Pumpkin with Patchwork Dress DetailAI
0

Report this carving

Tell us what is wrong. Reports are private.

Sally Portrait Pumpkin with Patchwork Dress Detail

Sally's portrait is retained with her hair rooting at both lower sides and wrapping around the face, a broad dress base supporting the shoulders, and pupil strips anchored to the eye rims on this hard Sally pumpkin carving. Patchwork seam lines and hair detail combine open cuts with shallow backed grooves for a layered, textile effect. Carve the dress base and hair roots first so the portrait has a stable foundation before you refine the face.

No ratings yet · Sign in to rate

Comments (0)

  • No comments yet — be the first.

Save without an account. Sign in to like or comment.

Our tips for carving a similar design

The design works as a self-supporting portrait because the broad dress base anchors the bottom, the hair roots at both lower sides wrap around the face like a frame, and the pupil strips sit firmly in the eye rims. Combining open cuts in the background with shallow backed grooves for patchwork and hair keeps the textured quality of Sally's ragdoll appearance without hollowing too much rind. Establish the foundation elements, dress and hair roots, before touching the face so the portrait always has structural support underneath it.

From pumpkin to porch

  1. Prep and wall thickness

    Scoop from the back and thin the interior walls to a consistent inch throughout, paying extra attention to the lower section where the dress base will be. Thicker rind here gives the dress base more structural weight. Transfer the full stencil with a pounce wheel, carefully tracing the patchwork seam lines and hair flow as well as the main cutout areas.

  2. Carve the dress base and hair roots

    Cut the broad dress base opening first using a medium carving saw, keeping the top edge clean so it visually supports the portrait above. Then cut the hair root openings at both lower sides, confirming each root connects its neighboring rind sections. These foundational cuts create the stable base the portrait depends on.

  3. Open the background around the portrait

    With the dress and hair roots established, work the background openings around the face using the broad areas defined on the stencil. Leave the pupil strips and their rind connections untouched at this stage. Working from outside inward ensures you always have solid rind to brace against.

  4. Cut the pupils and eye detail

    Cut each pupil strip carefully, leaving visible rooted connections to the surrounding eye rim rind at both top and bottom. Test the connection width with your fingertip before cutting; it should feel solid, not springy. An adult should handle the detail saw for this step.

  5. Groove patchwork seams and hair detail

    Switch to a V-gouge for the patchwork seam lines and hair detail grooves. Work the seam lines first using even, confident strokes to create consistent groove depth. Then follow the hair direction with the gouge, varying pressure slightly to suggest the natural irregularity of a stitched doll's hair.

  6. Light and evaluate

    Place a warm LED tea light inside and view from the front in a dark room. The dress base and hair roots should frame the face in shadow while the background apertures glow warmly around the portrait. If the patchwork grooves are not reading well, deepen them slightly with a second pass of the gouge. Apply petroleum jelly to all cut and grooved edges to slow drying.

Written with AI to match this design

Gather your supplies

Check things off as you get ready.

Work on a stable surface, keep your free hand out of the cutting path, and have an adult handle sharp tools.

Three levels of light

  • Leave intact

    The retained portrait face, hair silhouette, and dress surface remain dark against glowing backgrounds

  • Peel & shade

    Patchwork seam lines and hair detail grooves reveal cream flesh for a subtle mid-glow texture across the portrait

  • Cut through

    Dress base opening, hair root openings, and background apertures flanking the portrait are fully cut through for bright light

Learn the carving basics

Before you start cutting

What is the hardest part of this design to execute cleanly?

The junction where the hair roots meet the lower portrait rind is the most structurally critical spot. If that rind is too thin, the face can sag or crack when the pumpkin dries. Keep at least three-quarters of an inch of rind at every root junction and avoid undercutting from below.

How do I keep patchwork seam lines uniform across a curved surface?

Mark the seam grid lightly with a toothpick and ruler before gouging, pressing just hard enough to dent the skin without cutting. Work each row of horizontal lines first, then the vertical lines, so the grid stays oriented correctly as you move around the curved rind. A consistent gouge depth of about a third of the rind thickness produces the most readable result.

Can I use a Dremel for the hair and seam grooves?

Yes, a Dremel with a small ball or cylinder bit works well for long groove lines and is faster than a hand gouge on larger pumpkins. Keep the tool moving steadily to avoid heat buildup, and work at a medium speed setting to maintain control. Practice the speed and depth on a scrap piece of pumpkin rind first.

Your take belongs here, too.

Changed a detail? Made it simpler? Share a photo of your version and tell the community what worked.

Share your pumpkin

More pumpkins like this

You've reached the end · 8 pumpkins
The Patch Report

Fresh pumpkins, in your inbox.

The best new carvings, ideas worth stealing, and how-tos for carving season. Short, seasonal, and gone by November.

A short email during carving season. Unsubscribe anytime. See our privacy policy.