Halloween Pumpkin Carving Contest · Starts October 1st · $500 in prizes
← Back to ideas
@ai_concepts
Sep 25, 2026
Zero Ghost Dog Pumpkin with Stars and Trail OvalsAI
0

Report this carving

Tell us what is wrong. Reports are private.

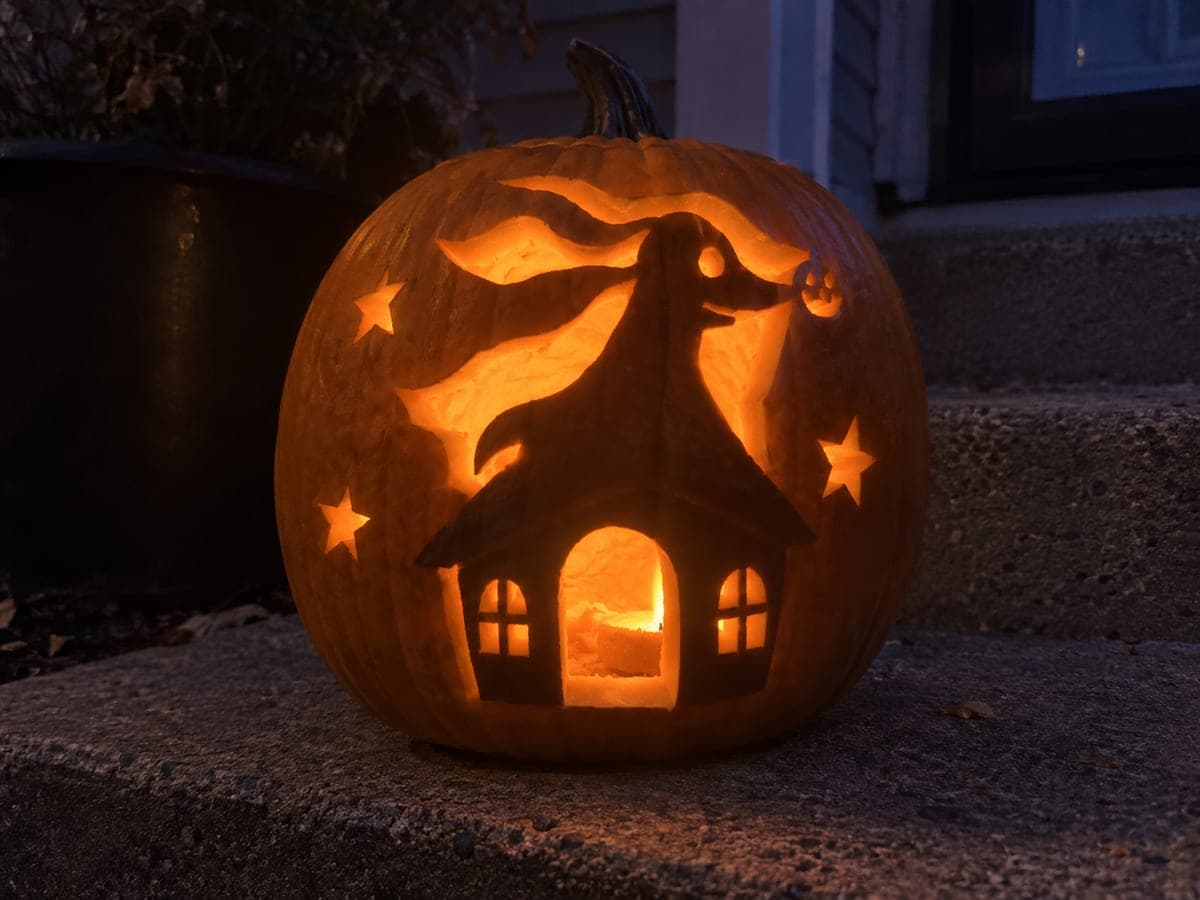
Zero Ghost Dog Pumpkin with Stars and Trail Ovals

Zero's ghost body and snout are cut open with a small retained face profile rooted to the left surrounding shell, plus separate star and trail oval holes scattered around the design on this medium Zero pumpkin carving idea. Some small accent marks use shallow backing for added texture. Cut the large body opening first, then position the trail ovals while the surrounding shell is still firm enough to support precise placement.

No ratings yet · Sign in to rate

Comments (0)

  • No comments yet — be the first.

Save without an account. Sign in to like or comment.

Our tips for carving a similar design

This version of Zero splits the design across three light levels: the large open ghost body and snout, the scattered star and trail-oval holes, and the small retained face profile that stays dark against the glow. The retained face is rooted directly into the left surrounding shell, so it is structurally sound as long as the nearby body opening does not encroach on that root. Cutting the large body opening first, while the surrounding shell is firm, gives you the stability needed to place the smaller trail ovals accurately afterward.

From pumpkin to porch

  1. Prep and transfer

    Scoop from the back and thin the interior walls to a consistent inch. Transfer the stencil with a pounce wheel, pressing carefully over the face profile root connection on the left side and each trail oval position. Mark the root boundary with a double line so you can see exactly where the retained piece begins.

  2. Cut the main ghost body

    Cut the large ghost body and snout opening first using a medium carving saw, stopping precisely at the root boundary of the retained face profile. Work slowly near the face root to avoid cutting into it. Remove the large body slug and set aside.

  3. Position and cut the trail ovals

    With the body open, use a fine detail saw to cut the trail oval holes one by one, working from those closest to the body outward. These small ovals are easier to cut accurately while the surrounding shell is still firm. Space each pass evenly to match the stencil layout.

  4. Cut the star holes

    Open the star holes with a small drill bit or fine detail saw. Place each star relative to the body position established in step two, following the stencil marks. Keep the star openings small so they read as accent points rather than competing with the main body.

  5. Add shallow accent marks

    Use a linoleum cutter or narrow V-gouge to add the small accent marks indicated on the stencil. These marks add subtle texture to the retained face profile and surrounding areas without punching through. Keep the backing depth to about a third of the rind thickness.

  6. Light and display

    Place a warm LED tea light inside and view from across the room. The glowing ghost body should frame the dark retained face profile, and the trail ovals and stars should scatter light around the composition. Adjust the LED position so it lights both the body and the outer trail elements evenly.

Written with AI to match this design

Gather your supplies

Check things off as you get ready.

Work on a stable surface, keep your free hand out of the cutting path, and have an adult handle sharp tools.

Three levels of light

  • Leave intact

    The retained face profile rooted to the left shell remains dark against the glowing body opening

  • Peel & shade

    Small accent marks on the face and surroundings are shallow-backed for a faint mid-glow texture

  • Cut through

    Main ghost body and snout, trail ovals, and star holes are all fully cut through for layered bright accents

Learn the carving basics

Before you start cutting

How do I make sure the retained face profile stays connected after the body is cut?

Before cutting the body opening, draw the exact root boundary on the pumpkin with a marker and stay at least a quarter-inch clear of that line when sawing. The root connects to the left surrounding shell, so keep your saw angle vertical near that boundary to avoid undercutting the connection from below.

The trail ovals are very close together. Can I simplify by skipping some?

Yes. Removing every other oval still produces a convincing trailing-spirit effect and leaves more rind intact, which is good for longevity. Just keep the spacing consistent between the remaining ovals so the trail reads as intentional rather than incomplete.

Is a warm or cool LED better for this design?

A warm white LED complements the ghost-dog character, evoking a gentle otherworldly glow. A cool white LED gives a crisper, more modern look. Either works, but avoid a yellow candle since the small trail ovals may accumulate soot over time and the open body aperture can create a draft.

Your take belongs here, too.

Changed a detail? Made it simpler? Share a photo of your version and tell the community what worked.

Share your pumpkin

More pumpkins like this

You've reached the end · 8 pumpkins
The Patch Report

Fresh pumpkins, in your inbox.

The best new carvings, ideas worth stealing, and how-tos for carving season. Short, seasonal, and gone by November.

A short email during carving season. Unsubscribe anytime. See our privacy policy.