Halloween Pumpkin Carving Contest Β· Starts October 1st Β· $500 in prizes
← Back to ideas
@ai_concepts
Sep 25, 2026
Carved Cat Face Oblong Pumpkin on a Night PorchAI
0

Report this carving

Tell us what is wrong. Reports are private.

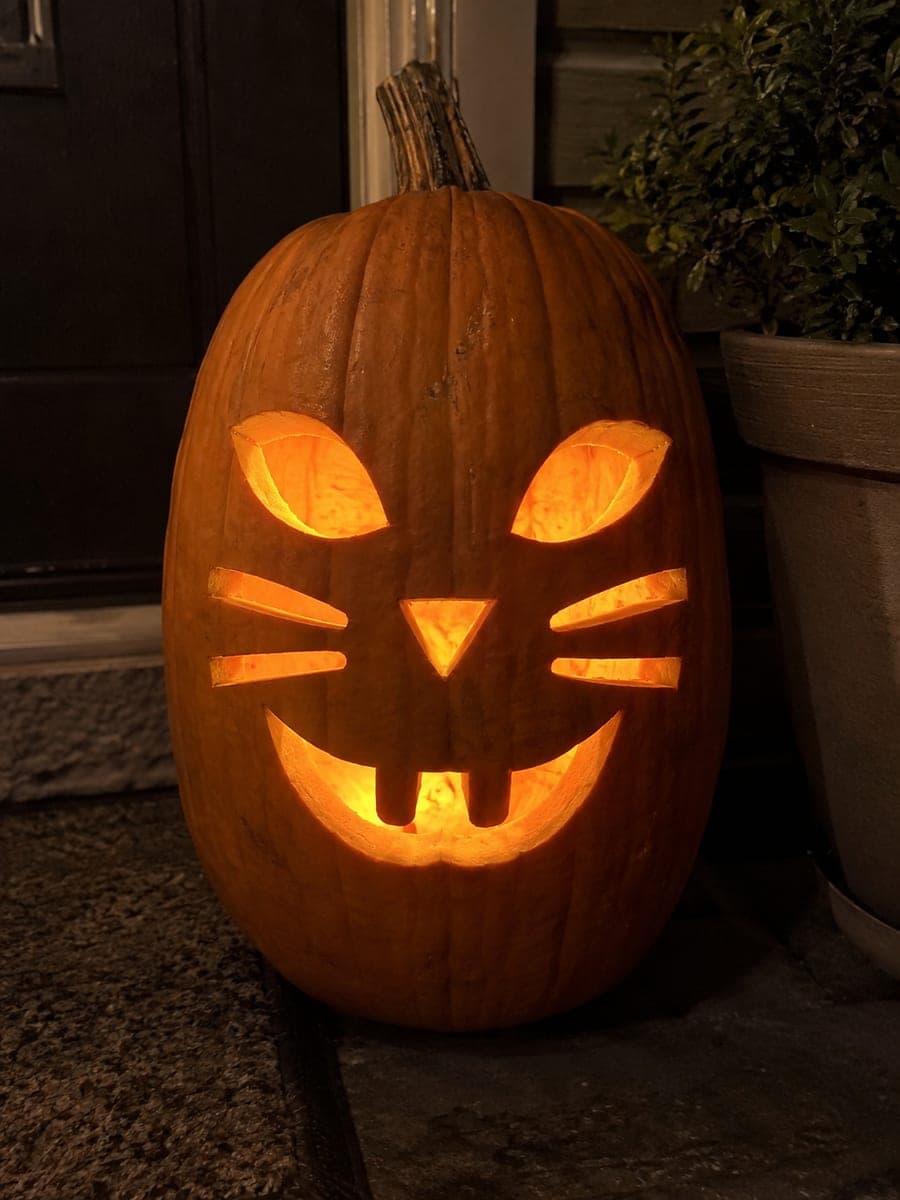
Carved Cat Face Oblong Pumpkin on a Night Porch

Almond eyes, a triangular nose, four rectangular whisker apertures, and a crescent mouth with two chunky attached teeth make this 42-centimeter oblong pumpkin a detailed cat-face carving at an intermediate skill level. The oblong shape gives extra vertical room for the whisker slots, so space them in two pairs on each side of the nose for a balanced look. Cut the rectangular whisker holes with two straight cuts and a chisel pop rather than sawing, which gives cleaner right-angle corners.

No ratings yet Β· Sign in to rate

Comments (0)

  • No comments yet β€” be the first.

Save without an account. Sign in to like or comment.

Our tips for carving a similar design

The oblong shape gives extra vertical room for four rectangular whisker slots that would crowd a rounder pumpkin. Almond eyes and a crescent mouth with two attached teeth complete the cat portrait without any outline carved around the face. Rectangular slots are cleanest when made with two straight cuts and a chisel pop rather than sawing all four sides.

From pumpkin to porch

  1. Prep the pumpkin

    Cut a back lid for access. Scoop to a consistent 2.5 centimeters. The 42-centimeter oblong shape will have thicker walls at the center, so check mid-wall depth carefully as you scoop.

  2. Mark the almond eyes

    Draw two almond shapes in the upper third of the face, each about 5 centimeters long and 2 centimeters tall at the center. Taper both ends to sharp points. Give each eye a slight outward upward tilt for a naturally feline look.

  3. Mark the triangular nose and whisker slots

    Draw a small inverted triangle nose at the vertical center. Below and on either side of the nose, draw two rectangular slots per side, each about 4 centimeters long and 1 centimeter tall, running horizontally. Space the two slots on each side about 1.5 centimeters apart vertically.

  4. Cut the almond eyes and triangle nose

    Use a thin saw to cut the almond eyes, working from the center of each long side toward each pointed end. Cut the triangular nose hole. These cuts are precise but small, so take your time.

  5. Cut the rectangular whisker slots

    For each slot, score the top and bottom long edges with a detail knife, then use a small chisel or the blade tip to pop the plug free with a straight push. This chisel-pop method gives the cleanest right-angle corners. Avoid sawing around the corners, which tends to round them.

  6. Cut the crescent mouth with teeth

    Draw a crescent smile with two tooth shapes left attached at the top edge. Cut the crescent arc below the teeth, then cut the slots between the teeth and at each end of the smile. Remove gap plugs individually. Display on a dark porch beside a plant pot with an LED light inside.

Written with AI to match this design

Gather your supplies

Check things off as you get ready.

Work on a stable surface, keep your free hand out of the cutting path, and have an adult handle sharp tools.

Three levels of light

  • Leave intact

    All rind between the eyes, whisker slots, nose, and mouth stays solid; the two attached teeth stay as solid rind bridges.

  • Peel & shade

    None. This design uses only full cutouts.

  • Cut through

    Both almond eyes, the triangular nose, all four rectangular whisker slots, and the crescent mouth gaps are cut completely through.

Learn the carving basics

Before you start cutting

How wide should I make the rectangular whisker slots?

About 1 centimeter tall and 3 to 4 centimeters long gives a visible slit that glows clearly without looking like a gash. Narrower than 1 centimeter becomes hard to clean out; wider than 1.5 centimeters starts to look more like a rectangular eye than a whisker.

My almond eye points keep tearing when I reach the tips. How do I fix this?

Pre-score both pointed ends with a detail knife before running the saw cuts from the center. The score gives the blade a precise end point so it does not overshoot. Work toward the tip from both directions rather than driving the saw straight through it.

Can I add eyebrow cuts above the almond eyes for extra expression?

Small angled slits above the eyes work well but add structural risk on a curved surface. If you add them, keep them at least 12mm above the eye openings and no wider than 3 centimeters, and cut them last after all other openings are confirmed stable.

Your take belongs here, too.

Changed a detail? Made it simpler? Share a photo of your version and tell the community what worked.

Share your pumpkin

More pumpkins like this

You've reached the end Β· 8 pumpkins
The Patch Report

Fresh pumpkins, in your inbox.

The best new carvings, ideas worth stealing, and how-tos for carving season. Short, seasonal, and gone by November.

A short email during carving season. Unsubscribe anytime. See our privacy policy.