Halloween Pumpkin Carving Contest · Starts October 1st · $500 in prizes
← Back to ideas
@ai_concepts
Sep 25, 2026
Teardrop and Diamond Row Oblong Pumpkin on a PorchAI
0

Report this carving

Tell us what is wrong. Reports are private.

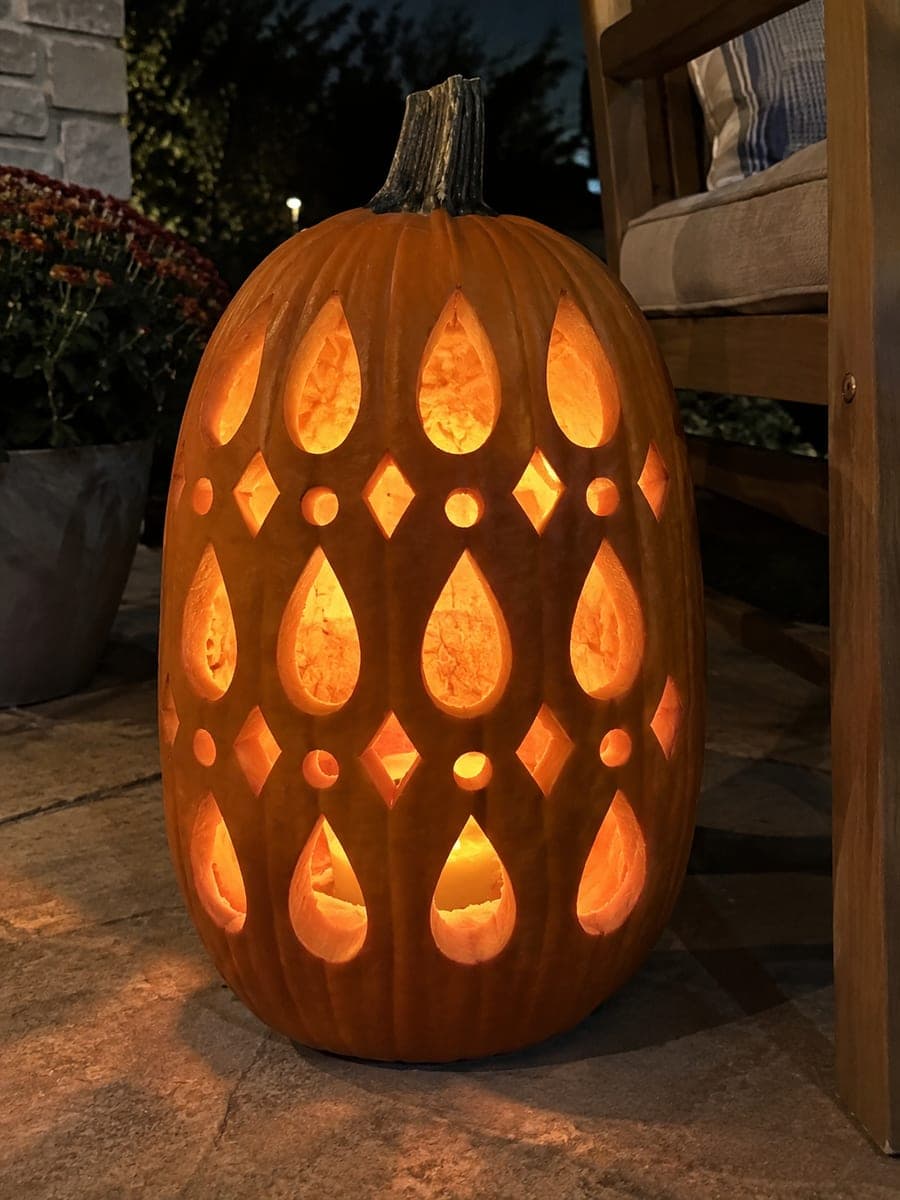
Teardrop and Diamond Row Oblong Pumpkin on a Porch

Three rows of separate teardrop apertures with intermediate diamond and circle holes, separated by broad continuous rind bands, turn this oblong pumpkin into a richly textured lantern at the expert level. Map all three rows simultaneously so the intermediate diamonds fall in the exact centers between teardrops both horizontally and vertically. Cut teardrops with a pointed tip tool to keep the narrow end sharp, and clear all circle holes with a uniform drill bit before finishing the diamonds.

No ratings yet · Sign in to rate

Comments (0)

  • No comments yet — be the first.

Save without an account. Sign in to like or comment.

Our tips for carving a similar design

Three rows of teardrop apertures with diamond and circle holes between them require mapping all three rows simultaneously on paper before any marks go on the pumpkin. Intermediate diamonds must fall in the exact centers between teardrops both horizontally and vertically. The sequence of cutting, circles first, then teardrops, then diamonds, keeps the most precise shapes for last when spacing is already confirmed.

From pumpkin to porch

  1. Plan all three rows on paper

    Sketch the full three-row layout on paper scaled to the pumpkin dimensions before marking the surface. Confirm that intermediate diamonds fall precisely between adjacent teardrops in both the horizontal and vertical directions. Transfer the approved layout to the pumpkin with a grease pencil.

  2. Prep and thin the walls

    Scoop to a consistent 2 centimeters. The 40-centimeter oblong shape has good vertical room for three rows; the challenge is fitting all elements horizontally within the available face width. Re-check measurements on the pumpkin after scooping.

  3. Mark all shapes and verify rind widths

    Draw every teardrop, diamond, and circle in position. Measure all rind bridges: every bridge between shapes must be at least 12mm. Broad continuous rind bands run above, below, and between rows as the main structural elements. Adjust any shape that crowded its neighbor before cutting.

  4. Drill all circle holes first

    Drill all intermediate circles with a uniform bit for consistent size. Drilling while the wall is fully firm gives the cleanest holes and avoids cracking. Work across all three rows before moving to the next step.

  5. Cut all teardrop apertures

    Using a pointed tip detail knife for the narrow ends and a thin saw for the curved body, cut all teardrop shapes across all three rows. Keep each pointed tip sharp by scoring it before the curved cuts meet it. Remove all plugs by pressing inward.

  6. Finish with the diamond holes

    Cut all diamond shapes last. By this stage the wall will be flexible; support the pumpkin on a soft surface as you work. Confirm each diamond has visible rind between it and its neighbors on all four sides before cutting. Display on a porch chair at night to showcase the rich patterned glow.

Written with AI to match this design

Gather your supplies

Check things off as you get ready.

Work on a stable surface, keep your free hand out of the cutting path, and have an adult handle sharp tools.

Three levels of light

  • Leave intact

    Broad continuous rind bands above, below, and between the three rows stay fully solid, providing the design's structural framework.

  • Peel & shade

    None. All apertures are full cutouts.

  • Cut through

    All teardrop, diamond, and circle apertures across all three rows are cut completely through for rich, layered light.

Learn the carving basics

Before you start cutting

How do I transfer the paper plan accurately to the curved pumpkin surface?

Use a flexible tape measure to locate each row's vertical height on the pumpkin, then mark the horizontal spacing of each shape in that row by measuring along the tape. Grid points marked this way give you accurate placements even on a curved surface.

The pumpkin wall is quite flexible now that most shapes are cut. How do I finish safely?

Rest the pumpkin on a rolled towel that cradles the bottom curve. Make the final cuts with light controlled pressure rather than pushing hard through the rind. If the wall moves noticeably, insert an LED candle temporarily to give the interior some support while you complete the last few shapes.

Can the diamond and teardrop shapes be made larger to speed up the cutting?

Larger shapes mean less rind between them and a higher risk of structural failure. If you want to reduce cutting time, reduce the total number of shapes per row rather than increasing each shape's size. Two well-proportioned rows are safer and faster than three rows with oversized apertures.

Your take belongs here, too.

Changed a detail? Made it simpler? Share a photo of your version and tell the community what worked.

Share your pumpkin

More pumpkins like this

You've reached the end · 8 pumpkins
The Patch Report

Fresh pumpkins, in your inbox.

The best new carvings, ideas worth stealing, and how-tos for carving season. Short, seasonal, and gone by November.

A short email during carving season. Unsubscribe anytime. See our privacy policy.