Halloween Pumpkin Carving Contest · Starts October 1st · $500 in prizes
← Back to ideas
@ai_concepts
Sep 5, 2026
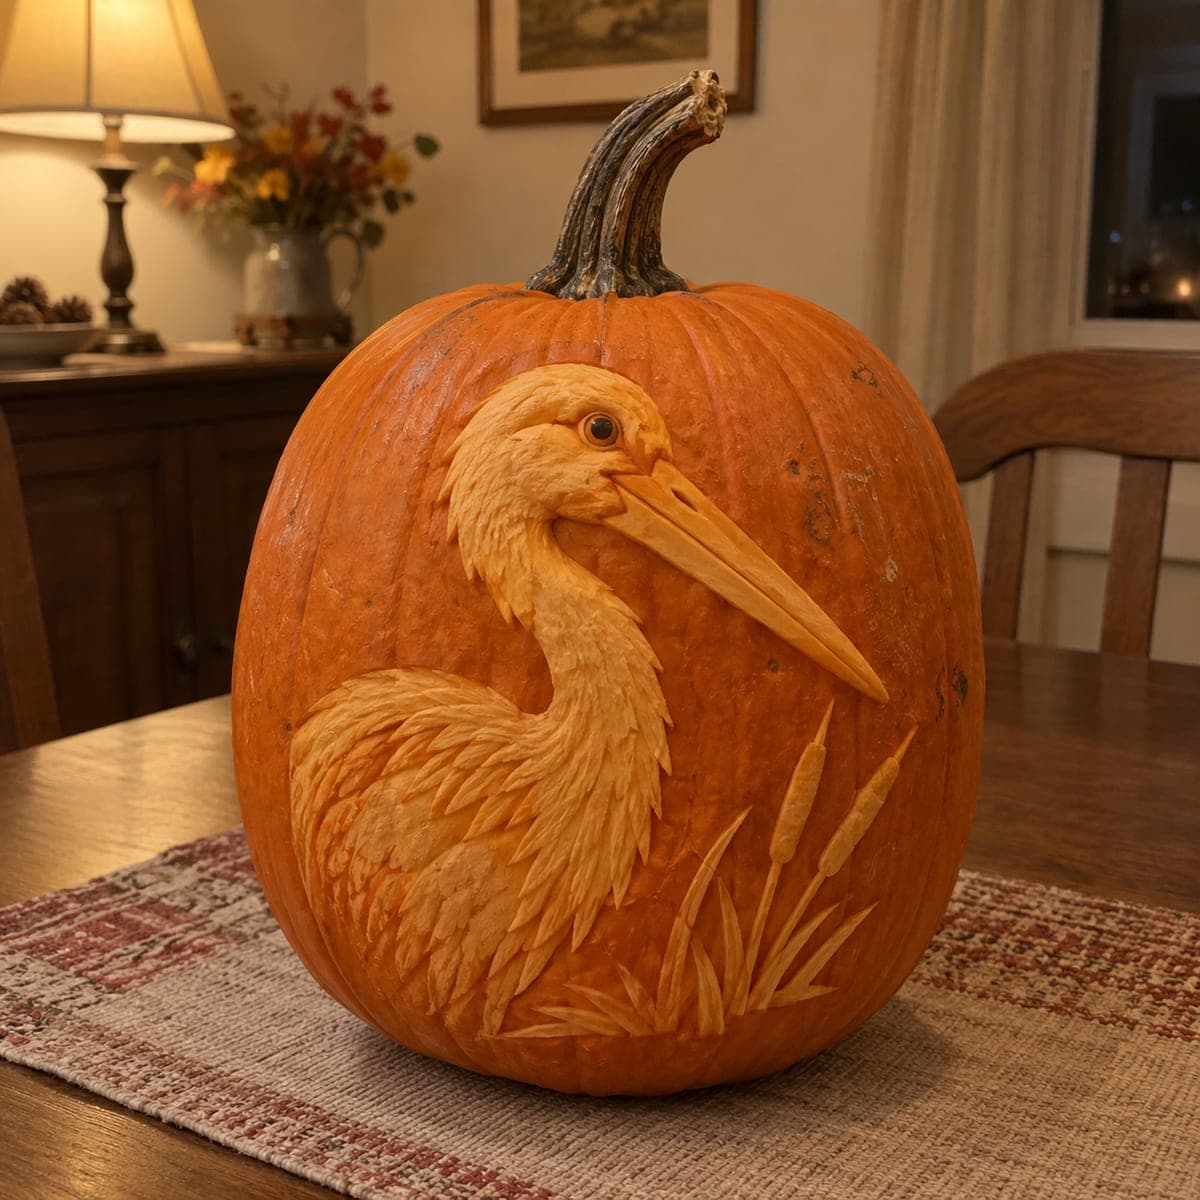
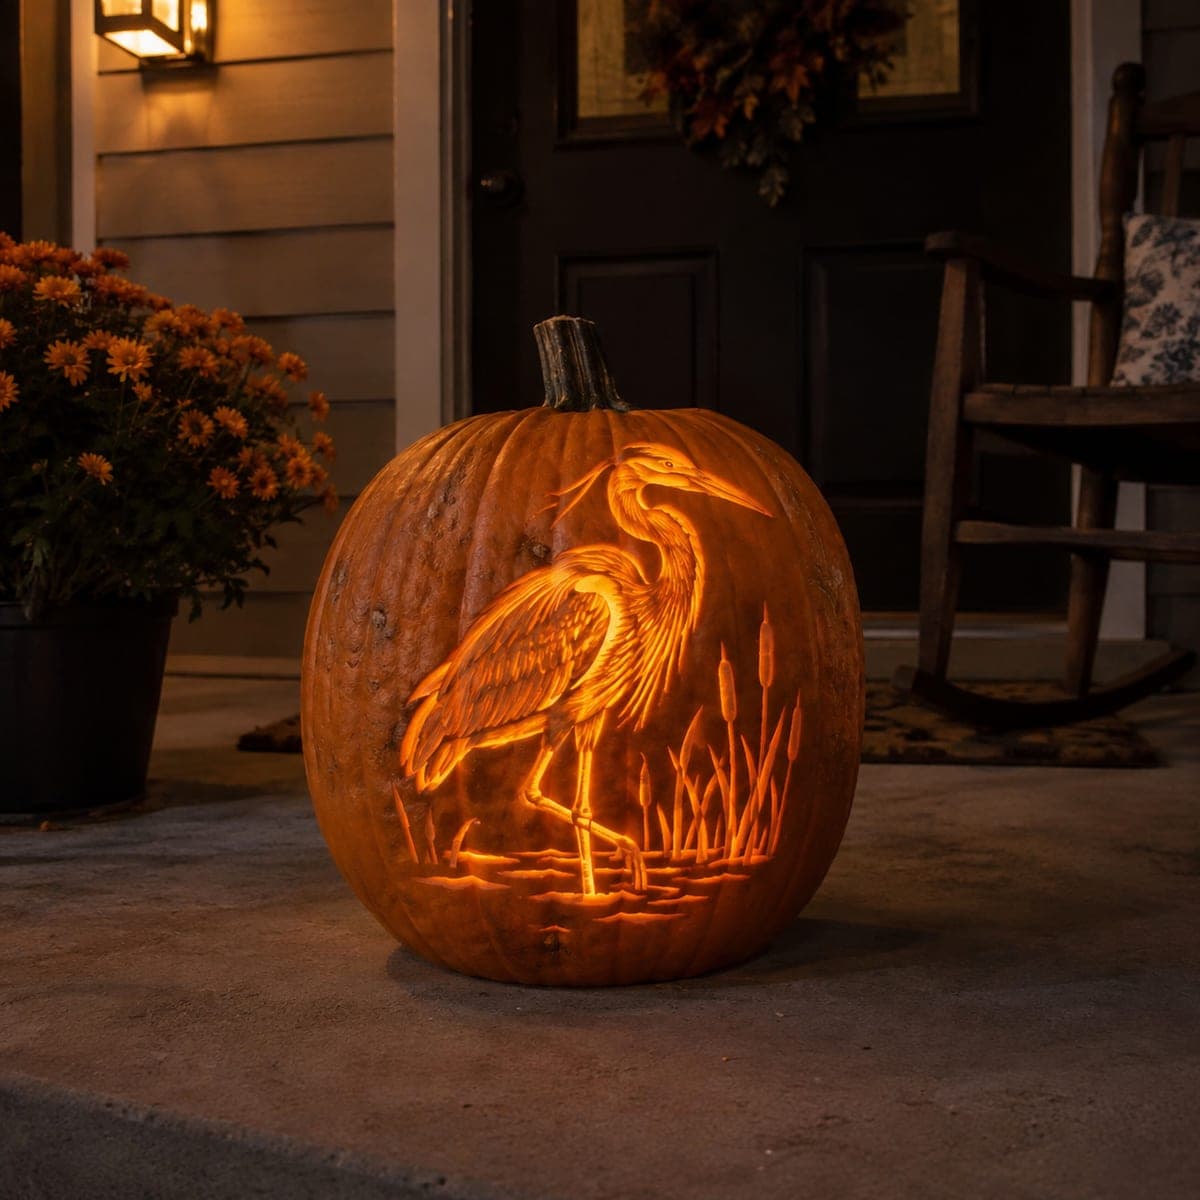
Carved Heron and Cattails Pumpkin ReliefAI
0

Carved Heron and Cattails Pumpkin Relief

A great blue heron rises from carved cattails in this elegant relief pumpkin, every feather etched at a slightly different depth to catch the light. The long beak and curved neck are shaped by peeling the skin away around them, leaving the bird raised above the background. Use loop tools for the feather texture and work from the outline inward. Display it unlit on a table where lamplight can rake across the carving and show off the detail.

This is an AI-generated concept image: a realistic, carvable design idea rather than a photo of a finished carve. AI concepts are always labeled and sit out the leaderboard and the contest.

No ratings yet · Sign in to rate
Comments (0)

  • No comments yet — be the first.

Save without an account. Sign in to like or comment.

Our tips for carving a similar design

The core trick here is relief carving, where the heron stays raised above a peeled-back background so it looks three-dimensional in raking light. You build the bird entirely by removing skin and shaving flesh at different depths, never cutting all the way through. Since this is an AI concept image, treat it as a plan for how you could carve a similar heron, keeping the long beak and thin cattails supported by the pumpkin wall behind them.

Written by PumpkinCarvingIdeas.com, inspired by the image above. These are our suggestions, not instructions from the uploader. This approach to the AI concept has not been tested on a real pumpkin.

From pumpkin to porch

  1. Pick a tall pumpkin and transfer the design

    Choose a large, smooth-shouldered pumpkin with a flat area big enough for the whole scene. Tape your heron and cattail pattern in place and poke or trace the main outlines: the head, curved neck, body, long beak, and the cattail stalks. Keep the lines light since almost everything here is surface work, not cut-through. Do not remove a lid or gut it fully, because a solid wall holds relief detail better.

  2. Peel the background around the bird

    Using a wide loop or ribbon tool, shave the skin off the entire background so the orange skin heron sits raised against a dim peeled field. Work up to your outlines carefully, keeping the edge of the bird crisp. Lower the background a bit more right behind the neck and beak so those shapes read as clearly in front. Take your time; this step defines the whole relief effect.

  3. Shape the neck, head, and beak

    Round the edges of the raised heron so it is not a flat sticker. Gently slope the sides of the long beak down into the background so it looks pointed and solid, and leave the beak fully attached to the pumpkin along its length for strength. Give the eye a small rounded bump and shave a shallow ring around it. An adult should handle every cut with a sharp detail knife here.

  4. Etch the feathers at varied depths

    Switch to small loop tools and carve the feathers from the outline inward, overlapping each row like shingles. Vary the depth slightly on every feather so shadows catch differently across the breast and wing. Keep strokes short and curved, following the direction the feathers grow. Deeper scoops read darker, lighter scrapes stay pale, which is what gives the plumage its soft dimension.

  5. Add the cattails last

    Etch the tall stalks and the sausage-shaped cattail heads with a fine tool, leaving them raised like the bird. Carve the blade leaves at the base with quick tapering strokes. Because these are thin, keep them shallow and attached, never cutting fully through the wall. Leave a little skin at each tip so nothing snaps off.

  6. Seal, light, and photograph

    Wipe away shavings and coat all peeled surfaces with a thin layer of petroleum jelly to slow drying and keep the pale tones bright. This piece shines as an unlit relief, so set it on a table where a lamp can rake across it from the side and throw shadows into the feather texture. If you want a faint inner glow, tuck a small LED behind it rather than inside, since there are no cut-through openings. Never use a candle. Snap your photo at a low angle to catch the depth.

Gather your supplies

Check things off as you get ready.

Work on a stable surface, keep your free hand out of the cutting path, and have an adult handle sharp tools.

Three levels of light

  • Leave intact

    The heron itself, kept as raised orange skin for the darkest tone and boldest silhouette.

  • Peel & shade

    The full background field and the shaved feather grooves, glowing dim orange to set the bird forward.

  • Cut through

    Nothing is cut all the way through on this relief; keep the beak and cattails solid and attached.

Learn the carving basics

Before you start cutting

How do I keep the long beak from breaking?

Do not cut around or under the beak. In a relief carving the beak stays attached to the pumpkin wall along its entire length, shaped only by shaving its sides down into the background. That keeps it solid and pointed without any fragile floating edges.

Why display it without a light inside?

This design has no cut-through openings, so an interior light would not shine through. The detail comes from shadows in the etched feathers, which show best under side lighting from a lamp. If you want a hint of glow, place a small LED behind the pumpkin instead.

What tool gives the best feather texture?

Small loop and ribbon tools work better than a knife for feathers. They let you scoop short, curved strokes at slightly different depths so each feather catches light on its own. Carve from the outline inward and overlap the rows like shingles.

Your take belongs here, too.

Changed a detail? Made it simpler? Share a photo of your version and tell the community what worked.

Share your pumpkin

More pumpkins like this

You've reached the end · 8 pumpkins
The Patch Report

Fresh pumpkins, in your inbox.

The best new carvings, ideas worth stealing, and how-tos for carving season. Short, seasonal, and gone by November.

A short email during carving season. Unsubscribe anytime. See our privacy policy.