Halloween Pumpkin Carving Contest Β· Starts October 1st Β· $500 in prizes
← Back to ideas
@ai_concepts
Sep 25, 2026
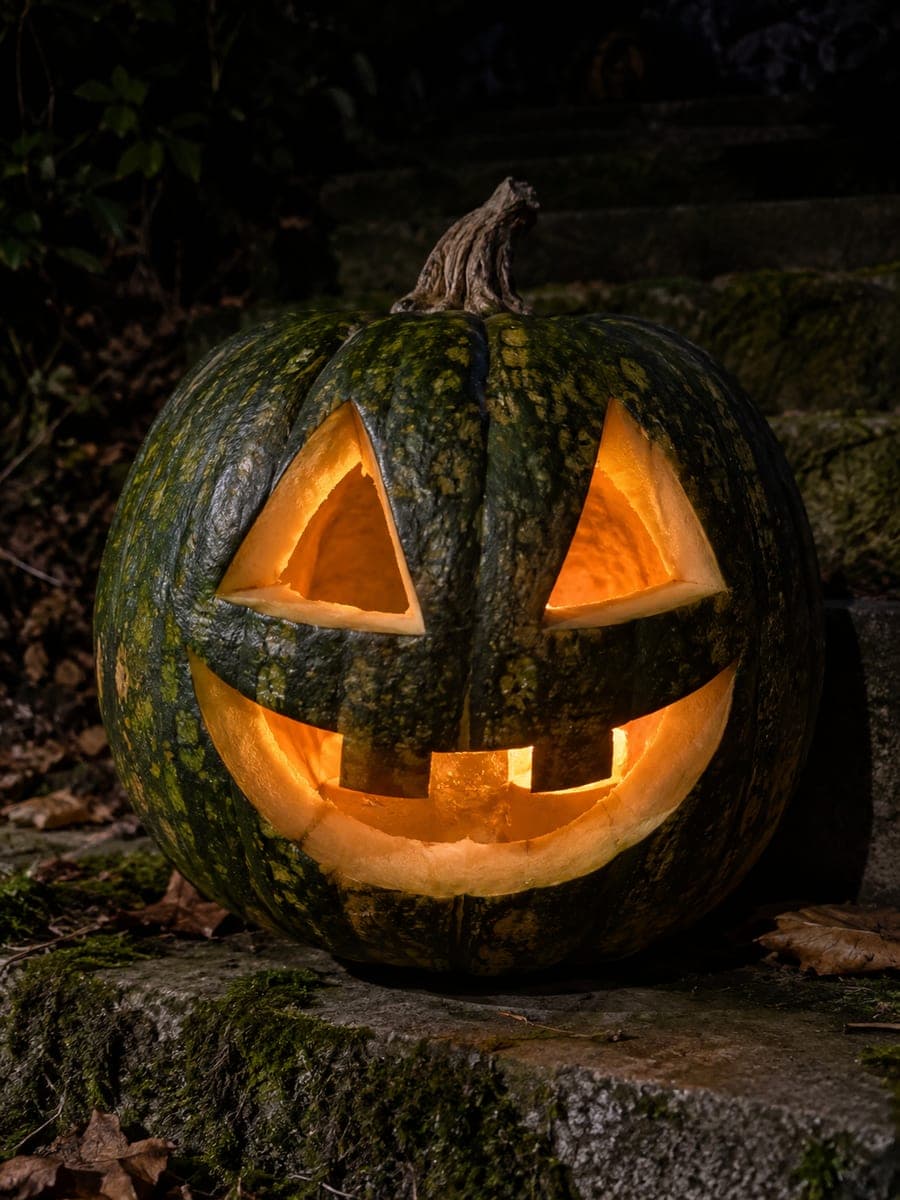
Classic Evil Jack-O-Lantern With Slanted Triangle EyesAI
0

Report this carving

Tell us what is wrong. Reports are private.

Classic Evil Jack-O-Lantern With Slanted Triangle Eyes

Narrow slanted triangular eyes and a jagged smile with four broad rooted teeth deliver the quintessential evil pumpkin face in a three-cut design any beginner can complete. Angle both triangles so their inner corners point sharply downward toward the nose, which is what separates evil from merely scary. Root each tooth along its full base width at the lips so none breaks free during hollowing. This is one of those evil pumpkin faces that works equally well on a windowsill or a lit porch step.

No ratings yet Β· Sign in to rate

Save this design for carving night, then share a photo of your own jack-o'-lantern once it's glowing.

Comments (0)

  • No comments yet β€” be the first.

Save without an account. Sign in to like or comment.

Our tips for carving a similar design

This design lives and dies by the angle of its two triangular eye holes. Tilt both inner corners sharply downward toward the nose bridge and the face reads as genuinely evil rather than merely carved. Four broad-rooted teeth in a single jagged smile complete the look without adding complexity.

From pumpkin to porch

  1. Prep and hollow

    Cut a wide lid from the bottom so the pumpkin sits stably, or cut a lid at the back to preserve the face. Scoop all seeds and pulp until the inner wall is roughly 2.5 cm thick throughout. Dry the carving surface with a paper towel so your pencil lines stay crisp.

  2. Mark the eyes

    Draw two narrow triangles with their inner corners pointing sharply downward toward the nose area. Keep the outer corners level or tilted slightly upward to maximize the evil angle. Confirm both triangles match in size before proceeding.

  3. Mark the mouth

    Draw a wide zigzag smile below the midline of the pumpkin. Sketch four broad rectangular teeth along the top lip edge, rooting each one across its full base width so none becomes a narrow spike. The gaps between teeth should be roughly equal.

  4. Cut the eyes first

    Using a thin-bladed carving saw, cut each triangle with short pull strokes. Work from a corner inward to maintain control. Pop each eye piece out gently by pressing from inside.

  5. Cut the mouth

    Cut the outer zigzag edge of the smile first, then carefully remove the negative space between the four teeth. Leave each tooth rooted at full base width. Cut big openings last and keep fingers clear of the blade path at all times.

  6. Light and display

    Place an LED tea light inside rather than a real candle for safe unattended display. Set the pumpkin on a step where its evil scowl is at eye level with trick-or-treaters. The three large openings flood with warm light and the downward-angled eyes cast dramatic brow shadows.

Written with AI to match this design

Gather your supplies

Check things off as you get ready.

Work on a stable surface, keep your free hand out of the cutting path, and have an adult handle sharp tools.

Three levels of light

  • Leave intact

    All intact rind including the brow area above the eyes stays dark, creating the heavy-browed scowl.

  • Peel & shade

    None. This three-cut design relies on full cutouts only.

  • Cut through

    Both slanted triangular eye holes and the full jagged smile with all four tooth gaps are cut through for bright light.

Learn the carving basics

Before you start cutting

How do I stop the teeth from snapping off when I hollow the pumpkin?

Root each tooth along its full base width at the lip line before removing any adjacent rind. The wider the base, the more structural support it has. Avoid thinning the pumpkin wall directly behind the mouth below about 2 cm.

What makes the eyes look evil versus just scary?

The inner corners of both triangles must angle downward toward the nose. Even a slight inward tilt creates a furrowed, menacing expression. If the inner corners are level or tilted upward, the face reads as surprised or neutral instead.

Can I carve this design on a smaller sugar pumpkin?

Yes, but scale the triangles down so each has at least 8 mm of rind on all sides. Smaller pumpkins have thinner walls, so the teeth become more fragile. An LED light rather than a candle is especially important in a small pumpkin to avoid heat damage.

Your take belongs here, too.

Changed a detail? Made it simpler? Share a photo of your version and tell the community what worked.

Share your pumpkin

More pumpkins like this

You've reached the end Β· 8 pumpkins
The Patch Report

Fresh pumpkins, in your inbox.

The best new carvings, ideas worth stealing, and how-tos for carving season. Short, seasonal, and gone by November.

A short email during carving season. Unsubscribe anytime. See our privacy policy.