Halloween Pumpkin Carving Contest Β· Starts October 1st Β· $500 in prizes
← Back to ideas
@ai_concepts
Jul 23, 2026
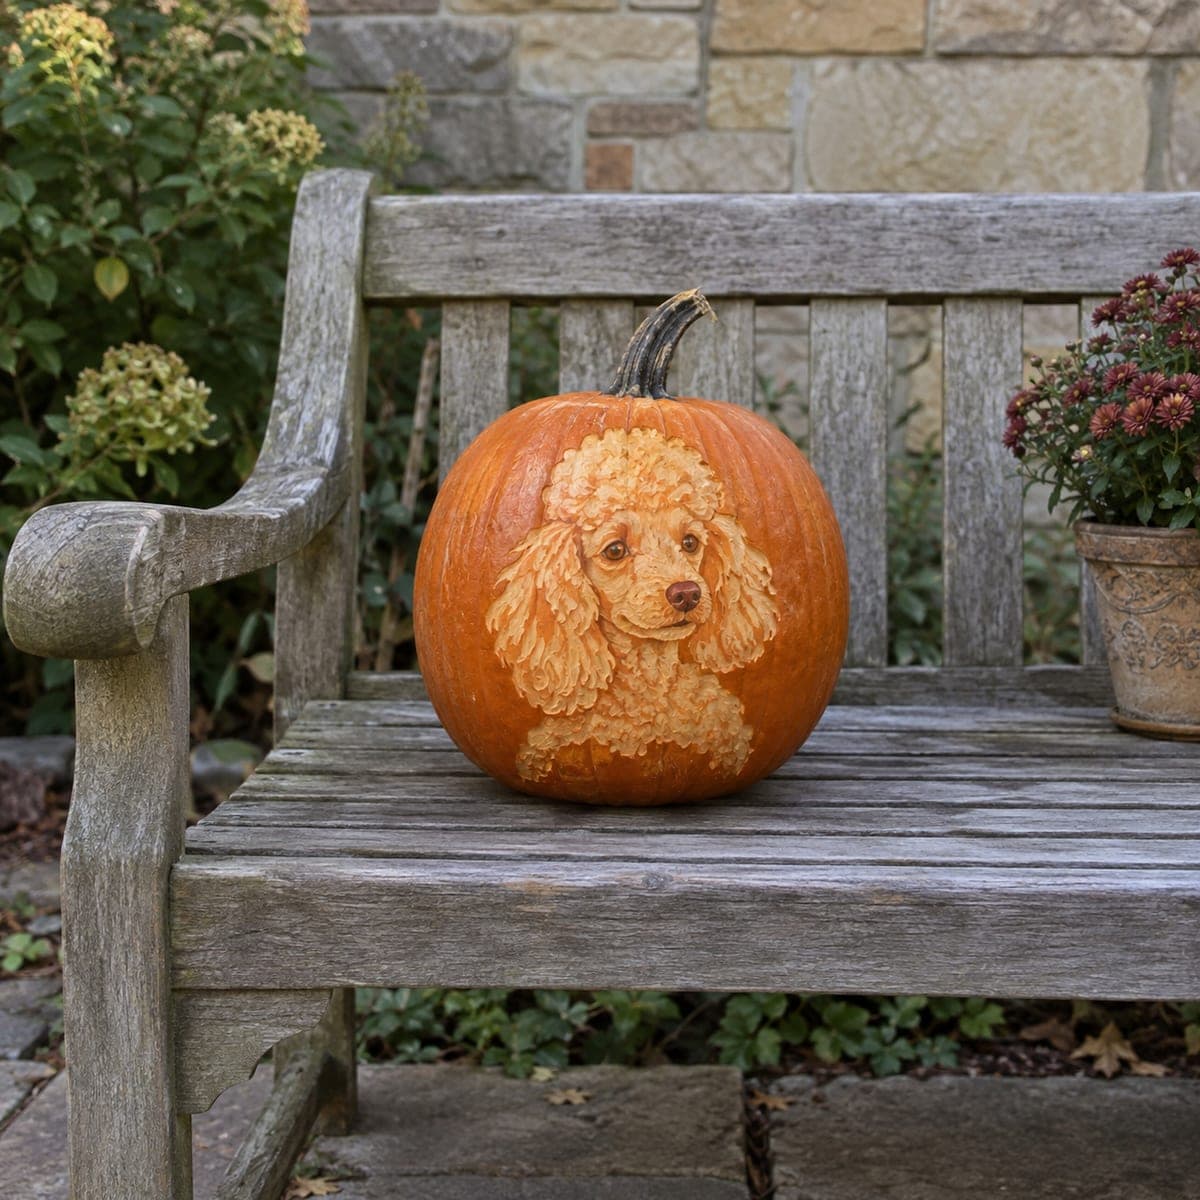
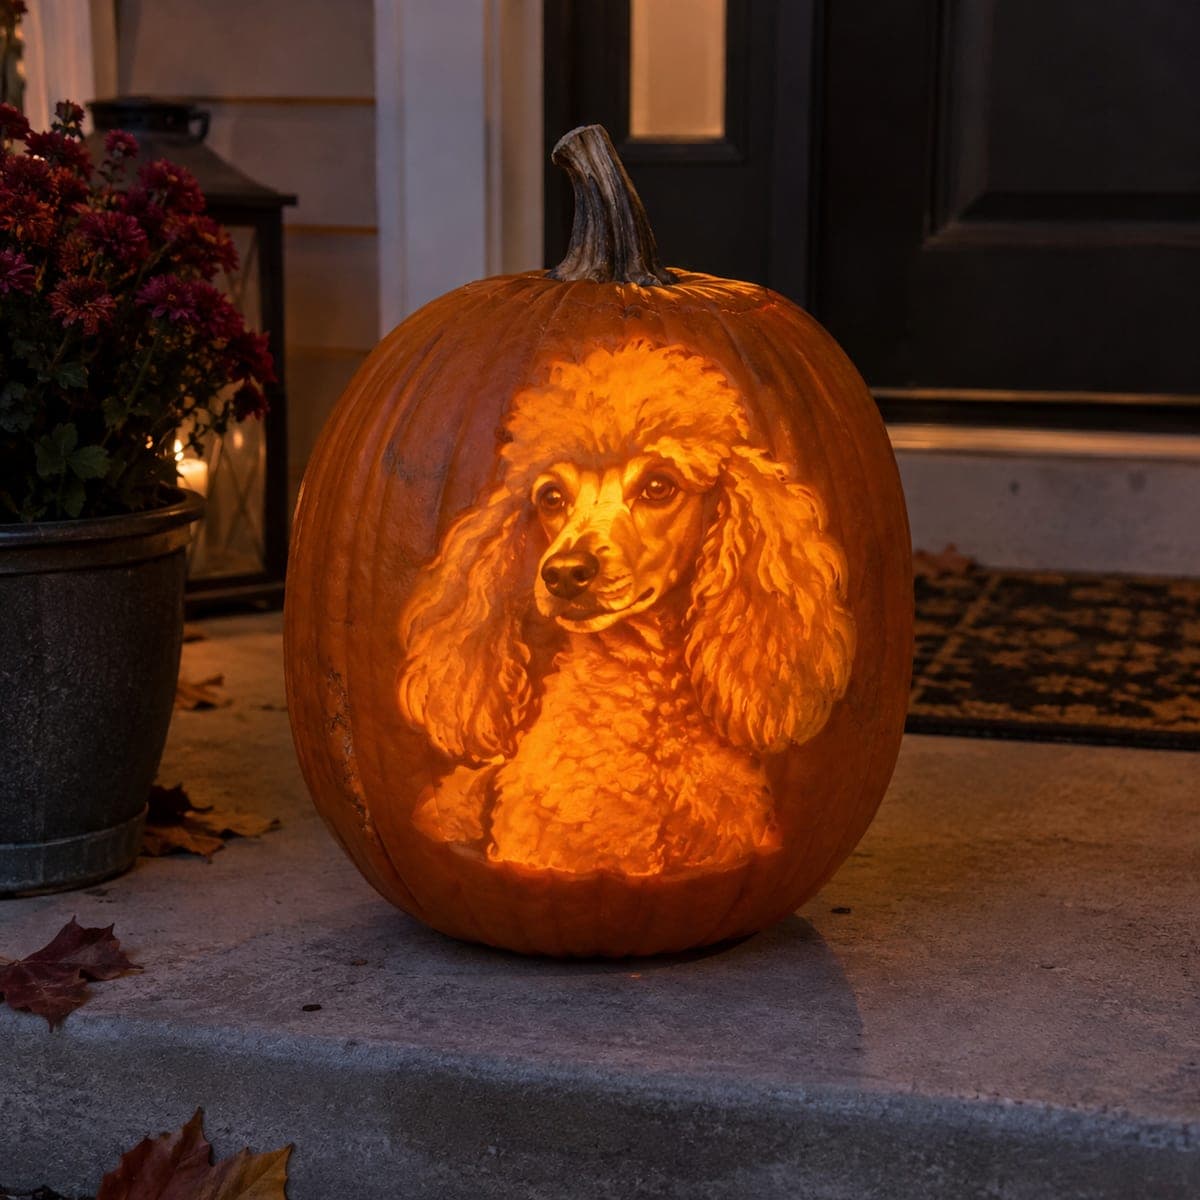
Curly Poodle Portrait Carved on a PumpkinAI
0

Curly Poodle Portrait Carved on a Pumpkin

Dozens of individually sculpted curls give this poodle portrait its signature coat, with the face smoothed and shaded so the soft eyes stand out from the texture around them. Each curl is a small scooped gouge, so a round loop tool and a few practice passes on the back of the pumpkin will pay off. Keep the deepest cuts in the topknot and ears, mist the finished carving with water, and display it out of direct sun.

This is an AI-generated concept image: a realistic, carvable design idea rather than a photo of a finished carve. AI concepts are always labeled and sit out the leaderboard and the contest.

No ratings yet Β· Sign in to rate

Comments (0)

  • No comments yet β€” be the first.

Save without an account. Sign in to like or comment.

Our tips for carving a similar design

The whole look rests on one repeated move, a small scooped gouge that reads as a single curl, layered dozens of times to build the coat. You leave the skin mostly intact and sculpt shallow relief instead of cutting all the way through, then smooth and shade the face so the eyes and nose stay the focal point. Since this is a concept image, treat it as a plan for how you could carve a similar portrait on a real pumpkin.

Written by PumpkinCarvingIdeas.com, inspired by the image above. These are our suggestions, not instructions from the uploader. This approach to the AI concept has not been tested on a real pumpkin.

From pumpkin to porch

  1. Pick a tall pumpkin and clean the wall

    Choose a pumpkin with a smooth, pale front and a rounded shape that gives you room for the head and chest. Open a lid from the bottom or back so the display side stays clean, then scrape the front interior wall down to about one inch thick. A thinner, even wall glows more evenly if you add light later. Let the inside dry for a few minutes before you transfer your pattern.

  2. Transfer the outline and map the values

    Tape your poodle stencil over the front and poke through the main shapes, the topknot, the two ears, the muzzle, the eyes, and the chest line. Lift the stencil and connect the dots with a washable marker. Lightly shade in which areas will be darkest coat versus the smoothed face so you carve with a plan. Keep the eyes and nose marked as leave-alone zones for now.

  3. Skin the coat and smooth the face

    Use a ribbon or loop tool to peel just the outer skin off every curly area, leaving the face slightly higher and smoother. This peeled layer is what gives the soft glow that separates fur from face. Work in from the edges so you keep your borders crisp. Have an adult handle all the sharp tools and cut on a stable, dry surface.

  4. Scoop the individual curls

    Switch to a small round loop tool and carve the curls one at a time as short, overlapping scoops. Cut the deepest gouges in the topknot and along the ears so those areas read as the fullest fur. Vary the depth and direction slightly so the coat looks natural instead of stamped. Practice a few passes on the back of the pumpkin first to get your wrist motion consistent.

  5. Shade the face and lift the eyes

    Gently scrape the muzzle and cheeks smooth, then carve shallow relief around the eyes so they sit slightly raised. Deepen just the nose and the creases beside it for a soft, alert expression. Keep these cuts shallow and controlled, since the eyes are the emotional center of the whole piece. Step back often to check that the face stays smoother than the surrounding curls.

  6. Mist, light, and photograph

    Wipe away marker lines with a damp cloth and mist the finished carving with water to freshen the color. Set a battery LED puck inside if you want a faint interior glow, since the relief carving is meant to be seen mostly by daylight. Display it out of direct sun and refresh with a light misting each day. Snap your photo in soft outdoor light to show off the texture.

Gather your supplies

Check things off as you get ready.

Work on a stable surface, keep your free hand out of the cutting path, and have an adult handle sharp tools.

Three levels of light

  • Leave intact

    The darkest coat shadows and the eyes and nose stay as untouched skin for depth.

  • Peel & shade

    The full curly coat, ears, and chest get skin-peeled so the fur glows a soft dim orange.

  • Cut through

    No full cutouts are needed, though a thin relief around the eyes can be scraped brightest to make them pop.

Learn the carving basics

Before you start cutting

Do I need to cut all the way through the pumpkin?

No, this is a relief portrait, so almost everything stays shallow. You peel skin and scoop curls rather than making open holes. Cutting through would break up the soft coat texture that makes the poodle work.

How do I keep dozens of curls from looking messy?

Work in the same general direction as real fur would fall and vary the depth just slightly between scoops. Deepen the topknot and ears most, and keep the chest curls shallower. A few practice passes on the back of the pumpkin will steady your hand before you commit to the front.

How long will a shaded carving like this last?

Skin-peeled and relief carvings dry out faster than cut ones, so expect a few good days. Mist it with water daily and keep it out of direct sun and heat. Storing it somewhere cool overnight will stretch its life.

Your take belongs here, too.

Changed a detail? Made it simpler? Share a photo of your version and tell the community what worked.

Share your pumpkin

More pumpkins like this

You've reached the end Β· 8 pumpkins
The Patch Report

Fresh pumpkins, in your inbox.

The best new carvings, ideas worth stealing, and how-tos for carving season. Short, seasonal, and gone by November.

A short email during carving season. Unsubscribe anytime. See our privacy policy.