Halloween Pumpkin Carving Contest · Starts October 1st · $500 in prizes
← Back to ideas
@ai_concepts
Aug 3, 2026
Desert Cactus Painted No-Carve PumpkinAI
0

Desert Cactus Painted No-Carve Pumpkin

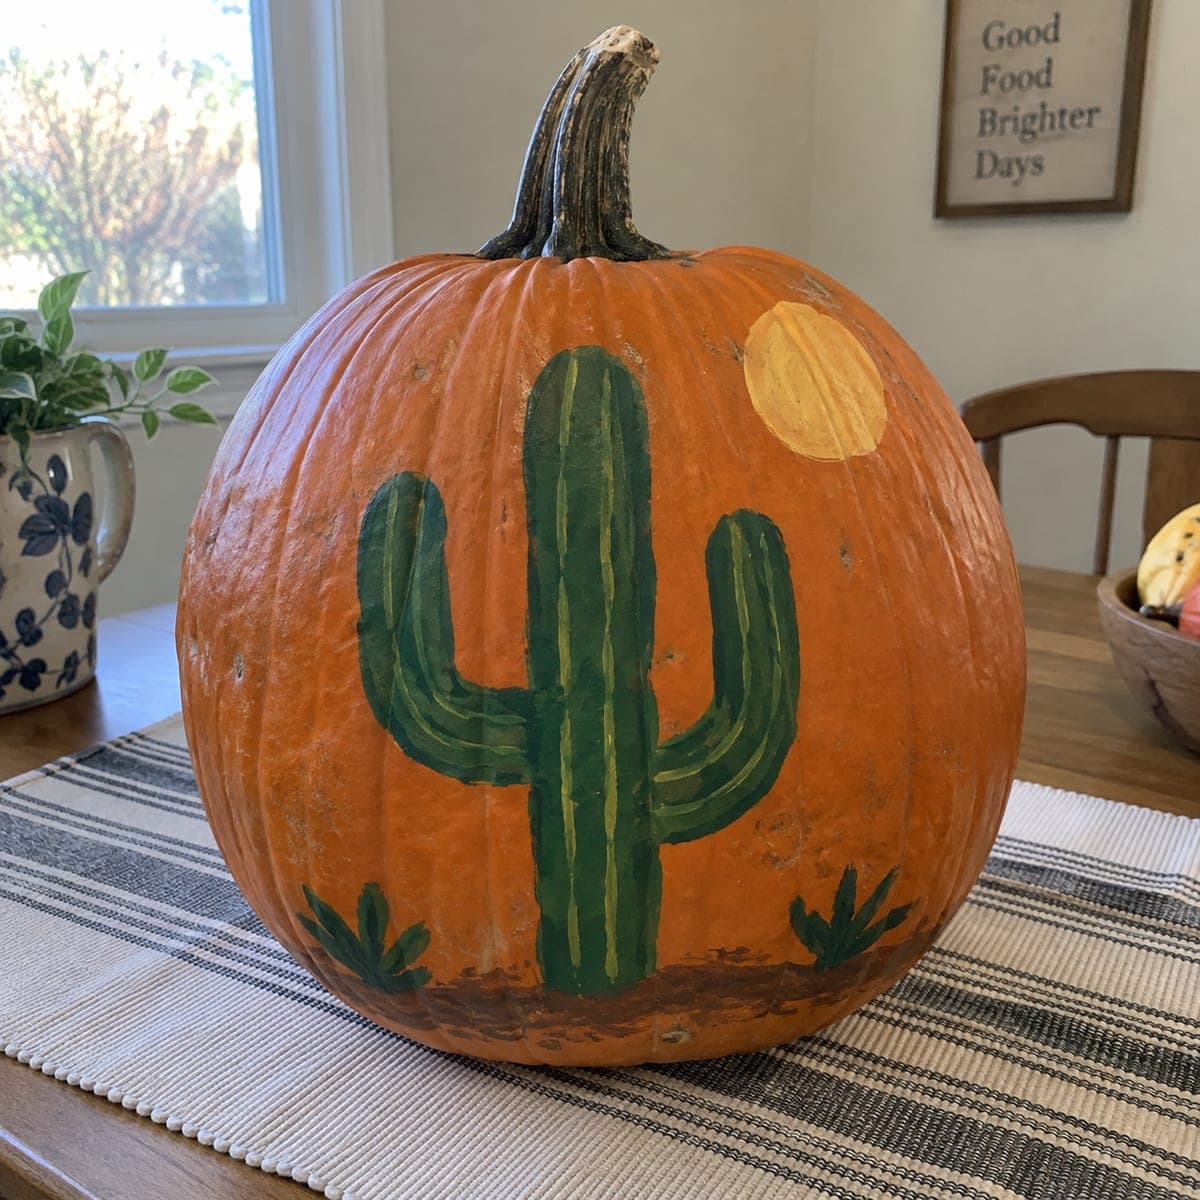
A green saguaro cactus stands under a pale yellow sun on this southwestern no-carve pumpkin, grounded by a strip of painted desert soil. Two greens do the heavy lifting: block the cactus in a dark base coat, then drag lighter vertical stripes to suggest the ridges. It is an easy fall craft for anyone who wants seasonal decor without Halloween imagery, and it keeps for a month indoors.

This is an AI-generated concept image: a realistic, carvable design idea rather than a photo of a finished carve. AI concepts are always labeled and sit out the leaderboard and the contest.

No ratings yet · Sign in to rate
Comments (0)

  • No comments yet — be the first.

Save without an account. Sign in to like or comment.

Our tips for carving a similar design

The whole look rests on one simple trick: block the saguaro in a dark green, then drag lighter green vertical stripes over it to suggest the ridges. Since this is a no-carve, paint-only design, there is no cutting involved, so you can relax and focus on clean color. Plan the tall cactus off-center, add a pale sun in the upper corner, and ground everything with a low strip of desert soil.

Written by PumpkinCarvingIdeas.com, inspired by the image above. These are our suggestions, not instructions from the uploader. This approach to the AI concept has not been tested on a real pumpkin.

From pumpkin to porch

  1. Clean and sketch the layout

    Wipe the pumpkin with a damp cloth and let it dry so paint grips well. With a pencil, lightly sketch the tall saguaro slightly off-center, its two curved arms, the small circle of sun in the upper corner, and a low horizon line for the soil. Keep the cactus trunk wide enough to hold your vertical stripes later. Step back and check the balance before you commit to paint.

  2. Base coat the cactus in dark green

    Fill the whole cactus shape with a solid dark green acrylic, working in smooth strokes that follow the vertical form. Round off the tops of the arms and trunk so they look soft, not sharp. Let this first coat dry fully, then add a second coat if the orange still shows through. A clean, even base makes the lighter stripes pop later.

  3. Add the sun and soil

    Paint the sun as a soft pale-yellow circle in the upper corner, letting the edges stay a little fuzzy for a hazy glow. Along the bottom, brush a low band of brown and tan for desert soil, keeping the top edge slightly uneven like real ground. Add a couple of small green agave or shrub clusters near the base to frame the scene. Let everything dry before the detail pass.

  4. Drag the light-green ridge stripes

    Load a thin brush with a lighter, slightly yellow green and pull straight vertical lines down the trunk and arms. Space them evenly to mimic the ribs of a saguaro, following the curve of each arm. Keep a light touch so the dark base still reads between the stripes. This two-tone contrast is what gives the cactus its rounded, dimensional feel.

  5. Add tiny spines and highlights

    With the tip of a fine brush, dot or dash short pale marks along the ridges to hint at spines. A few brighter highlights on the sun-facing side of the cactus add depth. Touch up any wobbly edges with the background orange if needed. Let it cure overnight before handling.

  6. Seal and display

    Once fully dry, brush on a thin coat of clear matte sealer to protect the paint and help it last. Set the pumpkin on a woven mat or wooden surface for that southwestern feel. Keep it indoors and out of direct sun, and it should stay bright for about a month. Snap a photo in soft daylight to show off the two greens.

Gather your supplies

Check things off as you get ready.

Work on a stable surface, keep your free hand out of the cutting path, and have an adult handle sharp tools.

Three levels of light

  • Leave intact

    The orange skin around the scene stays untouched and dark, acting as the desert sky behind the cactus.

  • Peel & shade

    This is a paint-only design, but if you want a soft glow you could lightly scrape the skin behind the sun for a dim halo.

  • Cut through

    For an optional lit version, cut out only the sun circle last and back it with an LED for the brightest point in the scene.

Learn the carving basics

Before you start cutting

Do I need to carve anything for this design?

No, this is a no-carve painted pumpkin, so there is no cutting at all. That makes it safe and easy for kids and first-timers, with an adult handling only any optional sun cutout. Everything else is done with acrylic paint and a few brushes.

How do I get the two-tone cactus look?

Block the entire cactus in a solid dark green first and let it dry completely. Then drag thin lines of a lighter, yellow-tinted green straight down the trunk and arms. Leaving the dark base showing between the stripes creates the rounded, ribbed saguaro effect.

How long will a painted pumpkin last?

Kept indoors and away from direct sun, a sealed painted pumpkin can stay looking good for around a month. A thin coat of clear matte sealer over dry paint helps a lot. Since nothing is cut open, it will not rot as quickly as a carved pumpkin.

Your take belongs here, too.

Changed a detail? Made it simpler? Share a photo of your version and tell the community what worked.

Share your pumpkin

More pumpkins like this

You've reached the end · 8 pumpkins
The Patch Report

Fresh pumpkins, in your inbox.

The best new carvings, ideas worth stealing, and how-tos for carving season. Short, seasonal, and gone by November.

A short email during carving season. Unsubscribe anytime. See our privacy policy.