Halloween Pumpkin Carving Contest · Starts October 1st · $500 in prizes
← Back to ideas
@ai_concepts
Sep 11, 2026
Desert Panorama PumpkinAI
0

Desert Panorama Pumpkin

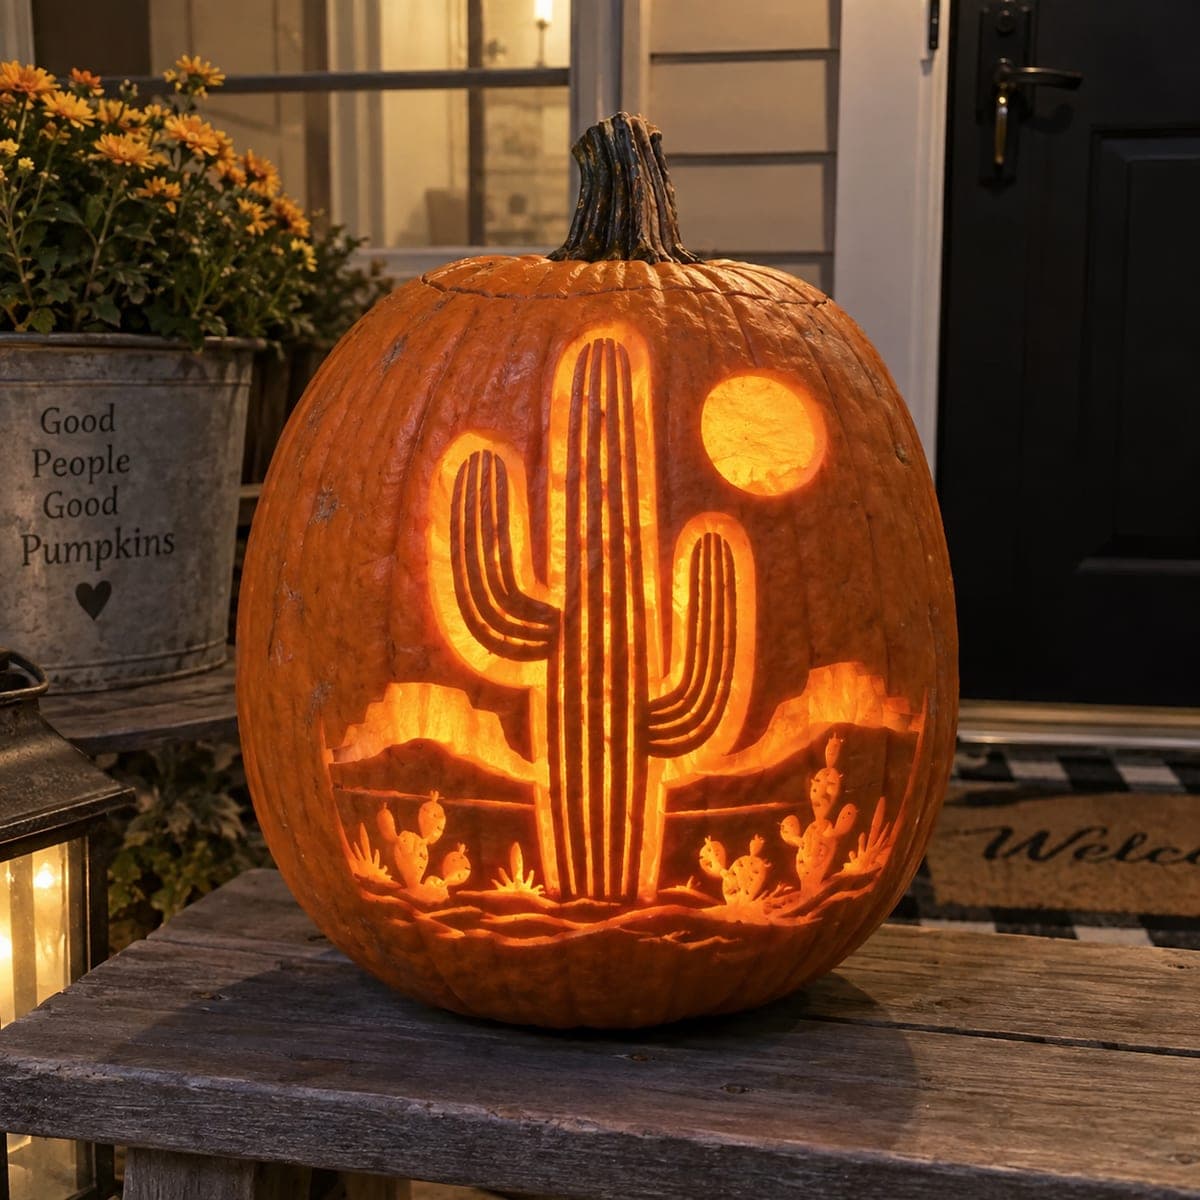
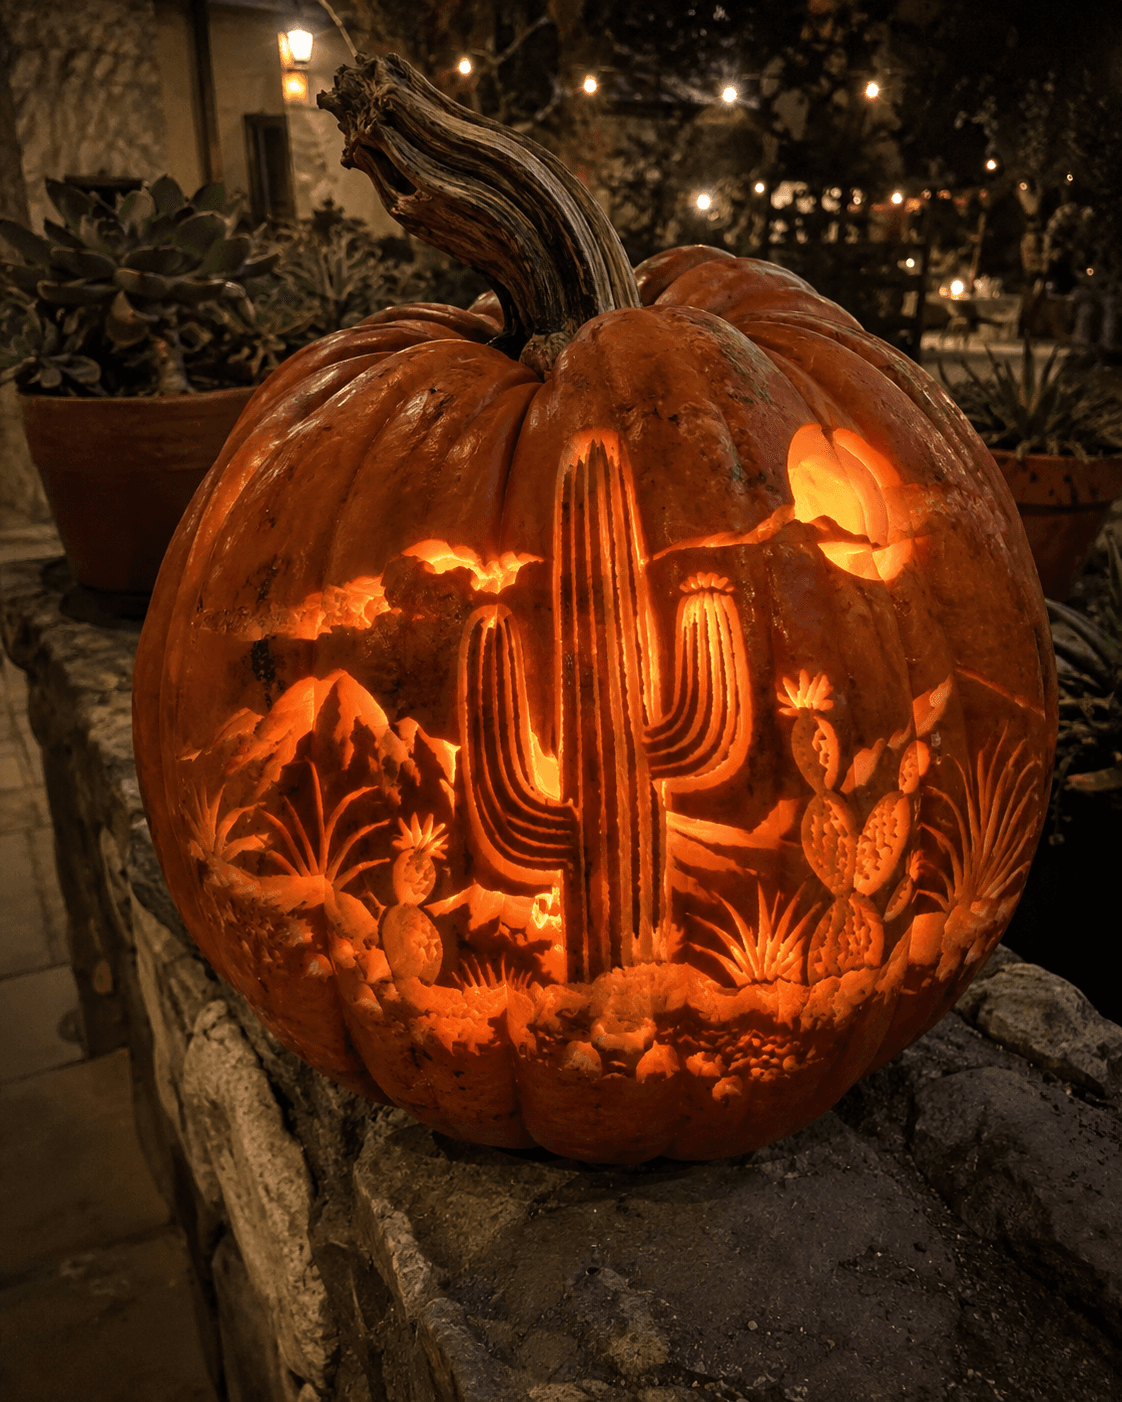
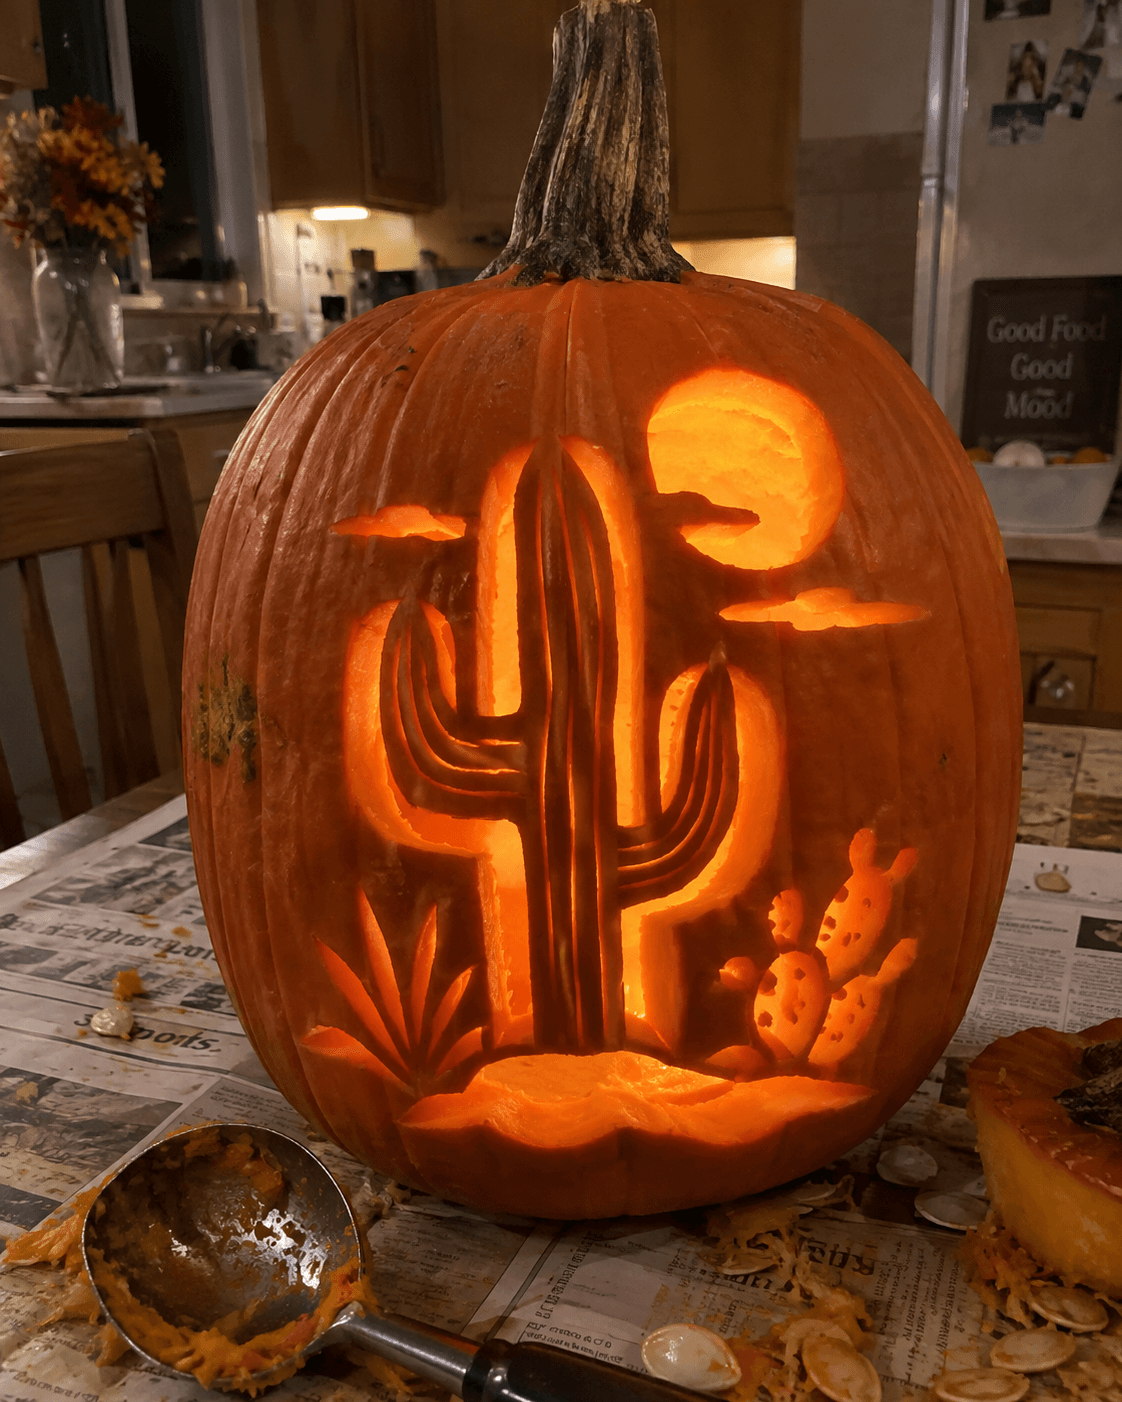
A whole stretch of desert wrapped across the pumpkin in deep layered relief. A towering ribbed saguaro anchors the middle while jagged mountains rise behind, bats cross a hazy moon, and flowering prickly pears, agaves, and desert grasses fill the foreground in carved texture. Nearly every surface is peeled to a different depth, so the scene glows in bands of light and shadow. A marathon carve with peeling tools and a full evening or two, and a stop-and-stare centerpiece when lit.

This is an AI-generated concept image: a realistic, carvable design idea rather than a photo of a finished carve. AI concepts are always labeled and sit out the leaderboard and the contest.

No ratings yet · Sign in to rate
Comments (0)

  • No comments yet — be the first.

Save without an account. Sign in to like or comment.

Our tips for carving a similar design

The core trick here is depth carving, where nearly every surface is skinned to a different level so the light reads as bands rather than a single glowing hole. You build the scene in relief: mountains and cactus shallow, foreground plants slightly deeper, and only the moon and a few bat shapes cut all the way through. Plan it as a marathon carve, working from background to foreground so your reference layers stay clean.

Written by PumpkinCarvingIdeas.com, inspired by the image above. These are our suggestions, not instructions from the uploader. This approach to the AI concept has not been tested on a real pumpkin.

From pumpkin to porch

  1. Gut it and thin the wall

    Since this is an AI concept and no real pumpkin exists, picture a large, evenly shaped pumpkin as your canvas. An adult should cut a lid or a bottom access hole and scoop the seeds, then scrape the inside of the carving face down to about one inch. A thinner wall makes shading peels glow more evenly and gives you room to carve several depths. Work over a towel and keep the flesh you remove for measuring wall thickness.

  2. Transfer the full panorama

    Tape your stencil across the front and poke the outlines with a pin: the saguaro in the center, jagged mountains behind, the hazy moon upper right, bats crossing it, and the band of prickly pear, agave, and grasses along the bottom. Take your time getting the saguaro centered, since it anchors the whole scene. Peel the paper off and connect any faint dots with a washable marker so you can see the layers before cutting.

  3. Peel the background first

    Start with the sky and mountains using a shallow ribbon or U gouge, skinning off just the top skin for a dim, hazy glow. Keep the mountain ridges a touch shallower than the sky so they stay darker and read as distant. This is the layer that sets your whole light range, so go slow and keep the peel even. Step back often and hold a light behind it to check the balance.

  4. Carve the saguaro and midground in relief

    Skin the saguaro body a little deeper than the sky so it glows brighter, then use a small V tool to press in the vertical rib lines without cutting through. Leave narrow strips of untouched skin between arms and ribs so nothing gets fragile. Carve the midground prickly pear pads and agave rosettes at a similar mid depth, varying pressure to shade rounded edges. Keep bridges of skin between overlapping pads so the pieces support each other.

  5. Deepen the foreground and cut the accents

    The grasses, flowers, and lower cactus clusters sit closest, so peel them deepest for the brightest relief, using fine detail loops for the spiky texture. Only now cut fully through the small moon and the bat silhouettes, saving these openings for last so the wall stays strong while you do the heavy shading. Keep bat wings chunky rather than thread thin so they do not tear. Clean up stray edges with a paring knife.

  6. Light it and photograph

    Drop in one or two battery LED lights, never a candle, and aim them so the beam spreads across the whole scene. Warm white LEDs give the deep orange desert glow; add a second light low in the foreground if the bottom plants look dim. Shoot in near darkness with the light steady, bracing your camera so the fine texture stays sharp. Rub cut edges with a little petroleum jelly to slow drying if you want it to last a few more nights.

Gather your supplies

Check things off as you get ready.

Work on a stable surface, keep your free hand out of the cutting path, and have an adult handle sharp tools.

Three levels of light

  • Leave intact

    Untouched skin stays dark for the mountain ridgelines and the crisp bat silhouettes against the moon.

  • Peel & shade

    Shallow peels give the hazy sky, the saguaro body, and the midground cactus pads their soft mid glow.

  • Cut through

    Only the small moon and the thin gaps around the bats are cut through for the brightest points of light.

Learn the carving basics

Before you start cutting

How do I keep the tall saguaro from looking flat?

Peel the cactus body a shade deeper than the sky behind it so it glows brighter and stands forward. Then press vertical rib lines with a small V tool without cutting through. The contrast between the lit body and the dark rib grooves is what gives it round, three dimensional shape.

Do I really carve every plant in the foreground?

You carve them, but mostly by peeling to different depths rather than cutting holes. Prickly pear pads, agaves, and grasses each get skinned a little deeper than the layer behind them. Leave thin bridges of skin between overlapping shapes so the crowded foreground stays strong and does not crumble.

This looks like a lot for one night. How should I pace it?

Treat it as a two evening project and always work background to foreground. Rough in the sky and mountains first, then the saguaro and midground, and save the deepest foreground and the cut moon and bats for last. Wrap the pumpkin in a damp towel in the fridge between sessions to keep it from drying and shrinking.

Your take belongs here, too.

Changed a detail? Made it simpler? Share a photo of your version and tell the community what worked.

Share your pumpkin

More pumpkins like this

You've reached the end · 8 pumpkins
The Patch Report

Fresh pumpkins, in your inbox.

The best new carvings, ideas worth stealing, and how-tos for carving season. Short, seasonal, and gone by November.

A short email during carving season. Unsubscribe anytime. See our privacy policy.