Halloween Pumpkin Carving Contest · Starts October 1st · $500 in prizes
← Back to ideas
@ai_concepts
Aug 14, 2026
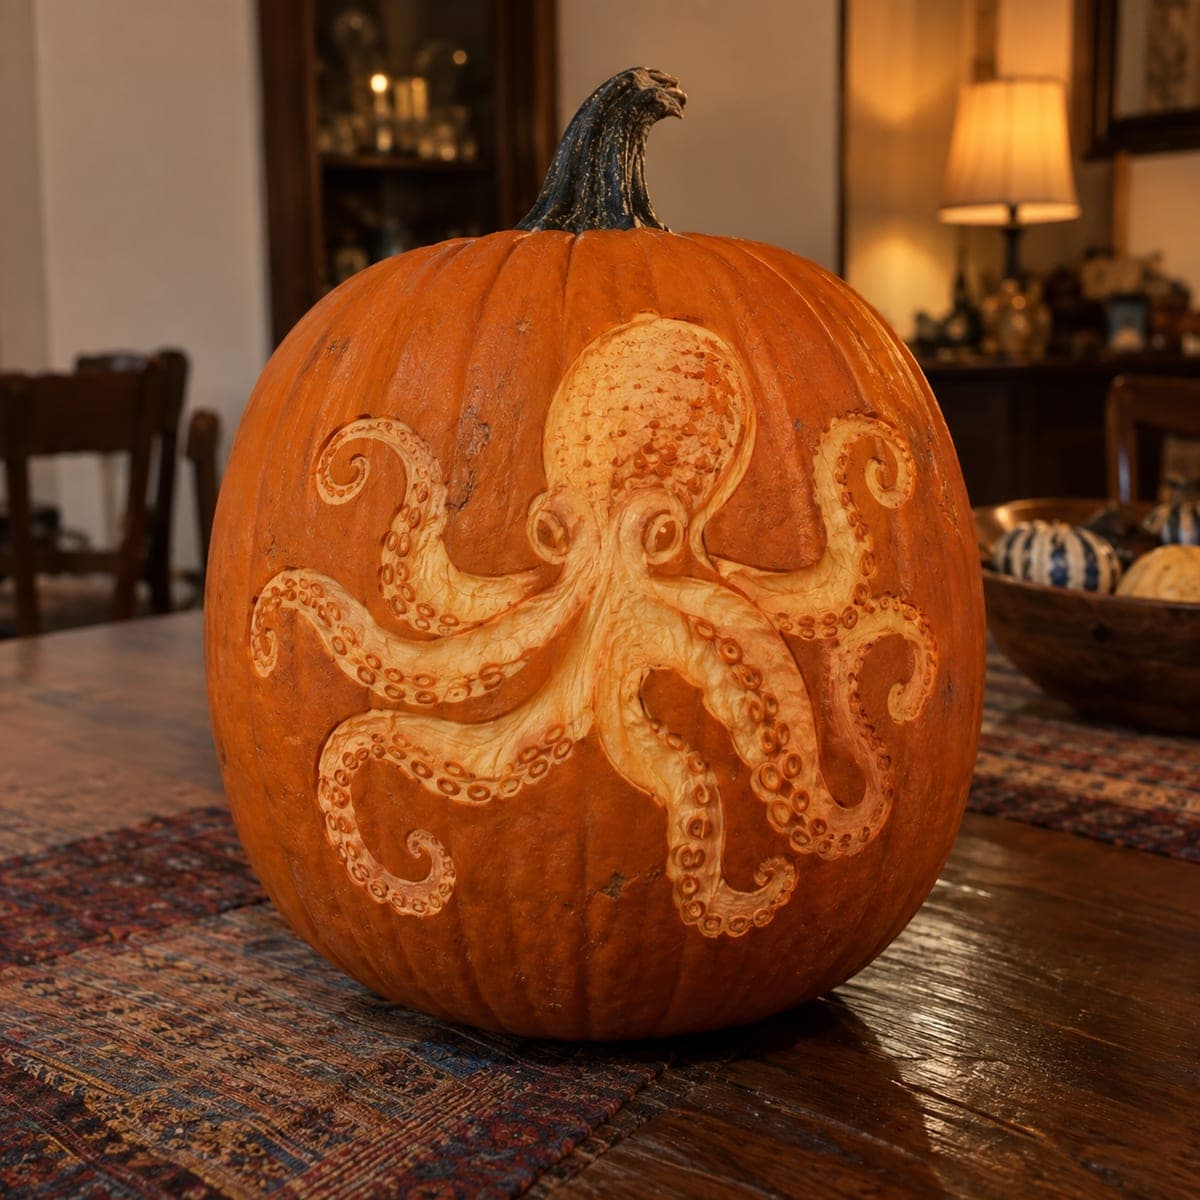
Detailed Octopus Etched Pumpkin with Curling TentaclesAI
0

Detailed Octopus Etched Pumpkin with Curling Tentacles

Eight textured tentacles radiate from a round head across almost the full width of this pumpkin, each arm etched at varying depths to suggest the suckers and curl of each limb. The technique is shading rather than cutting through, so the design appears as a relief carving lit by indirect room light. Use a linoleum cutter or loop tool to remove thin layers of skin, working lighter areas first and deepening shadows last. Displayed indoors under a warm lamp, the cream-and-orange tones create a striking decorative piece.

This is an AI-generated concept image: a realistic, carvable design idea rather than a photo of a finished carve. AI concepts are always labeled and sit out the leaderboard and the contest.

No ratings yet · Sign in to rate

Comments (0)

  • No comments yet — be the first.

Save without an account. Sign in to like or comment.

Our tips for carving a similar design

The core trick here is relief carving, where you shade the octopus by scraping away skin at different depths instead of cutting all the way through. Keep the octopus body and its eight curling tentacles as the lightest scraped areas, then deepen the negative space and shadows around them so the shape reads clearly under a warm lamp. Because this is a design concept and not a real carved pumpkin, plan every limb and sucker before you touch the rind so the thin curls stay supported.

Written by PumpkinCarvingIdeas.com, inspired by the image above. These are our suggestions, not instructions from the uploader. This approach to the AI concept has not been tested on a real pumpkin.

From pumpkin to porch

  1. Pick a smooth, wide pumpkin and plan the layout

    Choose a large pumpkin with a broad, even front face so all eight tentacles can spread across the width. Wipe it dry and transfer your octopus stencil by taping it on and poking the main outlines with a pin, or trace lightly with a washable marker. Mark the round head, the eyes, and where each tentacle curls so you never lose the shape once you start scraping. Sketch which areas will be brightest and which stay dark before any tool comes out.

  2. Open a lid or door for the light

    Since nothing is cut through, you still need a way to reach inside and place a light. Cut a hatch in the back or bottom with a sturdy carving saw held by an adult, then scoop out the seeds and scrape the inside wall smooth. Thin the front wall from the inside to about one inch so the scraped areas will glow more easily. A back or bottom door keeps the front face clean for your relief work.

  3. Outline the octopus with a shallow score

    Use a linoleum cutter or a small loop tool to trace the entire outline of the head and every tentacle with a light groove. This groove separates the creature from the background and gives you a clean edge to work against. Keep the tool moving away from your hand and take shallow passes rather than digging deep. Do not remove much skin yet, just define the shape.

  4. Peel the body and tentacles for a soft glow

    Switch to a loop or ribbon tool and gently remove the top skin across the head and arms so those areas turn dim orange. Work the lightest zones first, like the top of the head and the raised part of each curling limb. Leave narrow ridges of skin between tentacles so the thin curls stay strong and do not tear. Blend your scraped edges so the relief looks rounded rather than flat.

  5. Deepen shadows and detail the suckers last

    Now go back and scrape deeper into the shadow lines, the spaces between arms, and under the head to build contrast. Use the tip of the linoleum cutter to press small round dimples along each tentacle for the suckers and to stipple texture on the head. Save the deepest scraping for the darkest recesses so the brightest cream tones pop against them. Take your time here, since this depth work is what makes the octopus look three dimensional.

  6. Light it and photograph indoors

    Set a battery LED puck or string inside and close the back door. Because this is a shaded design, it shows best under indirect warm room light rather than in full dark, so place it near a lamp. Wipe away marker lines with a damp cloth and rub a little petroleum jelly on the scraped areas to slow drying. Snap your photo while the cream and orange tones are still fresh.

Gather your supplies

Check things off as you get ready.

Work on a stable surface, keep your free hand out of the cutting path, and have an adult handle sharp tools.

Three levels of light

  • Leave intact

    The background pumpkin skin around the octopus stays untouched and dark to frame the creature

  • Peel & shade

    The head, body, and raised parts of each tentacle are skin-peeled for a soft orange glow

  • Cut through

    Nothing is cut fully through on the front; only a hidden back or bottom door lets light in

Learn the carving basics

Before you start cutting

Do I really carve this without cutting any holes in the front?

Yes, the octopus is a relief design, so the front face is only scraped to different depths, never cut through. The light comes from thinning the wall and adding a hidden door in the back or bottom. This keeps the delicate tentacle curls intact and gives the soft glow you see in the concept.

How do I keep the thin tentacle curls from tearing?

Leave narrow ridges of unscraped skin between neighboring arms so each curl has support on both sides. Work with shallow passes and a sharp loop tool rather than forcing deep gouges. If a spot feels thin, stop scraping there and build contrast with shadow around it instead.

Why does it look best under a lamp instead of in the dark?

Shaded relief carvings show their cream and orange tones through reflected light on the surface, not just backlight through cutouts. In full darkness you would lose the subtle depth of the suckers and head texture. A warm lamp nearby brings out the three dimensional feel while the inner LED adds a gentle glow.

Your take belongs here, too.

Changed a detail? Made it simpler? Share a photo of your version and tell the community what worked.

Share your pumpkin

More pumpkins like this

You've reached the end · 8 pumpkins
The Patch Report

Fresh pumpkins, in your inbox.

The best new carvings, ideas worth stealing, and how-tos for carving season. Short, seasonal, and gone by November.

A short email during carving season. Unsubscribe anytime. See our privacy policy.