Halloween Pumpkin Carving Contest · Starts October 1st · $500 in prizes
← Back to ideas
@ai_concepts
Sep 25, 2026
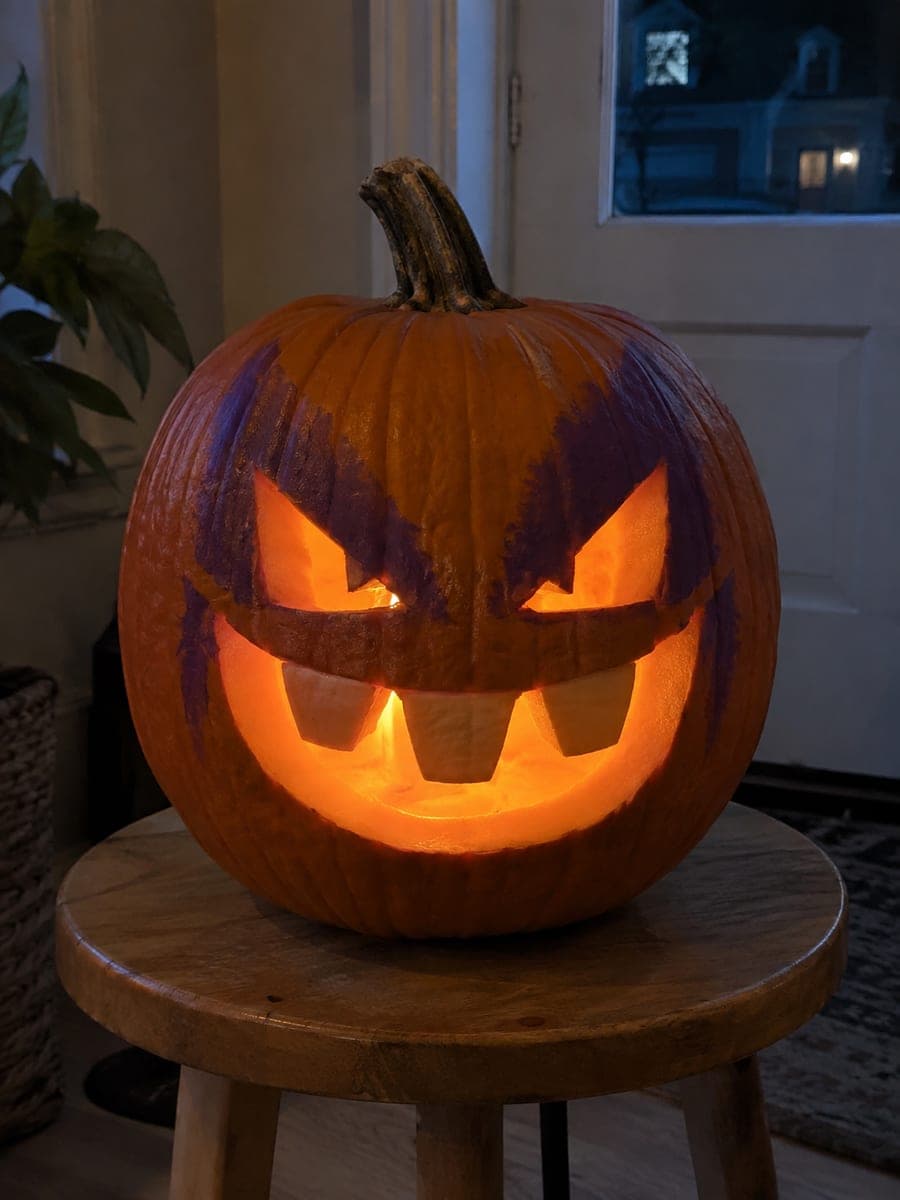
Easy Gengar Pumpkin Carving with Jagged Grin CutoutsAI
0

Report this carving

Tell us what is wrong. Reports are private.

Easy Gengar Pumpkin Carving with Jagged Grin Cutouts

Gengar's wide grin and half-moon eyes glow through cut-through main apertures on this easy Gengar pumpkin carving idea, retained pupils and tooth silhouettes broadly rooted to the shell keeping the menacing expression intact. Small surface accents are shallow back-carved rather than fully cut through for added detail without weakening the rind. A purple-tinted battery light inside captures Gengar's signature ghostly color better than a standard candle.

No ratings yet · Sign in to rate
Comments (0)

  • No comments yet — be the first.

Save without an account. Sign in to like or comment.

Our tips for carving a similar design

Gengar's half-moon eyes and wide jagged grin are the two features that make the character instantly recognizable, and both use the same structural principle: cut-through apertures with retained pupils and tooth silhouettes broadly rooted to the surrounding shell. Small surface accents add body texture without weakening the rind. A purple-tinted LED battery light inside captures Gengar's signature ghostly color and distinguishes this carving from a generic jack-o-lantern.

From pumpkin to porch

  1. Prep and transfer

    Scoop from the back and thin walls to about an inch. Transfer the stencil with a pounce wheel, clearly marking the retained pupil anchor points inside the eye apertures and the root connections of each tooth. These anchors are the structural core of the design.

  2. Cut the half-moon eye apertures

    Use a fine detail saw to cut the half-moon eye openings, leaving each retained pupil broadly connected to the upper eyelid rind. Gengar's eyes have a distinctive downward-curved lower edge, so follow the stencil arc carefully. Remove each eye slug cleanly.

  3. Cut the grin with retained teeth

    Cut the outer grin boundary first with a medium carving saw, then work between each tooth with the fine detail saw, keeping every tooth broadly rooted to the lip rind. Gengar's teeth are jagged and varied in size, so check the stencil carefully before each inter-tooth cut to confirm which rind stays retained.

  4. Cut any remaining body apertures

    Open any additional body or cheek apertures defined on the stencil using the appropriate saw size. Work from largest to smallest.

  5. Add shallow surface accents

    Use a narrow gouge or linoleum cutter to add the small surface accent marks. Keep all backing depth under a third of the rind thickness. These marks add the slightly mottled, ghostly texture of Gengar's body without creating any fragile pieces.

  6. Light and display

    Place a purple-tinted battery LED light inside and view from across a darkened room. The half-moon eyes and jagged grin should read immediately as Gengar. Apply petroleum jelly to all cut and grooved surfaces. Display at eye level for maximum effect.

Written with AI to match this design

Gather your supplies

Check things off as you get ready.

Work on a stable surface, keep your free hand out of the cutting path, and have an adult handle sharp tools.

Three levels of light

  • Leave intact

    Retained pupils and the rind between each tooth base remain dark

  • Peel & shade

    Small surface accent marks across the face are shallow-backed to cream flesh for subtle mid-glow body texture

  • Cut through

    Half-moon eye apertures, full grin opening with jagged tooth gaps, and any additional body apertures are fully cut through

Learn the carving basics

Before you start cutting

Where can I find a purple-tinted LED for this design?

Purple or violet LED tea lights and battery-powered puck lights are available at most craft stores and online retailers in October. Alternatively, a standard white LED inside a pumpkin with a small piece of purple cellophane wrapped loosely around it produces a convincing purple glow. Replace the cellophane every day or two as the heat can slightly discolor it.

Gengar's teeth are different sizes. Does that change the cutting approach?

Larger teeth need wider root connections to the lip rind for proportional support, while smaller teeth need narrower roots. Scale the root width to roughly match the base width of each tooth as shown on the stencil. Cutting the largest teeth first establishes the overall grin scale before you work the smaller jagged teeth around them.

Can I add Gengar's pointed ears as shallow-backed shapes at easy level?

Yes. Score the ear outlines at the top of the pumpkin with a gouge, removing just the orange skin to reveal cream flesh. Keep both ears as backed surface marks at easy level rather than through-cuts to avoid creating thin, fragile projections. Backed ear shapes still read clearly as part of the character at typical display distances.

Your take belongs here, too.

Changed a detail? Made it simpler? Share a photo of your version and tell the community what worked.

Share your pumpkin

More pumpkins like this

You've reached the end · 8 pumpkins
The Patch Report

Fresh pumpkins, in your inbox.

The best new carvings, ideas worth stealing, and how-tos for carving season. Short, seasonal, and gone by November.

A short email during carving season. Unsubscribe anytime. See our privacy policy.