Halloween Pumpkin Carving Contest · Starts October 1st · $500 in prizes
← Back to ideas
@ai_concepts
Sep 25, 2026
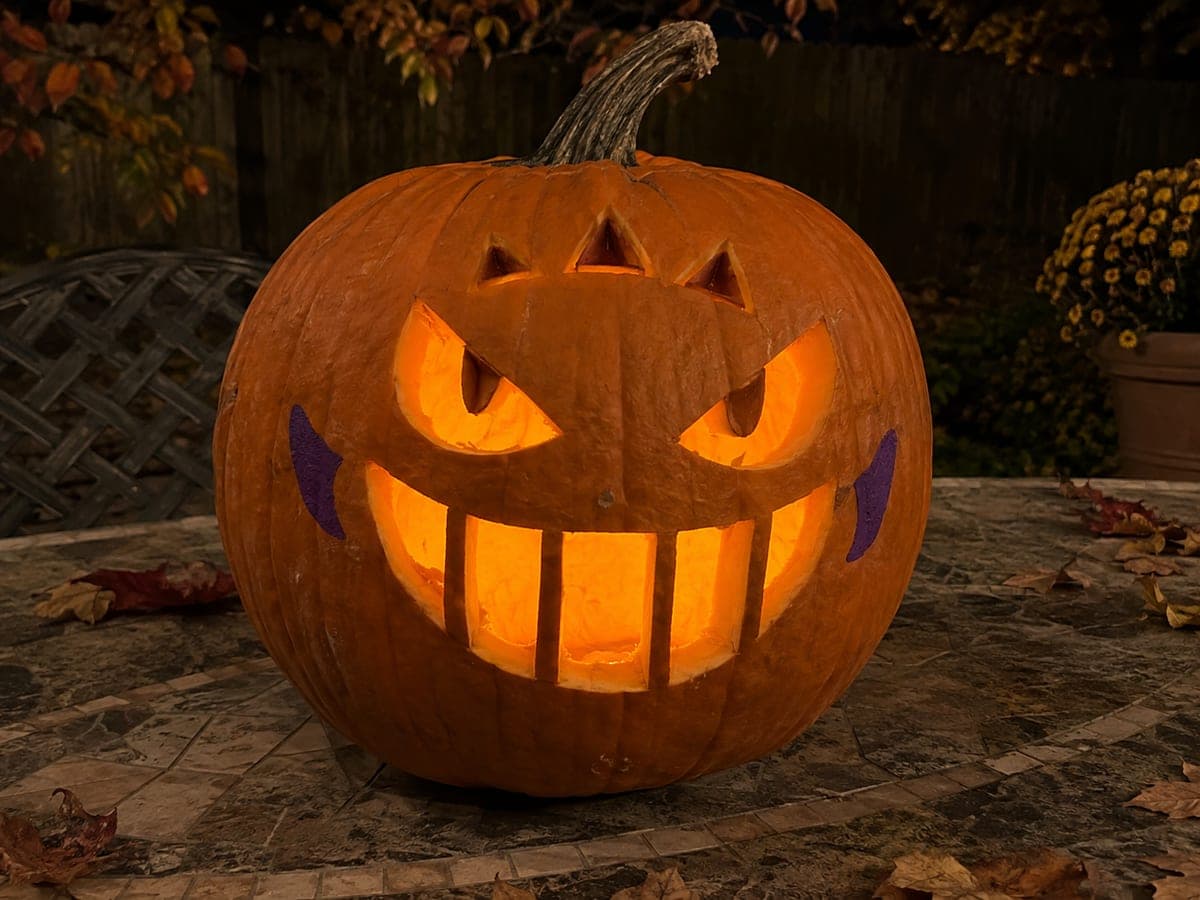
Expert Gengar Pumpkin with Full Portrait and Shadow TextureAI
0

Report this carving

Tell us what is wrong. Reports are private.

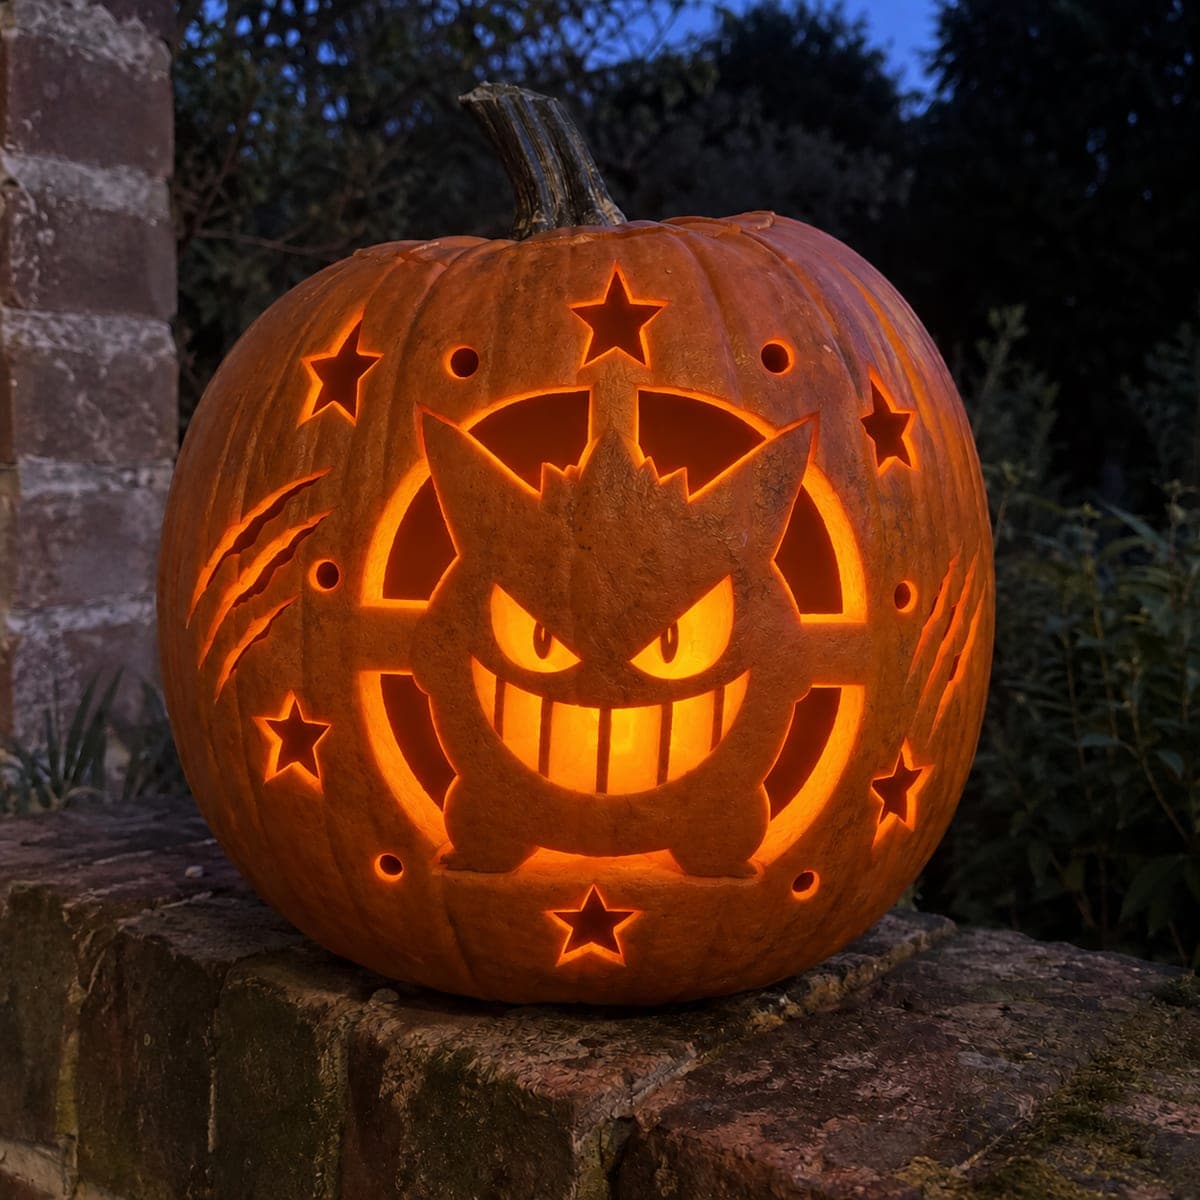
Expert Gengar Pumpkin with Full Portrait and Shadow Texture

This expert Gengar pumpkin carving idea achieves a detailed full-portrait look with cut-through main apertures, retained pupils and teeth on wide rind bridges, and shallow back-carved surface accents adding shadow texture across the ghost's body. Every retained piece has at least two structural connections to the surrounding shell. Plan the bridge positions before you start cutting so no tooth or eye detail is left floating mid-carve.

No ratings yet · Sign in to rate
Comments (0)

  • No comments yet — be the first.

Save without an account. Sign in to like or comment.

Our tips for carving a similar design

This full-portrait build combines cut-through apertures for maximum glow with retained pupils, teeth, and body sections that each connect to the shell on at least two wide bridges. A layer of shallow back-carved shadow accents across the body surface adds depth without adding structural risk. The key is planning every bridge position on the stencil before any cutting begins so no critical connection is accidentally severed.

From pumpkin to porch

  1. Map every bridge before you start

    Lay your pattern flat and circle each retained piece, marking where its bridges contact the shell. At this difficulty the bridges are narrow, so knowing their exact positions prevents accidental cuts. Transfer the full pattern to the pumpkin surface with a pin tool, and re-draw any bridge marks that are hard to see before picking up a saw.

  2. Hollow to a consistent depth

    Remove the interior pulp and thin the walls evenly to about three-quarters of an inch. Expert-level designs have many small retained pieces, and uneven walls create weak spots where the rind could crack under saw pressure. Use a large metal spoon or a pumpkin scoop and check thickness periodically by pressing a thumbtack through from inside.

  3. Cut the large background apertures first

    Start with the widest open areas of the body, the sections that will ultimately frame the portrait. Removing these large pieces first reduces total rind tension and gives you a clear view of the negative space the portrait will occupy. Keep every saw stroke short and deliberate, and adults should handle all cutting throughout.

  4. Work through the facial details

    Move to the eye openings, preserving the retained pupils on wide double-anchored bridges. Cut the mouth apertures next, leaving each tooth rooted to both the upper and lower lips. The rib details along the body come after the face so any slight flex in the rind from facial cuts settles before you address the body ribs.

  5. Back-carve the shadow accents

    Using a Dremel ball bit or a V-gouge, carve the surface accents roughly halfway through the rind wall. Work from the outer edges of each accent shape toward the center to avoid undercutting a bridge. Hold a flashlight behind the wall to judge depth: a warm ambient glow without a full hole is the target.

  6. Light, photograph, and preserve

    Insert a bright LED on a timer so the design glows each night automatically. Rub the cut edges lightly with petroleum jelly to slow dehydration of the exposed rind. Photograph the final piece from directly in front in a fully dark room to capture the portrait effect at its best.

Written with AI to match this design

Gather your supplies

Check things off as you get ready.

Work on a stable surface, keep your free hand out of the cutting path, and have an adult handle sharp tools.

Three levels of light

  • Leave intact

    Retained pupils, tooth segments, rib silhouettes, and the bounding body outline remain uncut and read as dark graphic shapes

  • Peel & shade

    Shallow back-carved shadow accents across the body and face glow softly as a mid-tone layer

  • Cut through

    All main portrait apertures and large body openings are fully cut through for maximum brightness

Learn the carving basics

Before you start cutting

How do I prevent the portrait from collapsing partway through a multi-hour carve session?

Keep a spray bottle of cold water nearby and mist the cut surface lightly every thirty minutes to slow dehydration and maintain rind flexibility. Avoid leaving the pumpkin in direct sunlight between sessions. Refrigerating the whole pumpkin overnight if you split the project across two days also helps it stay firm.

Some of my retained pieces feel wobbly after cutting. Should I glue them?

A wobbly piece usually means a bridge has thinned too much during cutting. Rather than gluing, check whether a shallow back-carved groove could link the loose piece back to adjacent stable rind. If the piece is truly free, use a round toothpick as a pin pressed horizontally through both the piece and the shell wall to re-anchor it.

Is there a way to make the shadow accents look more even?

Consistent bit pressure and a slow, steady Dremel speed produce the most uniform depth. Practice the back-carving motion on a flat scrap of pumpkin wall before working on the face. You can also score the outline of each accent shape with a sharp knife first, then scoop the interior with a gouge, which gives cleaner edges than freehand Dremel work alone.

Your take belongs here, too.

Changed a detail? Made it simpler? Share a photo of your version and tell the community what worked.

Share your pumpkin

More pumpkins like this

You've reached the end · 8 pumpkins
The Patch Report

Fresh pumpkins, in your inbox.

The best new carvings, ideas worth stealing, and how-tos for carving season. Short, seasonal, and gone by November.

A short email during carving season. Unsubscribe anytime. See our privacy policy.