Halloween Pumpkin Carving Contest · Starts October 1st · $500 in prizes
← Back to ideas
@ai_concepts
Sep 14, 2026
Egyptian Pharaoh Mask PumpkinAI
0

Egyptian Pharaoh Mask Pumpkin

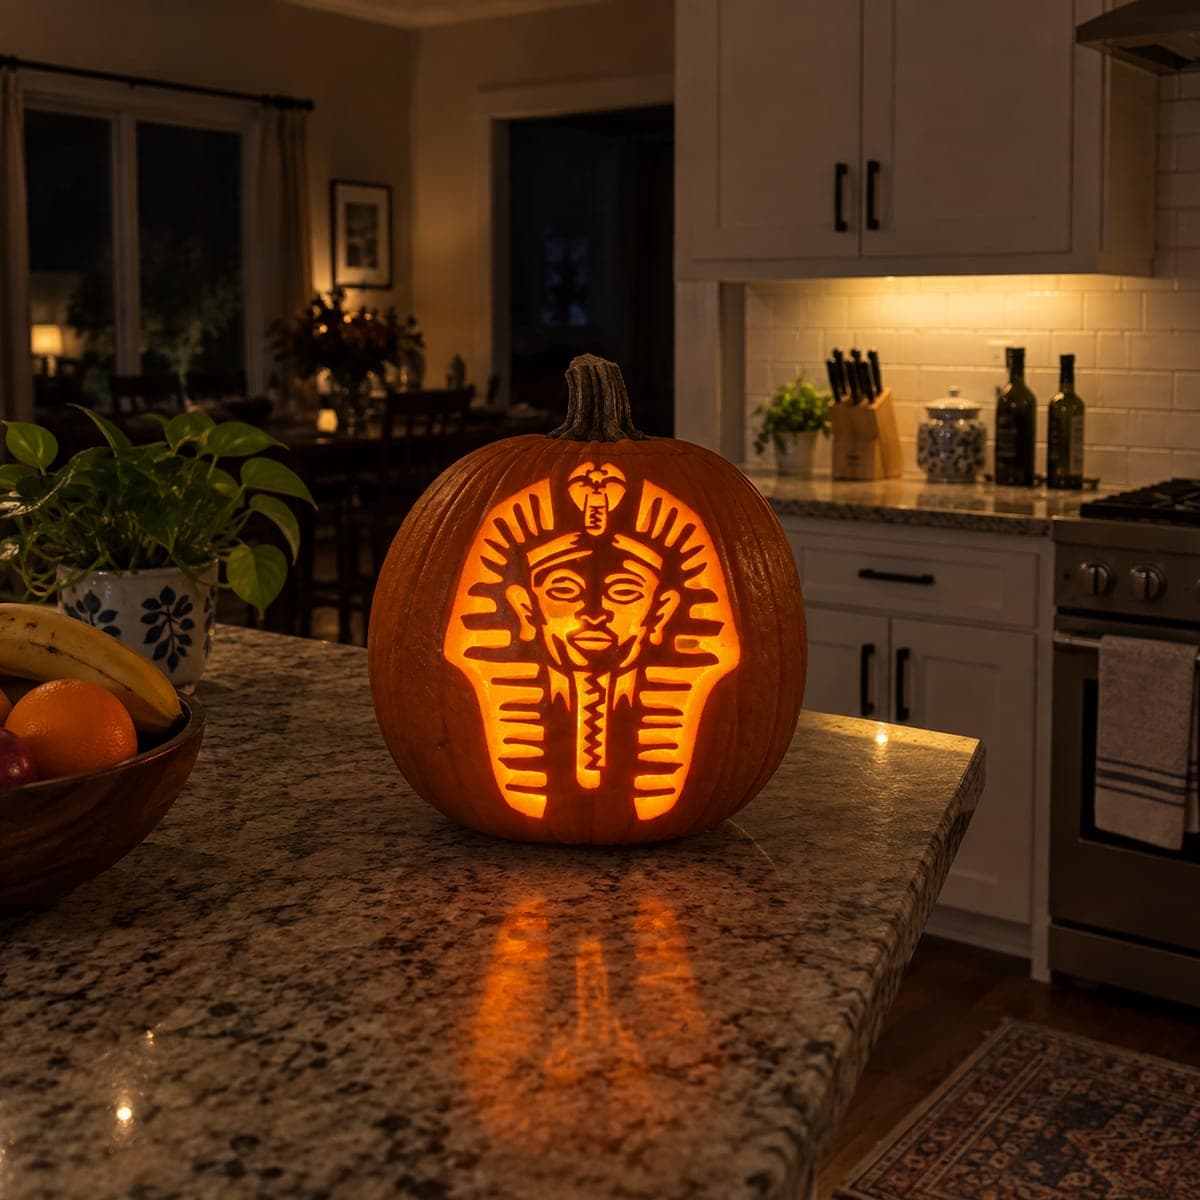
A frontal Egyptian pharaoh death mask with a nemes headdress, uraeus cobra at the crown, and detailed facial features fills the pumpkin face with deep-cut shading lines and multiple levels of relief. The striped headdress lappets, the cobra, and the facial features are carved at varying depths rather than cut all the way through, revealing lighter and darker tones as the rind thins in this shading technique. Work the deepest relief cuts on the face first, then peel the headdress stripes to a medium depth so the light graduation reads from the inside out.

This is an AI-generated concept image: a realistic, carvable design idea rather than a photo of a finished carve. AI concepts are always labeled and sit out the leaderboard and the contest.

No ratings yet · Sign in to rate
Comments (0)

  • No comments yet — be the first.

Save without an account. Sign in to like or comment.

Our tips for carving a similar design

The core trick here is relief shading, where you thin the rind to different depths instead of cutting all the way through. The nemes headdress stripes, the cobra at the crown, and the facial features each sit at their own depth so light graduates from dim to bright as the skin gets thinner. Plan the whole face before you start, since once you commit to a depth you cannot add rind back.

Written by PumpkinCarvingIdeas.com, inspired by the image above. These are our suggestions, not instructions from the uploader. This approach to the AI concept has not been tested on a real pumpkin.

From pumpkin to porch

  1. Pick a tall pumpkin and cut a back access hole

    Choose a large, evenly round pumpkin with a smooth front panel and no soft spots. Cut a wide access opening in the back rather than the top so the front stays intact for the mask. Scrape the inside wall behind the face down to about one inch thick with a loop tool. A thinner, even wall makes shading depths far easier to read from the inside.

  2. Transfer the pharaoh stencil cleanly

    Tape your pharaoh mask pattern flat against the front and poke the outlines through with a pin or transfer wheel. Mark which zones are deep relief, which are medium peels, and which are full cutouts so you do not lose track. The symmetry of the headdress matters, so check that both lappets line up before you cut. Take a photo of the marked pumpkin as a reference for depth.

  3. Carve the deepest facial relief first

    Start with the face itself, the eyes, nose, and lips, using a small detail knife or a fine loop tool. Shave these areas so the rind is thin enough to glow softly but never punched through. Work slowly and keep your non-cutting hand clear of the blade path. Doing the delicate face first means the pumpkin is still firm and stable.

  4. Peel the headdress stripes to medium depth

    Move to the nemes headdress and skin the stripe bands to a medium depth for a mid orange glow. Leave the ridges between stripes as untouched skin so the stripe pattern reads as dark lines against light. Keep each stripe an even thickness so the graduation looks intentional. The cobra at the crown gets a shallow peel too, with its outline scored for definition.

  5. Add the brightest cutouts last

    If your pattern calls for a few true openings, such as thin accent lines framing the face, cut those all the way through now that the shading is done. Cutting openings last keeps the panel strong while you do the fussy shading work. Support the rind with your fingers around each cut and use short, controlled strokes. Keep any thin slivers connected with small bridges so nothing sags or breaks.

  6. Light it and take your photo

    Set a battery LED puck or string inside, never a candle, since the thinned rind can scorch. Test the glow in a dark room and touch up any spots that read too flat by shaving a little deeper. A single warm LED close to the front wall pushes the most light through the shaded face. Snap your photo the same night, because shaded pumpkins dry and dull within a day or two.

Gather your supplies

Check things off as you get ready.

Work on a stable surface, keep your free hand out of the cutting path, and have an adult handle sharp tools.

Three levels of light

  • Leave intact

    The ridges between the headdress stripes and the outer background stay as untouched skin for the darkest tone.

  • Peel & shade

    The nemes stripes, the cobra, and the facial shading are peeled to medium depth for a soft mid orange glow.

  • Cut through

    Only a few thin accent lines framing the mask are cut all the way through for the brightest light.

Learn the carving basics

Before you start cutting

This is a concept image, so can a pumpkin really hold this much fine detail?

Yes, a design like this is carvable, but success depends on relief shading rather than cutting everything through. Keep the face and stripes as thinned skin so the rind stays connected and strong. Reserve true openings for just a few thin accents so the front panel does not weaken.

How do I keep the headdress stripes even?

Mark every stripe on the stencil before you scrape and decide on one target depth for all of them. Peel each band the same amount and leave the ridge between them as full skin. Checking your progress with the light on helps you catch any stripe that has gone too thin.

What is the best way to handle the cobra at the crown?

Treat the uraeus cobra as a shallow relief element rather than a cutout so its small shape stays supported. Score its outline first, then peel the body to a light medium depth. Keeping it attached to the surrounding skin prevents the delicate curve from cracking off.

Your take belongs here, too.

Changed a detail? Made it simpler? Share a photo of your version and tell the community what worked.

Share your pumpkin

More pumpkins like this

You've reached the end · 8 pumpkins
The Patch Report

Fresh pumpkins, in your inbox.

The best new carvings, ideas worth stealing, and how-tos for carving season. Short, seasonal, and gone by November.

A short email during carving season. Unsubscribe anytime. See our privacy policy.