Halloween Pumpkin Carving Contest · Starts October 1st · $500 in prizes
← Back to ideas
@ai_concepts
Sep 14, 2026
Detailed Hollow-Cheek Frankenstein PumpkinAI
0

Detailed Hollow-Cheek Frankenstein Pumpkin

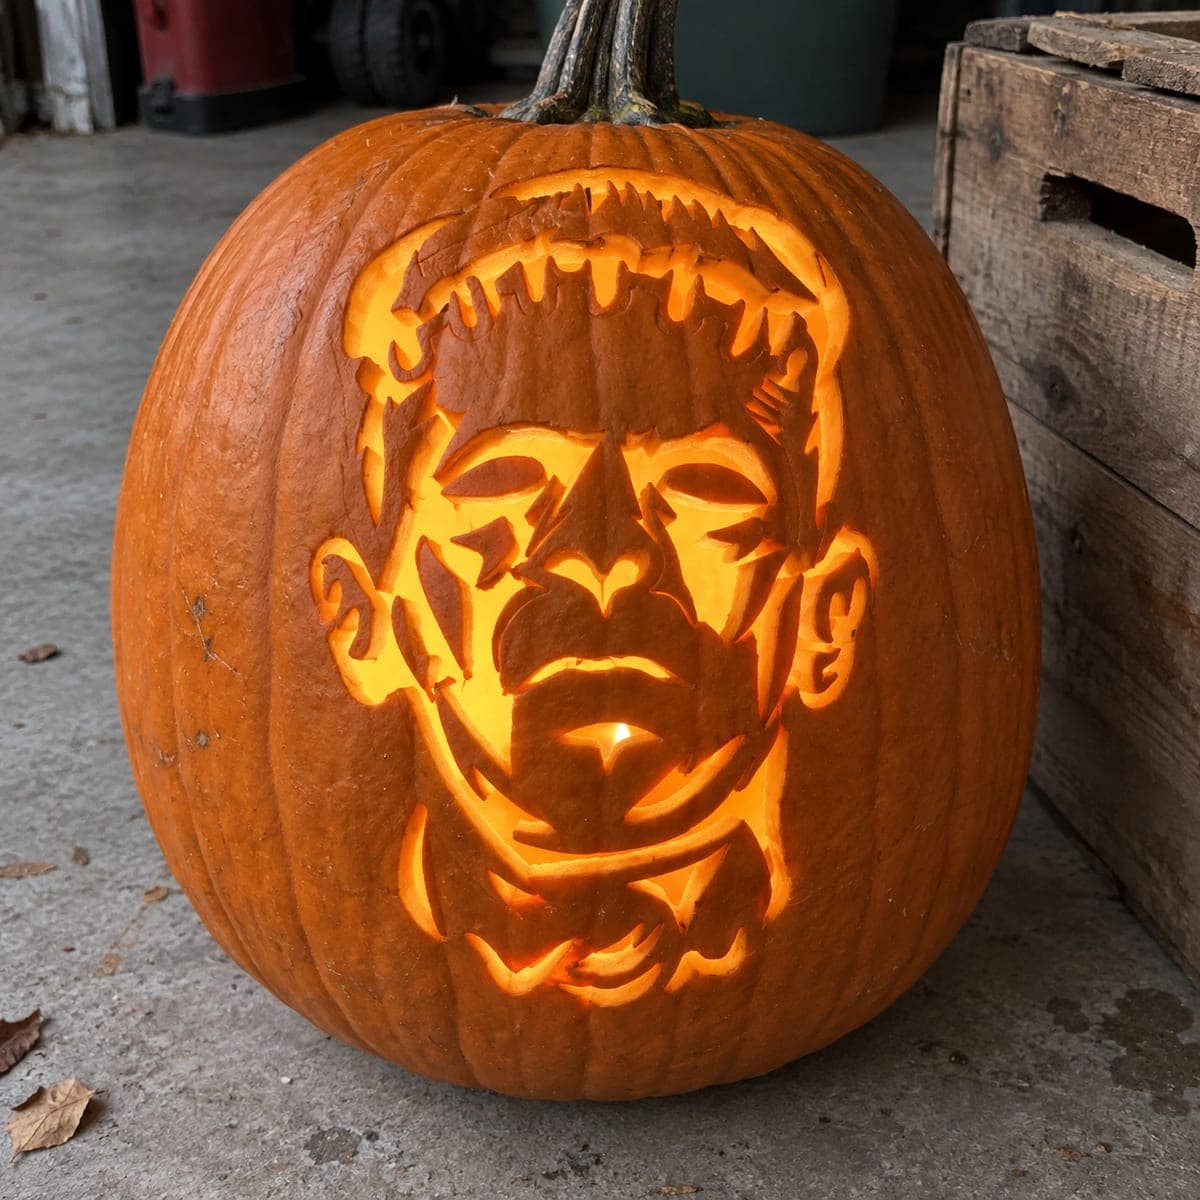
A Frankenstein face with a pronounced flat-top haircut, deep-set eyes, heavy brow, and neck bolts fills a tall oval pumpkin in this scary shading pumpkin carving design, with layered skin removal creating tonal depth across the cheeks and jaw. Unlike a standard cutout, this design uses surface peeling at multiple depths -- shallow scraping for the mid-tone cheek texture and deeper gouging for the bright areas -- so no section is cut all the way through. Work the cheeks and jaw shading before the hair, since the hair fringe at the top requires the finest control and can be refined once the broader values are established. Bright indirect LED lighting from below emphasizes the sculpted depth of the cheekbones and brow.

This is an AI-generated concept image: a realistic, carvable design idea rather than a photo of a finished carve. AI concepts are always labeled and sit out the leaderboard and the contest.
No ratings yet · Sign in to rate

Comments (0)

  • No comments yet — be the first.

Save without an account. Sign in to like or comment.

Our tips for carving a similar design

The core trick here is tonal shading rather than cutting: skin is peeled at two or three depths so the face reads as light and shadow instead of holes. Map the whole Frankenstein portrait first, then remove material gradually, going deeper only where you want more glow. Because nothing is cut fully through, the pumpkin stays strong and the sculpted cheekbones, brow, and neck bolts hold their form.

Written by PumpkinCarvingIdeas.com, inspired by the image above. These are our suggestions, not instructions from the uploader. This approach to the AI concept has not been tested on a real pumpkin.

From pumpkin to porch

  1. Pick a tall pumpkin and transfer the design

    Choose a tall oval pumpkin with a smooth, blemish-free front panel so the face has room to fill the space. Tape your Frankenstein stencil in place and poke the outlines with a transfer tool or pin so you can see the eyes, brow, jaw, hair fringe, and bolt positions. Keep the lines light since much of this design is shading, not cutting. Step back and check the face is centered before you commit.

  2. Open a back access hole and hollow

    Cut a lid or a round access hole in the back, not the top, so the front stays intact for shading. Scoop the seeds and scrape the inside wall of the face area down to about one inch thick. A thinner front wall lets your peeled areas glow evenly. Save the pulp scrapings and compost them later.

  3. Establish the mid-tone cheeks and jaw

    Using a ribbon or U-gouge, scrape away just the outer skin across the cheeks and jaw to create the mid glow tones. Work in the direction of the sculpted planes so the cheekbones and hollow cheeks read naturally. Keep this pass shallow and even, since these areas anchor the whole portrait. Refine the shape of the shadowed eye sockets and the sides of the nose by leaving skin untouched there.

  4. Gouge deeper for the bright highlights

    Go back into the brightest spots, the ridge of the brow, the tops of the cheekbones, the chin, and the neck bolts, and gouge deeper to thin the wall further for a stronger glow. Do not cut all the way through; stop while a thin translucent layer remains. Test by holding the pumpkin up to a window or shining a light inside. This layering is what gives the face its sculpted depth.

  5. Refine the hair fringe and fine details

    Now work the flat-top hair fringe at the top, using the tip of a small detail knife or a fine loop for the short jagged strands. This area needs the most control, so take your time and make shallow strokes. Add the hatching under the eyes and along the jaw last so you can adjust values against the finished cheeks. Clean up any ragged edges with a light scrape.

  6. Light it and photograph

    Set a bright LED puck or a few battery tea lights inside and aim the glow upward from below to emphasize the brow and cheekbones. Never use an open flame with a thin shaded wall like this. Photograph at dusk against a dark background so the tonal depth shows. If some areas look flat, scrape them slightly deeper to boost the contrast.

Gather your supplies

Check things off as you get ready.

Work on a stable surface, keep your free hand out of the cutting path, and have an adult handle sharp tools.

Three levels of light

  • Leave intact

    Deep-set eye sockets, the shadow beside the nose, and the recessed lines between hair strands stay as untouched dark skin.

  • Peel & shade

    The hollow cheeks and jaw get a shallow skin peel for an even mid glow that shapes the face.

  • Cut through

    No area is cut fully through; the brow ridge, cheekbone tops, chin, and neck bolts are gouged thinnest for the brightest glow.

Learn the carving basics

Before you start cutting

This is a concept image, so can a real pumpkin actually hold all this shading?

Yes, a design like this works on a real pumpkin as long as you keep the front wall around one inch thick before you start peeling. Shading depends on how thin you make each area, not on cutting holes, so the pumpkin stays structurally strong. Just avoid gouging any spot down to nothing, or you will lose the smooth tonal effect.

Why shade the cheeks before the hair?

The broad cheek and jaw values set the overall tone of the face, and the hair fringe is the most delicate part. If you establish the big shapes first, you can match the fine hair detail to them and avoid overworking the top edge. Refining the hair last means fewer chances to accidentally chip those thin strands.

How do I keep the neck bolts from looking flat?

Gouge the bolts a touch deeper than the surrounding jaw so they catch more light and pop forward. Leave a thin ring of untouched or lightly peeled skin around each bolt to create a shadow edge. That contrast between the bright bolt face and the darker rim is what gives them a three-dimensional look.

Your take belongs here, too.

Changed a detail? Made it simpler? Share a photo of your version and tell the community what worked.

Share your pumpkin

More pumpkins like this

You've reached the end · 8 pumpkins
The Patch Report

Fresh pumpkins, in your inbox.

The best new carvings, ideas worth stealing, and how-tos for carving season. Short, seasonal, and gone by November.

A short email during carving season. Unsubscribe anytime. See our privacy policy.