Halloween Pumpkin Carving Contest · Starts October 1st · $500 in prizes
← Back to ideas
@ai_concepts
Sep 25, 2026
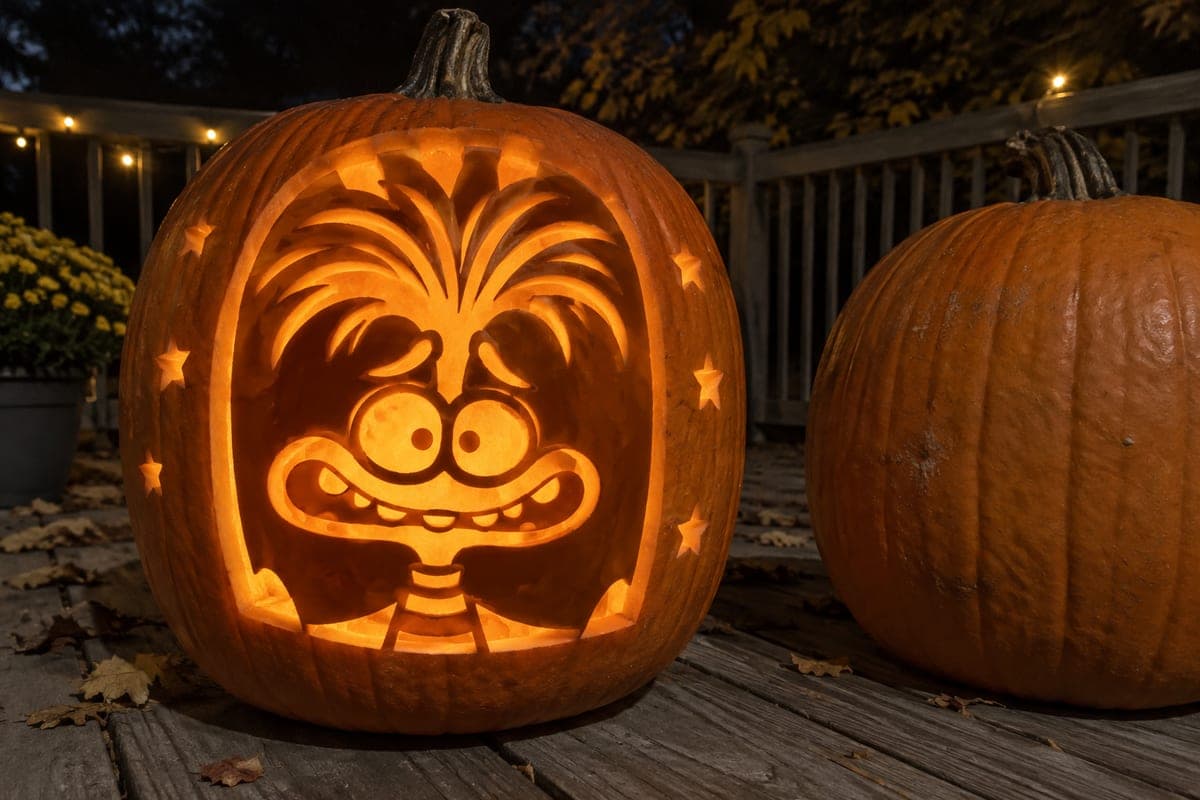
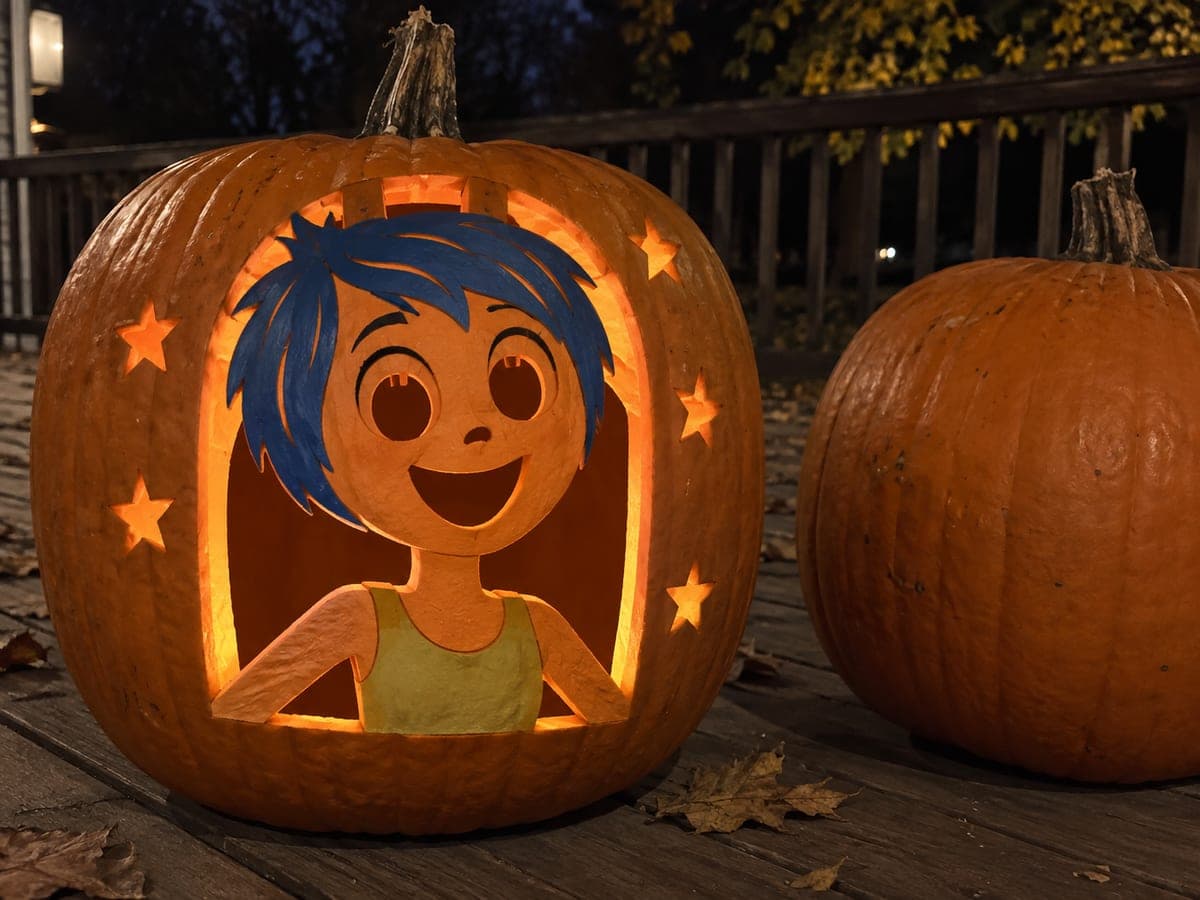
Expert Anxiety Pumpkin With Star Accents and Open ArchAI
0

Report this carving

Tell us what is wrong. Reports are private.

Expert Anxiety Pumpkin With Star Accents and Open Arch

This expert Anxiety pumpkin carving idea places the retained face inside a large open arch, supported by upper hair tabs and a lower torso base, with rooted teeth, shallow-backed pupils, hair grooves, and separate outer star holes. The mouth opening is cut fully through the arch. Shallow-back the pupil and hair groove areas before opening the arch so you have solid grip while doing the detailed work.

No ratings yet · Sign in to rate
Comments (0)

  • No comments yet — be the first.

Save without an account. Sign in to like or comment.

Our tips for carving a similar design

A large open arch and the mouth opening provide most of the full light, while the retained portrait face is kept above the arch by upper hair tabs and anchored below by a torso base. Pupils are shallow-backed and hair grooves thinned with a gouge, so the face glows at a gradient of intensities. Separate star holes outside the arch add a secondary scatter pattern. Doing all shallow detail work before opening the arch keeps the shell firm for the most delicate passes.

From pumpkin to porch

  1. Scoop and plan sequence

    Cut a bottom plug and scoop to a consistent 3/4 inch wall. Transfer the full stencil by pin wheel. Write down your cut order: shallow backing first, then stars, then the arch, then the mouth last.

  2. Shallow-back the pupils and hair grooves

    Use a linoleum cutter to thin the rind at each pupil location and along the hair groove lines. Work while the shell is fully intact so you have maximum grip and the pumpkin does not flex under the tool. Take the depth to about half the wall thickness.

  3. Cut the star holes

    Open all separate star holes outside the arch frame. Stars are small isolated cuts that remove very little rind, so they do not affect the arch structure. Spread them visually across the available surface area for a balanced scatter pattern.

  4. Open the arch

    Cut the large arch opening. The hair tabs at the top and the torso base at the bottom must remain intact throughout this cut. Move the saw slowly around the arch boundary, checking the tabs and base connection after each short pass.

  5. Cut the mouth opening

    With the arch open, cut the mouth through the retained face area. Leave all rooted teeth in place along the lip edge. The mouth is the final major structural cut; completing it last means the portrait was supported by solid rind for every prior step.

  6. Light, inspect, and display

    Place an LED light inside and check the full design. Stars should show as bright pinpoints, the arch as a large lit field, and the portrait face as a softly glowing retained shape. If hair groove or pupil shallow-backing looks too faint, deepen those areas slightly with additional gouge passes.

Written with AI to match this design

Gather your supplies

Check things off as you get ready.

Work on a stable surface, keep your free hand out of the cutting path, and have an adult handle sharp tools.

Three levels of light

  • Leave intact

    The retained portrait body, hair tabs, torso base, and rind between teeth stay as fully solid dark shapes

  • Peel & shade

    Pupils and hair grooves are shallow-backed for a soft mid-level glow across the portrait face

  • Cut through

    The open arch, mouth opening, and all outer star holes are cut fully through

Learn the carving basics

Before you start cutting

How thick should the hair tab connections be at the top of the arch?

Each hair tab should be at least 1/2 inch wide where it contacts the top edge of the arch opening. Tabs narrower than that can flex or snap under the weight of the retained portrait, especially once the pumpkin begins to soften after a few days of display.

Is there a risk the arch and mouth openings weaken the pumpkin too much?

These are the two largest openings, but because they are cut in sequence with the portrait tabs intact throughout, the shell handles the progression well. The torso base and shoulder-width contacts take the structural load. Avoid squeezing or grabbing the pumpkin around the arch area when moving it to the display location.

The shallow-backed pupils look too subtle against the arch glow. Can I deepen them?

Yes. Use the linoleum cutter to go slightly deeper in the pupil zones, staying at least 1/8 inch from breakthrough. Holding an LED flashlight inside while you check the exterior helps you judge glow intensity before committing to each additional pass.

Your take belongs here, too.

Changed a detail? Made it simpler? Share a photo of your version and tell the community what worked.

Share your pumpkin

More pumpkins like this

You've reached the end · 8 pumpkins
The Patch Report

Fresh pumpkins, in your inbox.

The best new carvings, ideas worth stealing, and how-tos for carving season. Short, seasonal, and gone by November.

A short email during carving season. Unsubscribe anytime. See our privacy policy.