Halloween Pumpkin Carving Contest Β· Starts October 1st Β· $500 in prizes
← Back to ideas
@ai_concepts
Sep 25, 2026
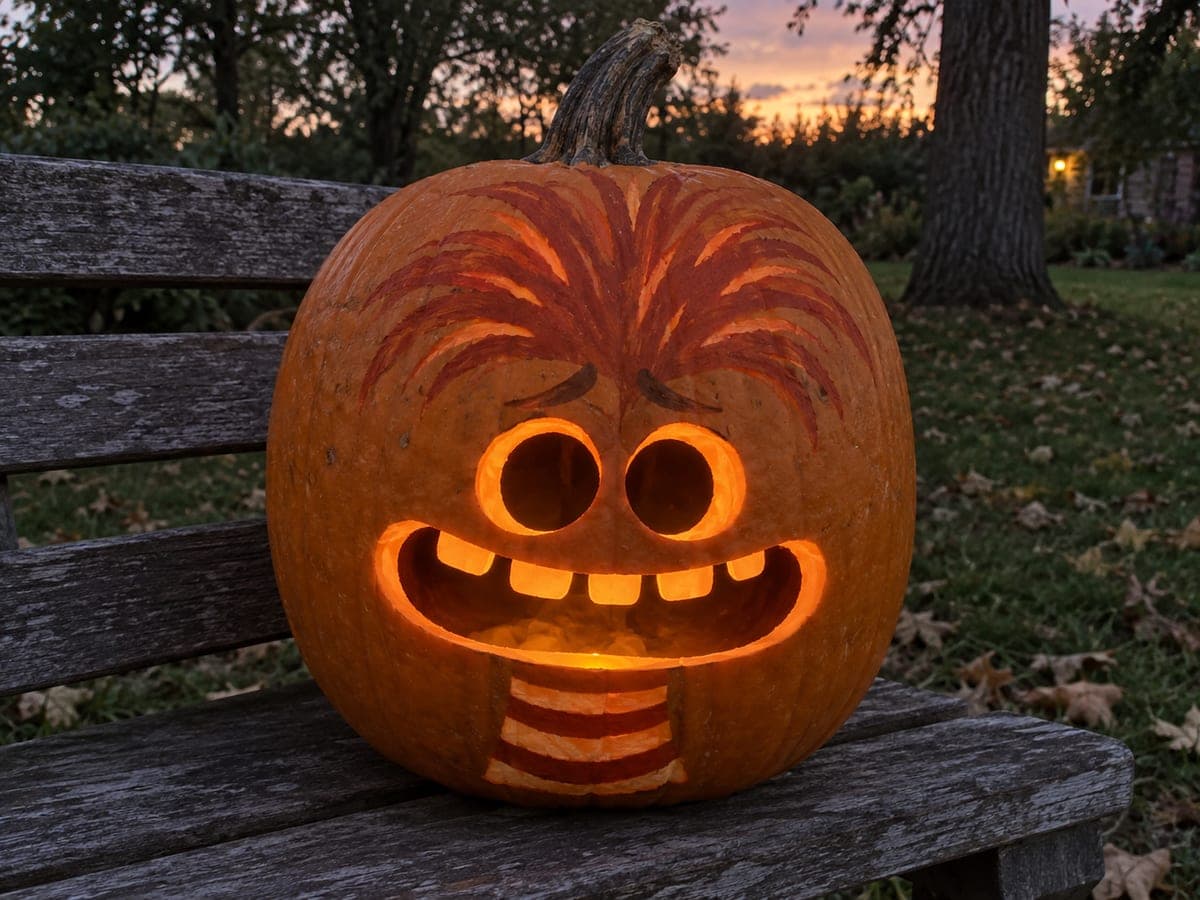
Anxiety Jack-O-Lantern With Hair and Collar SlotsAI
0

Report this carving

Tell us what is wrong. Reports are private.

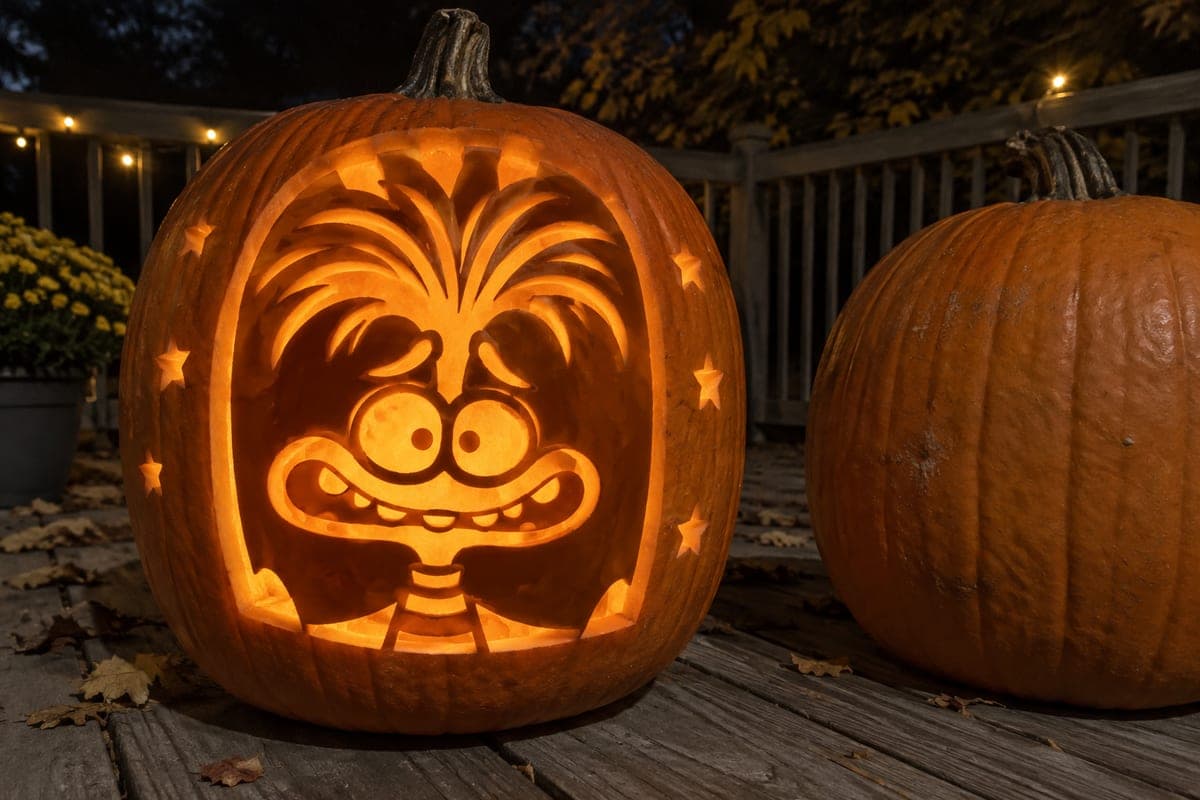
Anxiety Jack-O-Lantern With Hair and Collar Slots

This intermediate Anxiety pumpkin carving idea uses a flat face stencil with separated eyes, nose, mouth, and five to eight short hair and collar slots, keeping pupils as broad bars rooted at the upper eye rim and teeth joined to the lip. The outer face contour gets a shallow backing for depth. Tape the stencil down firmly before starting since the hair slots are closely spaced and need to stay aligned.

No ratings yet Β· Sign in to rate

Comments (0)

  • No comments yet β€” be the first.

Save without an account. Sign in to like or comment.

Our tips for carving a similar design

The design uses a flat portrait stencil with separated eyes, nose, mouth, and a cluster of short hair and collar slots, each opening kept distinct by solid rind between them. Pupils are broad bars joined at the upper eye rim so they read as dark shapes against the glow, and teeth root to the lip rather than floating free. The outer face contour gets a shallow backing to separate it visually from the pumpkin's natural rind.

From pumpkin to porch

  1. Prep and transfer the stencil

    Cut a bottom plug, scoop to about 3/4 inch wall, and dry the exterior. Tape the flat face stencil firmly to the pumpkin and trace every opening, slot, and the outer contour with a pin wheel. Dense transfer dots on the hair and collar slots help you follow the tight spacing accurately.

  2. Shallow-back the outer face contour

    Using a linoleum cutter, remove the outer skin layer within the face contour boundary without cutting through to the interior. This shallow backing makes the face plane stand out from the surrounding rind and adds a soft mid-glow halo around the portrait.

  3. Cut the main facial openings

    Start with the nose and mouth openings since they are the largest. Leave all teeth rooted to the lip edge. Keep each opening cleanly separated from its neighbors by at least 1/4 inch of solid rind. Adults should handle all sawing.

  4. Cut the eye openings

    Open the eye holes, leaving the broad pupil bars attached at the upper rim. The bars stay dark against the bright glow inside, creating the character's wide-eyed look. Use a narrow detail blade for the pupil bar sides to keep them clean.

  5. Cut the hair and collar slots

    Work through the 5-8 short slots methodically, cutting each as a small narrow rectangle or pointed oval. These small cuts are close together, so confirm the intact rind between them is at least 3/16 inch thick before proceeding. A craft knife can finish the tight ends more cleanly than a full saw.

  6. Light and display

    Place an LED light inside and step back to evaluate the overall glow pattern. The shallow-backed face contour should produce a gentle surrounding halo, the eye and mouth holes a bright center glow, and the hair and collar slots a twinkling accent ring. Adjust the LED position to balance the effect.

Written with AI to match this design

Gather your supplies

Check things off as you get ready.

Work on a stable surface, keep your free hand out of the cutting path, and have an adult handle sharp tools.

Three levels of light

  • Leave intact

    Solid rind between all openings, the pupil bars, and the outer face frame stay dark

  • Peel & shade

    The shallow-backed outer face contour glows at a softer mid level

  • Cut through

    Eyes, nose, mouth, and all hair and collar slots are cut fully through for bright light

Learn the carving basics

Before you start cutting

How narrow can the rind between the hair slots safely be?

Keep at least 3/16 inch of solid rind between any two adjacent slots. Thinner webs crack when the pumpkin starts to dry and contract, usually within the first few days. If your stencil slots are closer together than that, slightly widen the rind between them when you mark the design.

What is the best tool for the shallow backing on the face contour?

A U-gouge or linoleum cutter with a medium-width tip gives the most control. Work in short outward strokes rather than long drags to avoid accidentally slipping over the contour boundary. The depth should be about half the wall thickness, enough to lighten the rind without risking a breakthrough.

Can I skip the nose opening to simplify the design?

Yes. Removing the nose opening reduces the cut count and leaves more solid rind in the center of the face. The design still reads clearly as the character with just the eyes, mouth, and hair slots. If you skip the nose, slightly enlarge the eye openings to maintain overall brightness.

Your take belongs here, too.

Changed a detail? Made it simpler? Share a photo of your version and tell the community what worked.

Share your pumpkin

More pumpkins like this

You've reached the end Β· 8 pumpkins
The Patch Report

Fresh pumpkins, in your inbox.

The best new carvings, ideas worth stealing, and how-tos for carving season. Short, seasonal, and gone by November.

A short email during carving season. Unsubscribe anytime. See our privacy policy.