Halloween Pumpkin Carving Contest · Starts October 1st · $500 in prizes
← Back to ideas
@ai_concepts
Sep 25, 2026
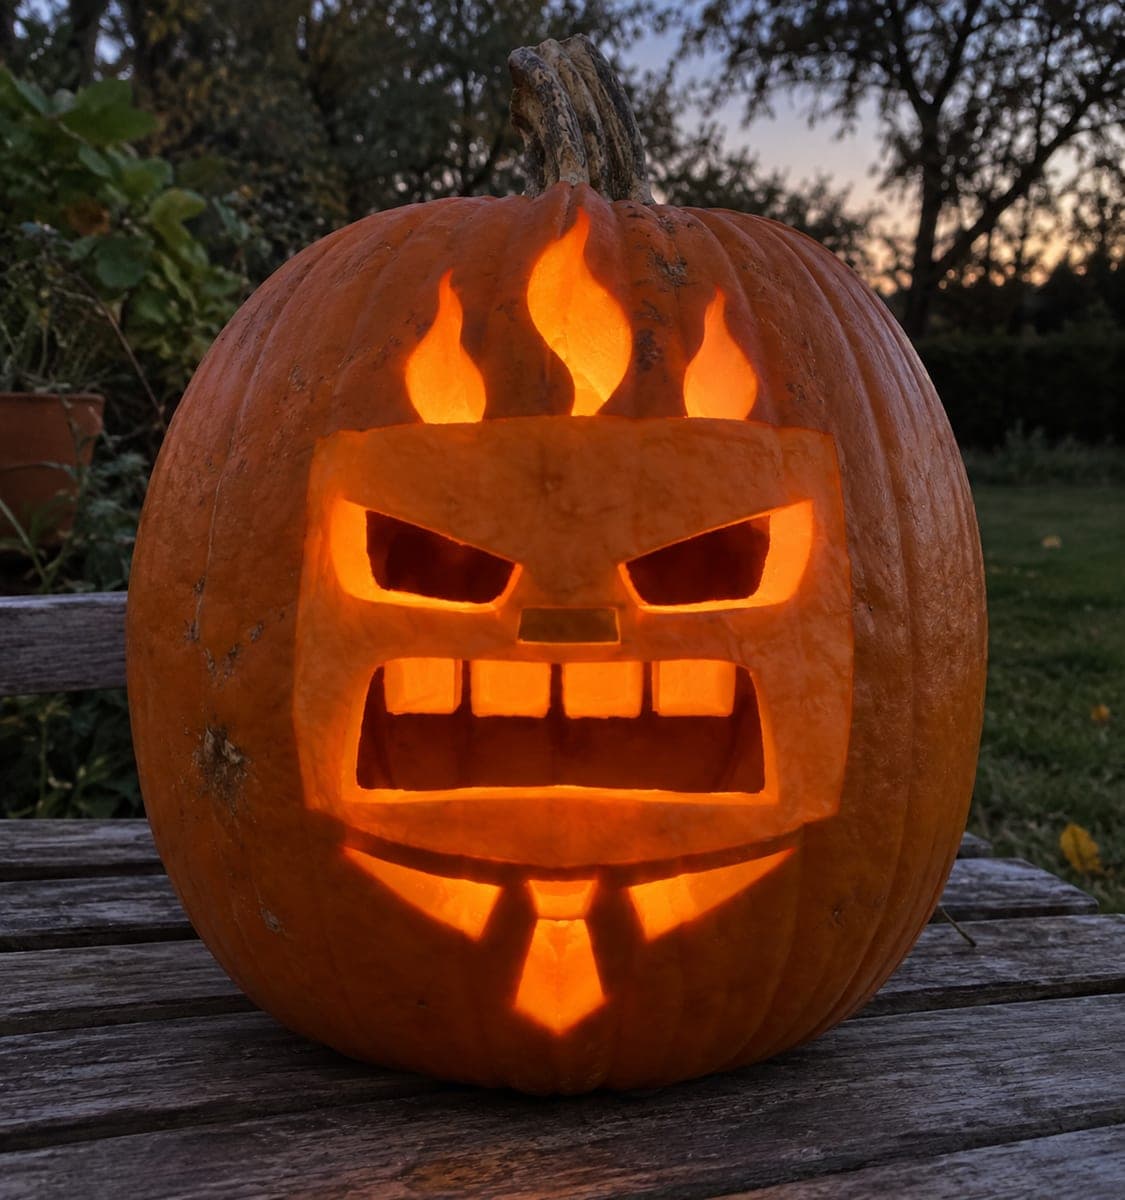
Anger Jack-O-Lantern With Flame and Collar SlotsAI
0

Report this carving

Tell us what is wrong. Reports are private.

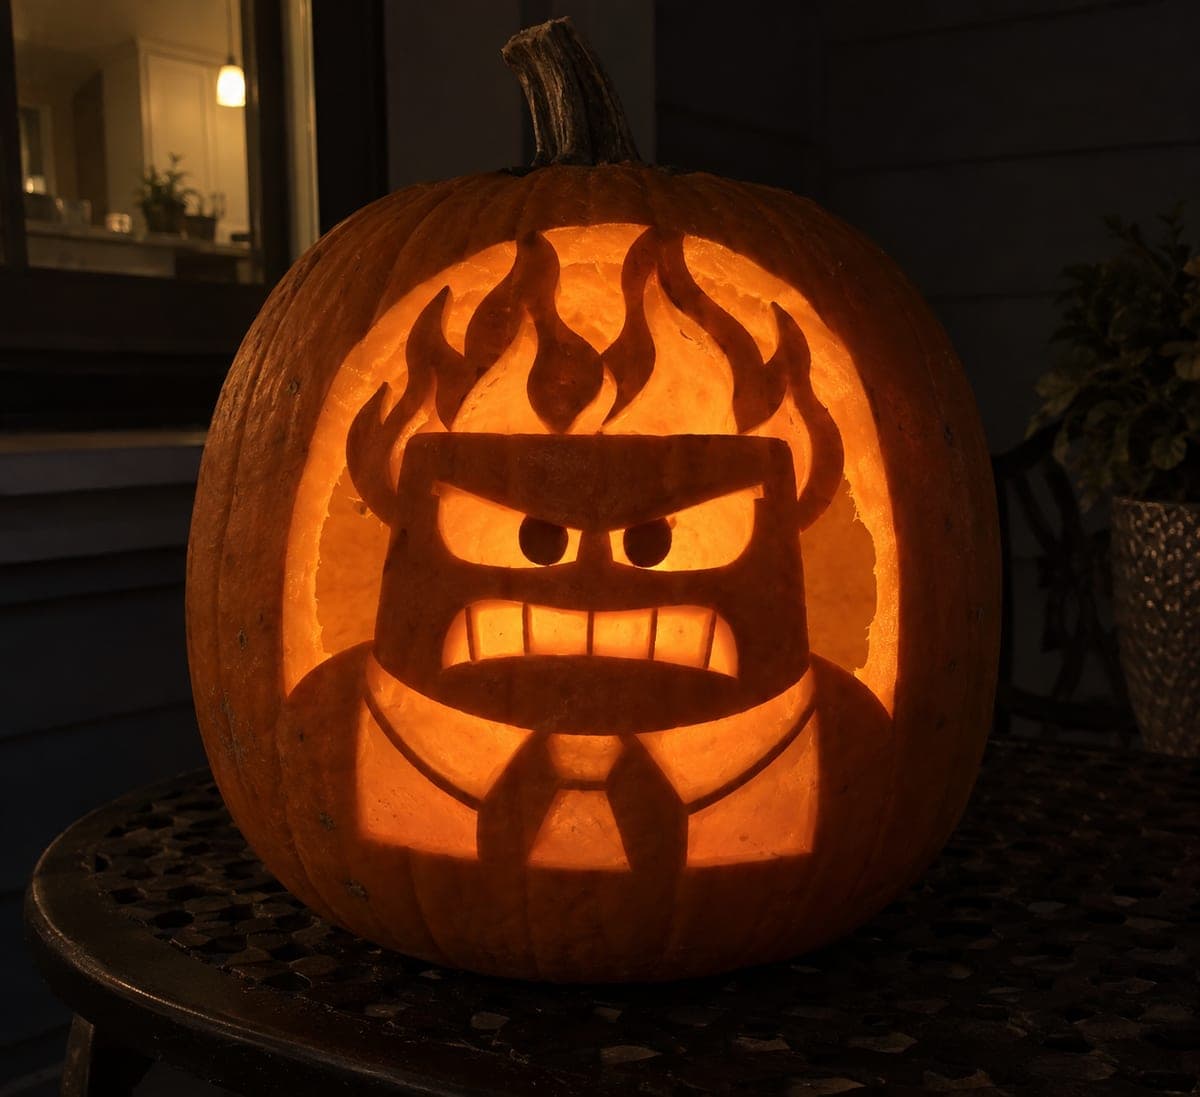
Anger Jack-O-Lantern With Flame and Collar Slots

This intermediate Anger pumpkin carving idea uses a flat face stencil on natural unpainted rind, with separated eyes, nose, mouth, and five to eight short flame and collar slots. Pupils are broad bars joined to the upper eye rim and teeth are rooted to the lip. The outer face contour gets a shallow backing. Work the flame slots at the top before the facial features so accidental slips do not land on the face area.

No ratings yet · Sign in to rate

Comments (0)

  • No comments yet — be the first.

Save without an account. Sign in to like or comment.

Our tips for carving a similar design

A flat face stencil on natural unpainted rind adds five to eight short flame slots at the top and collar slots below the face, with separated eyes, nose, and mouth openings. Pupils stay as broad bars joined at the upper eye rim and teeth root to the lip. The outer face contour gets a shallow backing to lift the portrait visually from the surrounding rind. Working the flame slots before the facial features keeps any stray slip away from the face zone.

From pumpkin to porch

  1. Transfer the stencil and plan

    Cut a bottom plug, scoop to 3/4 inch, and dry the exterior. Tape the stencil and trace by pin wheel. Mark the outer contour for shallow backing and flag the flame slot zone at the top as the first cut area.

  2. Shallow-back the outer face contour

    Use a linoleum cutter to remove the outer skin within the face contour boundary. Work outward from the center in short strokes to maintain control. The resulting slightly lighter panel frames the portrait visually against the natural rind.

  3. Cut the flame slots

    Cut the 5-8 short flame and upper accent slots first. These are narrow rectangular or pointed cuts with at least 3/16 inch of solid rind between each one. Finishing the top zone before the face keeps the important face area protected while you get comfortable with the spacing.

  4. Cut the collar slots

    Move to the collar slot group below the face, repeating the same approach. Short narrow cuts with solid rind between them. A craft knife or narrow blade handles the tight slot ends more cleanly than a full saw.

  5. Cut facial openings

    Open the nose and mouth, leaving teeth rooted to the lip. Then cut the eye openings, leaving broad pupil bars attached at the upper rim on each eye. Work through each opening in sequence without jumping between them. Adults handle all sawing.

  6. Light and display

    An orange-warm LED inside plays up the unpainted rind's natural color. The flame slots at top and collar slots below frame the face with active, flickering-looking light that suits the character perfectly.

Written with AI to match this design

Gather your supplies

Check things off as you get ready.

Work on a stable surface, keep your free hand out of the cutting path, and have an adult handle sharp tools.

Three levels of light

  • Leave intact

    Pupil bars, rooted teeth, and all rind between openings stay dark; natural unpainted rind throughout

  • Peel & shade

    The shallow-backed outer face contour glows at a soft mid level

  • Cut through

    Eyes, nose, mouth, flame slots, and collar slots are all cut fully through

Learn the carving basics

Before you start cutting

How do I keep the flame slots at the top from looking like random holes?

Space them in a V-shape or gentle arc rising from the center of the head to suggest the character's flame crown. Transfer the stencil slots carefully and do not improvise their placement. Even spacing and consistent slot widths are what distinguish a clean intermediate result from something that looks accidental.

The rind between the collar slots feels very thin after cutting. Will it hold?

If the remaining rind is at least 3/16 inch thick and unbroken, it should hold for the display period. Avoid pressing or flexing the collar zone when moving the pumpkin. If a web between two slots cracks, a thin bead of petroleum jelly on the crack seals it and slightly slows further drying.

Should I add paint to the design or leave the rind natural?

The construction notes specify natural unpainted rind, which keeps the orange-red tone consistent with Anger's character color. If you want to add depth, a light red acrylic wash over the face contour area (inside the shallow-backed zone) is the only paint addition that stays true to the character without changing the overall design strategy.

Your take belongs here, too.

Changed a detail? Made it simpler? Share a photo of your version and tell the community what worked.

Share your pumpkin

More pumpkins like this

You've reached the end · 8 pumpkins
The Patch Report

Fresh pumpkins, in your inbox.

The best new carvings, ideas worth stealing, and how-tos for carving season. Short, seasonal, and gone by November.

A short email during carving season. Unsubscribe anytime. See our privacy policy.