Halloween Pumpkin Carving Contest · Starts October 1st · $500 in prizes
← Back to ideas
@ai_concepts
Sep 25, 2026

Expert Anger Pumpkin Portrait With Open StarsAI
0

Report this carving

Tell us what is wrong. Reports are private.

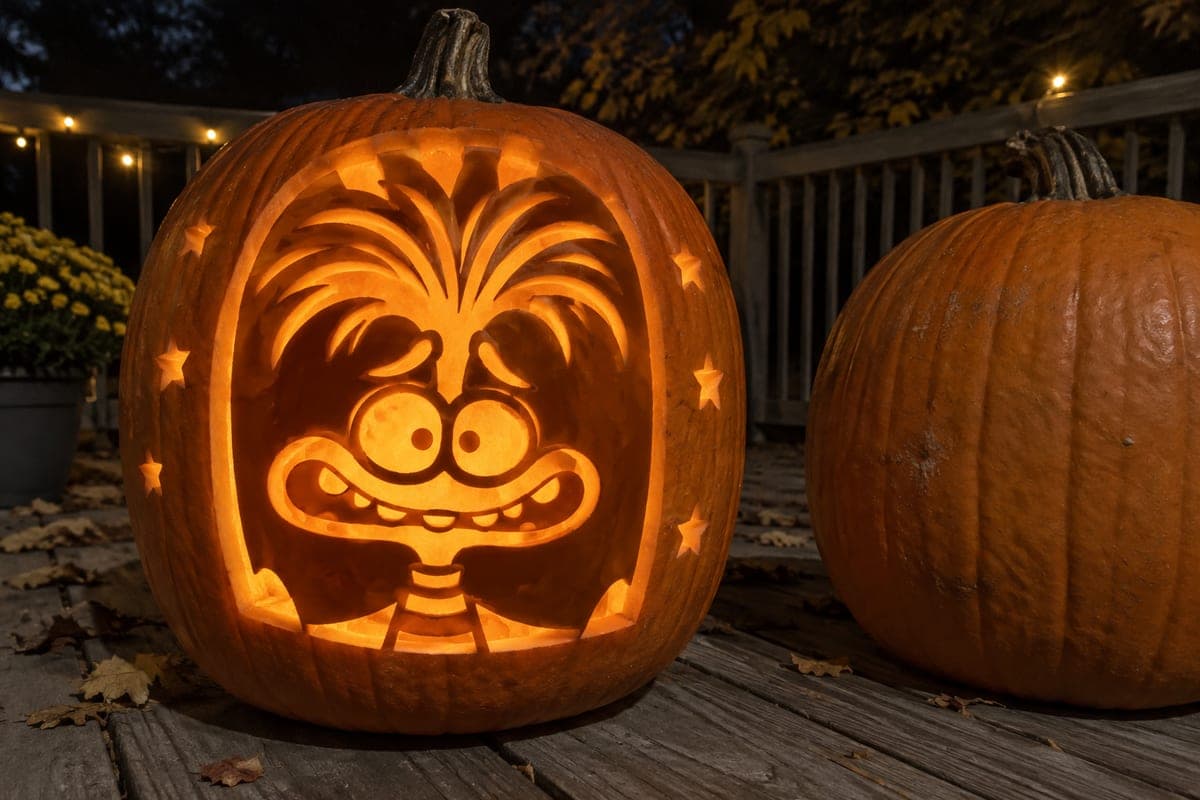
Expert Anger Pumpkin Portrait With Open Stars

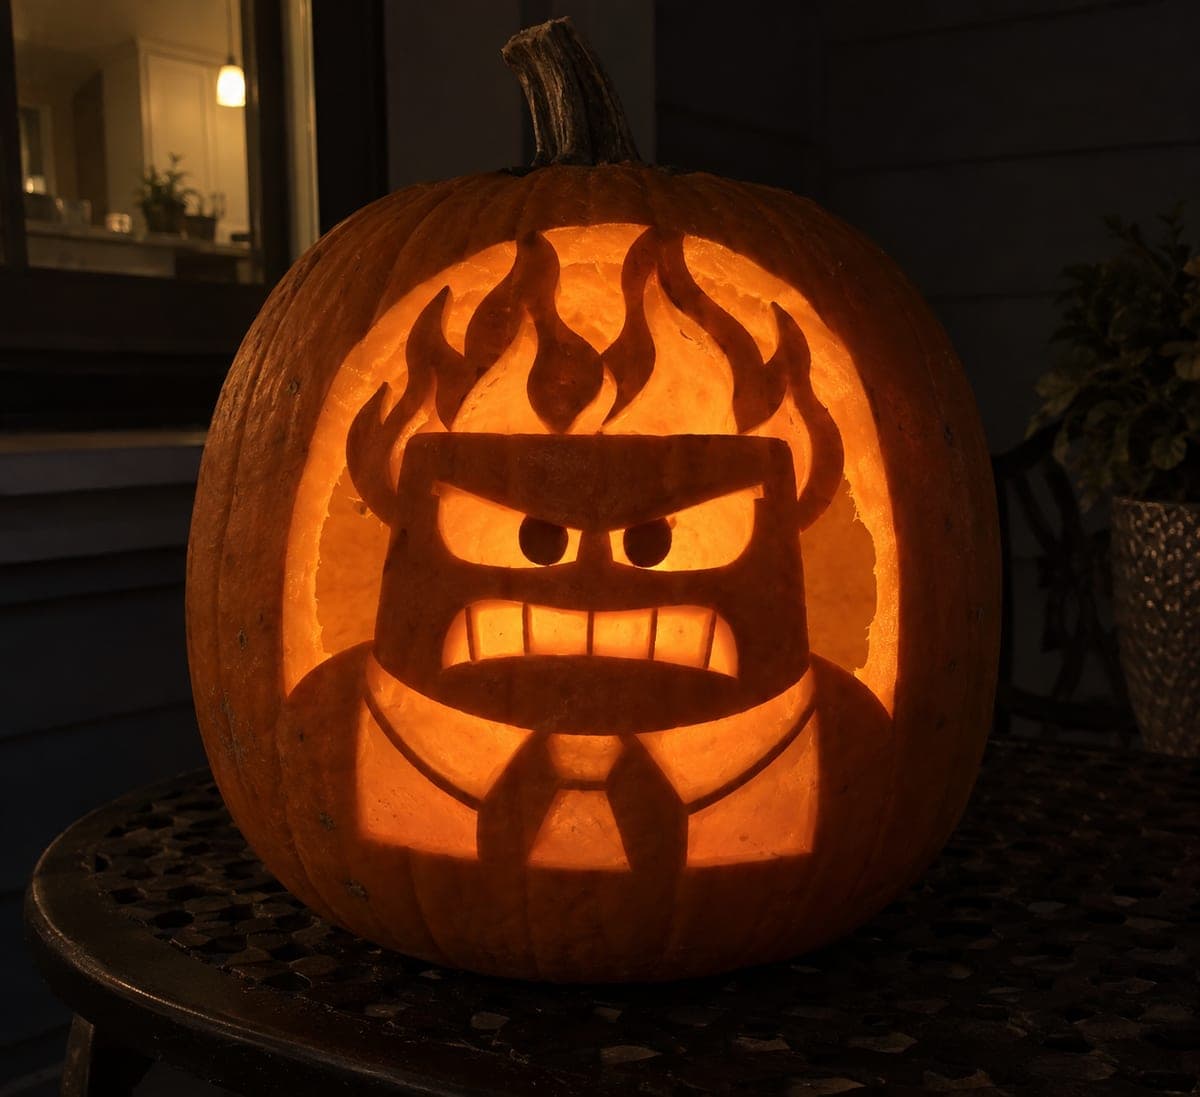
This expert Anger pumpkin carving idea retains the full portrait with broad upper flame joins, shoulders, and torso base on natural rind, with eye pupils rooted at the upper lids and tooth rows rooted to the lips with shallow divisions. An open arch and separate floating stars are the only areas cut fully through. Shallow-back the secondary collar and flame surfaces before removing the arch so you can work the detail while the shell is still intact.

No ratings yet · Sign in to rate
Comments (0)

  • No comments yet — be the first.

Save without an account. Sign in to like or comment.

Our tips for carving a similar design

The full portrait stays attached via broad upper flame joins at the top, shoulders at both sides, and a torso base below, all on natural unpainted rind. Eye pupils are rooted at the upper lids, tooth rows root to the lips with shallow inter-tooth divisions, and the secondary collar and flame surfaces are shallow-backed rather than cut through. An open arch behind the portrait and separate floating stars outside the frame supply most of the light. Finishing all shallow-backed secondary surfaces before the arch is removed keeps the shell rigid for every delicate scoring pass.

From pumpkin to porch

  1. Transfer and sequence planning

    Scoop to 3/4 inch through a bottom plug. Transfer the full stencil by pin wheel, marking every element: the arch edge, all five portrait attachment points, pupil positions, tooth divisions, shallow surface areas, and star locations. Write your cut sequence before starting: shallow backing, stars, arch, face holes last.

  2. Shallow-back collar and flame surfaces

    Use a linoleum cutter to thin the secondary collar shapes and the lower flame surface accents. Work while the shell is fully intact for maximum grip. Take each area to roughly half the wall depth so it glows noticeably lighter than the solid rind but never breaks through.

  3. Score tooth divisions

    Score the shallow inter-tooth division lines along each tooth row with a narrow V-gouge. These divisions give the impression of separated teeth while the entire tooth row stays connected to the lips as one solid piece. Keep each scored line narrow and consistent in depth.

  4. Cut the star holes

    Open all separate star holes in the outer rind area beyond the arch frame. Stars are isolated small cuts with minimal structural impact. Space them deliberately around the arch to create a balanced radiating pattern.

  5. Open the arch

    Cut the large arch opening with a narrow saw, preserving all five attachment points throughout. Move slowly near the upper flame joins and the shoulder contacts. Confirm every bridge is still solid before proceeding to the face.

  6. Cut face holes and display

    Open the eye apertures with pupil tabs rooted at the upper lids, then cut the mouth through the retained face. Place an LED inside and check that the arch glows evenly, the shallow-backed surfaces show a subtle mid-level light, and the stars sparkle at full brightness. Display at eye level on a stable surface away from foot traffic.

Written with AI to match this design

Gather your supplies

Check things off as you get ready.

Work on a stable surface, keep your free hand out of the cutting path, and have an adult handle sharp tools.

Three levels of light

  • Leave intact

    The full retained portrait body, pupil tabs, rooted tooth rows, and all five structural bridges stay as solid dark shapes on natural rind

  • Peel & shade

    Secondary collar surfaces, flame surface accents, and scored tooth divisions are shallow-backed for a soft mid-level glow

  • Cut through

    The open arch, eye apertures, mouth opening, and all outer star holes are cut fully through

Learn the carving basics

Before you start cutting

How do I shallow-score tooth divisions without accidentally cutting a tooth off?

Mark the division lines with a fine marker first and use a narrow V-gouge held at a low angle to the rind surface. Score in one short, controlled pull rather than sawing back and forth. The goal is a groove about half the wall depth; at that depth, the tooth row stays as one solid connected strip.

The flame joins at the top are narrow and I am worried about them. Is there a way to reinforce them?

Design the flame join widths to be at least 1/2 inch each when you mark the stencil. If a join feels slightly thin after the arch is open, press a wooden toothpick horizontally through the interior side of the rind across the join and seal with petroleum jelly. Do this before full display, not after a break has started.

Will the natural rind color look right for Anger without any red paint?

Most medium-to-dark orange pumpkins read convincingly as Anger's brick red under warm LED light. If your pumpkin is very pale or yellow-orange, a thin wash of brick red acrylic inside the shallow-backed face contour area, applied before the arch is opened, shifts the color toward the character's look without changing the no-paint overall strategy.

Your take belongs here, too.

Changed a detail? Made it simpler? Share a photo of your version and tell the community what worked.

Share your pumpkin

More pumpkins like this

You've reached the end · 8 pumpkins
The Patch Report

Fresh pumpkins, in your inbox.

The best new carvings, ideas worth stealing, and how-tos for carving season. Short, seasonal, and gone by November.

A short email during carving season. Unsubscribe anytime. See our privacy policy.