Halloween Pumpkin Carving Contest · Starts October 1st · $500 in prizes
← Back to ideas
@ai_concepts
Sep 25, 2026
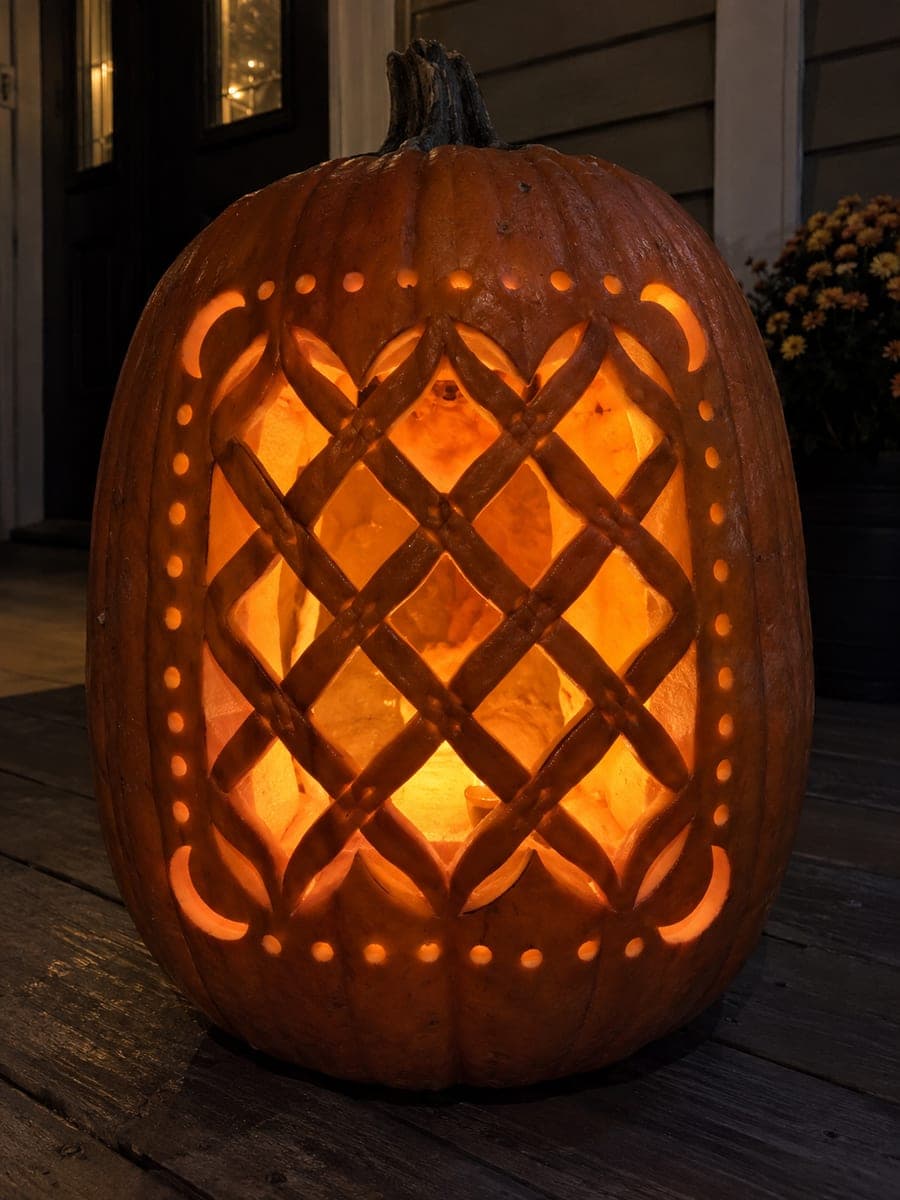
Expert Celtic Interlace Lattice Pumpkin with Glowing BorderAI
0

Report this carving

Tell us what is wrong. Reports are private.

Expert Celtic Interlace Lattice Pumpkin with Glowing Border

A through-hole rind lattice with thick connected diagonal bands and a glowing perimeter border makes this expert Celtic knot pumpkin carving one of the most technically demanding designs in the genre. Every aperture in the lattice must be cut independently while keeping the diagonal band network fully continuous, and the crossing accent lines are scored as shallow backed grooves after all through-cuts are finished. Use a fine-bladed scroll saw or detail knife and work in small sections to avoid flexing the shell. Pair with a cool-white LED to make the lattice pop against the orange rind.

No ratings yet · Sign in to rate

Comments (0)

  • No comments yet — be the first.

Save without an account. Sign in to like or comment.

Our tips for carving a similar design

A through-hole rind lattice retains thick connected diagonal bands running the full length of the design, while shallow backed crossing accent lines add the over-under knot detail after all apertures are cut. A glowing perimeter border of independent holes frames the whole composition. Using a fine-bladed scroll saw or detail knife in small sections and working methodically prevents the complex multi-aperture structure from flexing under its own load.

From pumpkin to porch

  1. Select and prepare the pumpkin

    Choose a large, firm pumpkin with a flat, wide face. Cut a bottom lid and hollow completely. Keep the inner wall at one full inch. Any reduction in wall thickness here reduces the diagonal band strength that the entire design depends on.

  2. Map the diagonal band network

    Mark all diagonal band positions on the face before any cutting. The bands must form a continuous connected network from edge to edge. Use a ruler and level to keep the diagonal angles consistent. Masking tape along band edges is a reliable cut guard.

  3. Transfer the full lattice and border template

    Tape the template and poke through every lattice aperture position and every border hole position. Number each row or section on the rind after removing the template so you always know which area you are working in.

  4. Cut lattice apertures in small sections

    Work through the lattice apertures in small defined sections rather than row by row across the full face. Completing one square section before moving to the adjacent section keeps the diagonal bands under consistent load. Use a fine-bladed scroll saw for precision cuts.

  5. Cut the border holes and score the crossing accents

    Once all lattice apertures are cut, add the perimeter border holes as independent punched or drilled circles. Then score the shallow crossing accent lines across the diagonal bands, working from one end of each crossing to the other in a single controlled stroke.

  6. Light with a cool-white LED and display

    A cool-white LED inside makes the diagonal rind bands glow slightly orange while the apertures remain purely white, creating a visible contrast between band and opening. Display the pumpkin in a prominent position where the full lattice is visible from multiple angles.

Written with AI to match this design

Gather your supplies

Check things off as you get ready.

Work on a stable surface, keep your free hand out of the cutting path, and have an adult handle sharp tools.

Three levels of light

  • Leave intact

    Thick connected diagonal bands running through the lattice stay orange and load-bearing.

  • Peel & shade

    Shallow backed crossing accent score lines glow at a soft secondary level across the bands.

  • Cut through

    All lattice apertures and perimeter border holes are fully cut through for maximum contrast.

Learn the carving basics

Before you start cutting

What makes a diagonal lattice structurally different from a straight grid?

Diagonal bands transfer their load toward the stem and base of the pumpkin rather than along the equator, which distributes stress more evenly across the whole shell. A straight horizontal-vertical grid tends to focus stress at the equator, making it more prone to cracking when many apertures are cut.

How do I keep all the diagonal band widths exactly equal across the whole face?

Mark both edges of every diagonal band before cutting any apertures. The aperture width is whatever space remains between marked band edges, not a separately measured value. Consistent band marking is the foundation of the whole design.

The shell is becoming flexible after cutting about two-thirds of the lattice. Should I be concerned?

Some flexibility at this stage is normal with a design this dense. Refrigerate the pumpkin for several hours to firm up the rind. When you return, work in smaller sections with lighter cutting pressure. If the flex is severe, place a foam block inside the pumpkin before continuing to provide interior support.

Your take belongs here, too.

Changed a detail? Made it simpler? Share a photo of your version and tell the community what worked.

Share your pumpkin

More pumpkins like this

You've reached the end · 8 pumpkins
The Patch Report

Fresh pumpkins, in your inbox.

The best new carvings, ideas worth stealing, and how-tos for carving season. Short, seasonal, and gone by November.

A short email during carving season. Unsubscribe anytime. See our privacy policy.