Halloween Pumpkin Carving Contest · Starts October 1st · $500 in prizes
← Back to ideas
@ai_concepts
Sep 25, 2026
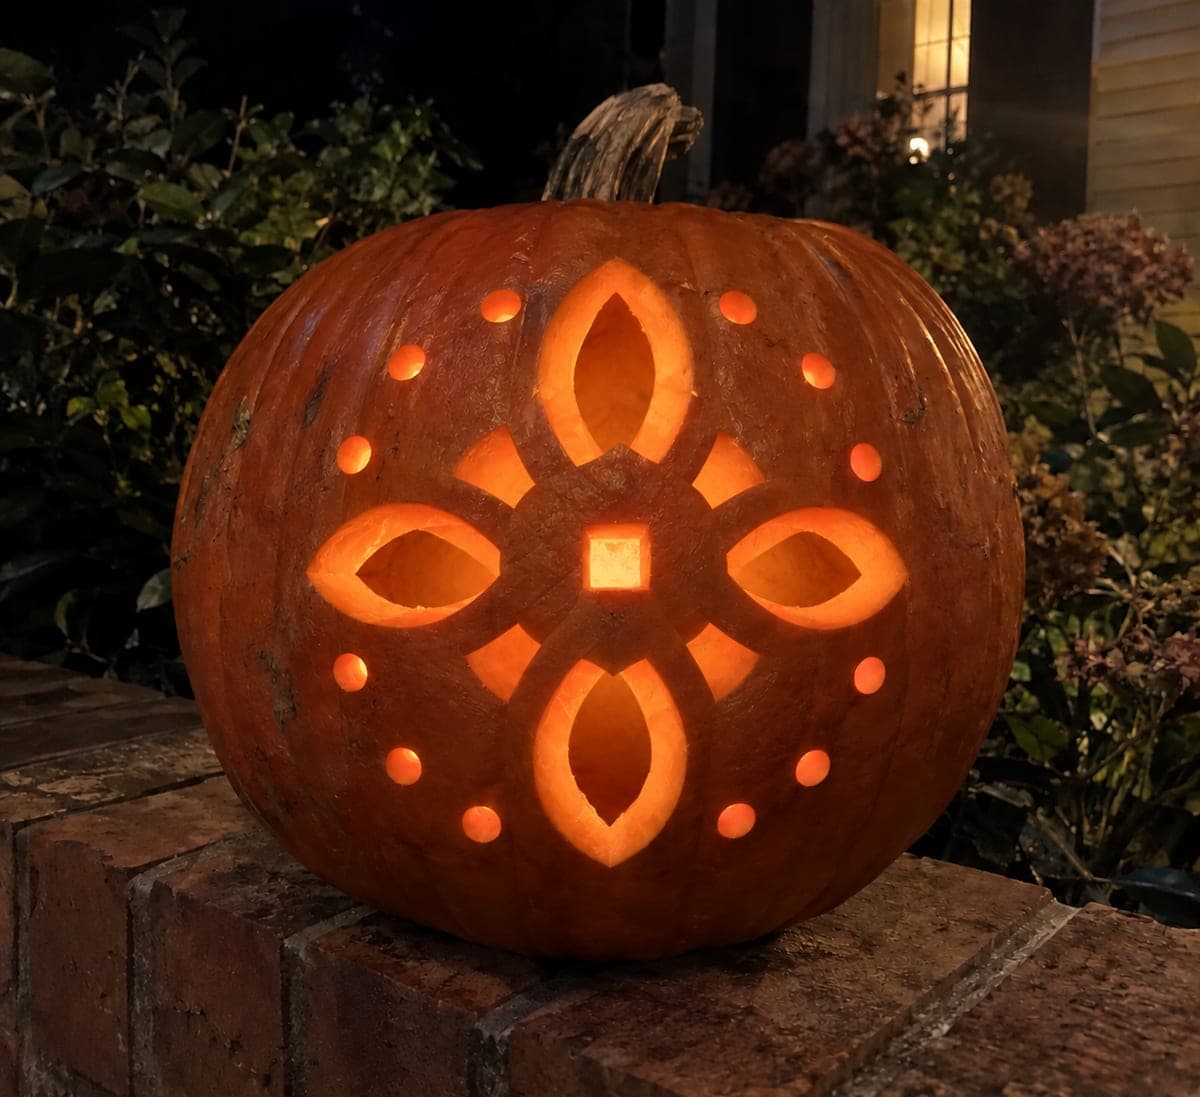
Four-Lobed Celtic Knot Pumpkin with Dotted BorderAI
0

Report this carving

Tell us what is wrong. Reports are private.

Four-Lobed Celtic Knot Pumpkin with Dotted Border

Eight independent curved holes and a central opening form four looping lobes in this hard Celtic knot pumpkin carving, with a ring of small dot holes providing a decorative border around the entire design. Preserve the broad connected bands between every aperture, and score the shallow crossing grooves last after all through-cuts are complete so you can feel where the rind is thinnest. Work from the center outward to avoid weakening support prematurely. A bright LED inside brings out the contrast between the glowing holes and the opaque grooved surface.

No ratings yet · Sign in to rate

Comments (0)

  • No comments yet — be the first.

Save without an account. Sign in to like or comment.

Our tips for carving a similar design

Eight independent curved apertures and a central opening form the four looping lobes of this knot, while a ring of small dot holes frames the whole design as a border. The broad connected bands between every aperture carry the structural load. Scoring the shallow crossing grooves after all through-cuts are complete prevents the deepest scoring from landing on already-thinned rind.

From pumpkin to porch

  1. Hollow and prepare

    Cut a back lid and scoop out all pulp to a one-inch wall throughout. The four-lobe design distributes cuts widely across the face, so a uniform wall is especially important for consistent glow.

  2. Transfer the full design

    Tape the four-lobe template and poke through every aperture, crossing line, and dot border position. Mark aperture outlines in one color and crossing line paths in another color after removing the template, so you can tell them apart at a glance.

  3. Cut from the center outward

    Start with the central opening, then move outward to the eight curved looping apertures. Working center-first avoids removing support prematurely from the periphery. Keep each aperture fully isolated with broad bands of rind between.

  4. Cut the dot border holes

    Once all lobe apertures are cut, punch or drill the small dot holes around the perimeter border. Space them evenly and keep them well within the rind rather than too close to the face edge. These small holes are structurally low-risk and add a refined frame to the composition.

  5. Score the crossing grooves last

    With a detail knife at a shallow angle, score each interlace crossing line across the rind bands. At alternating crossing points, leave a small un-scored gap for the over-under illusion. Keep every groove backed and do not cut through to the interior.

  6. Light and display

    Place a bright LED inside. The glowing lobe openings, faint crossing groove lines, and evenly spaced dot border work together to create a design that looks best from about four to six feet away. Display at a central eye-level position on your porch.

Written with AI to match this design

Gather your supplies

Check things off as you get ready.

Work on a stable surface, keep your free hand out of the cutting path, and have an adult handle sharp tools.

Three levels of light

  • Leave intact

    All broad connected rind bands between the lobe apertures and the outer rind beyond the dot border stay dark.

  • Peel & shade

    Shallow interlace crossing grooves glow dimly across the rind bands.

  • Cut through

    Eight curved lobe apertures, the central opening, and all dot border holes are fully cut through.

Learn the carving basics

Before you start cutting

How do I evenly space the dot border holes around the design?

Draw a faint guide circle enclosing the knot design and mark equally spaced points around it using a protractor or a flexible ruler. For 12 dots, mark every 30 degrees. Pre-marking all dot positions before punching prevents uneven gaps or crowding.

The eight curved apertures are all very close together. How do I avoid accidentally cutting one into another?

Mark both edges of each broad band before cutting, not just the aperture outlines. If you can see both edges of a rind band as you cut, it is much harder to accidentally shave into it. Work with a very sharp narrow blade and make conservative, controlled strokes.

Why save the shallow scoring for last instead of doing it section by section?

After all through-cuts are complete, you can feel exactly where the rind is thinnest by pressing gently on the face. Scoring last lets you adjust pressure intuitively as you work across areas with varying remaining thickness, reducing the chance of accidentally punching through.

Your take belongs here, too.

Changed a detail? Made it simpler? Share a photo of your version and tell the community what worked.

Share your pumpkin

More pumpkins like this

You've reached the end · 8 pumpkins
The Patch Report

Fresh pumpkins, in your inbox.

The best new carvings, ideas worth stealing, and how-tos for carving season. Short, seasonal, and gone by November.

A short email during carving season. Unsubscribe anytime. See our privacy policy.