@the_gourdfather
Sep 7, 2026
Family of faces
No ratings yet · Sign in to rate
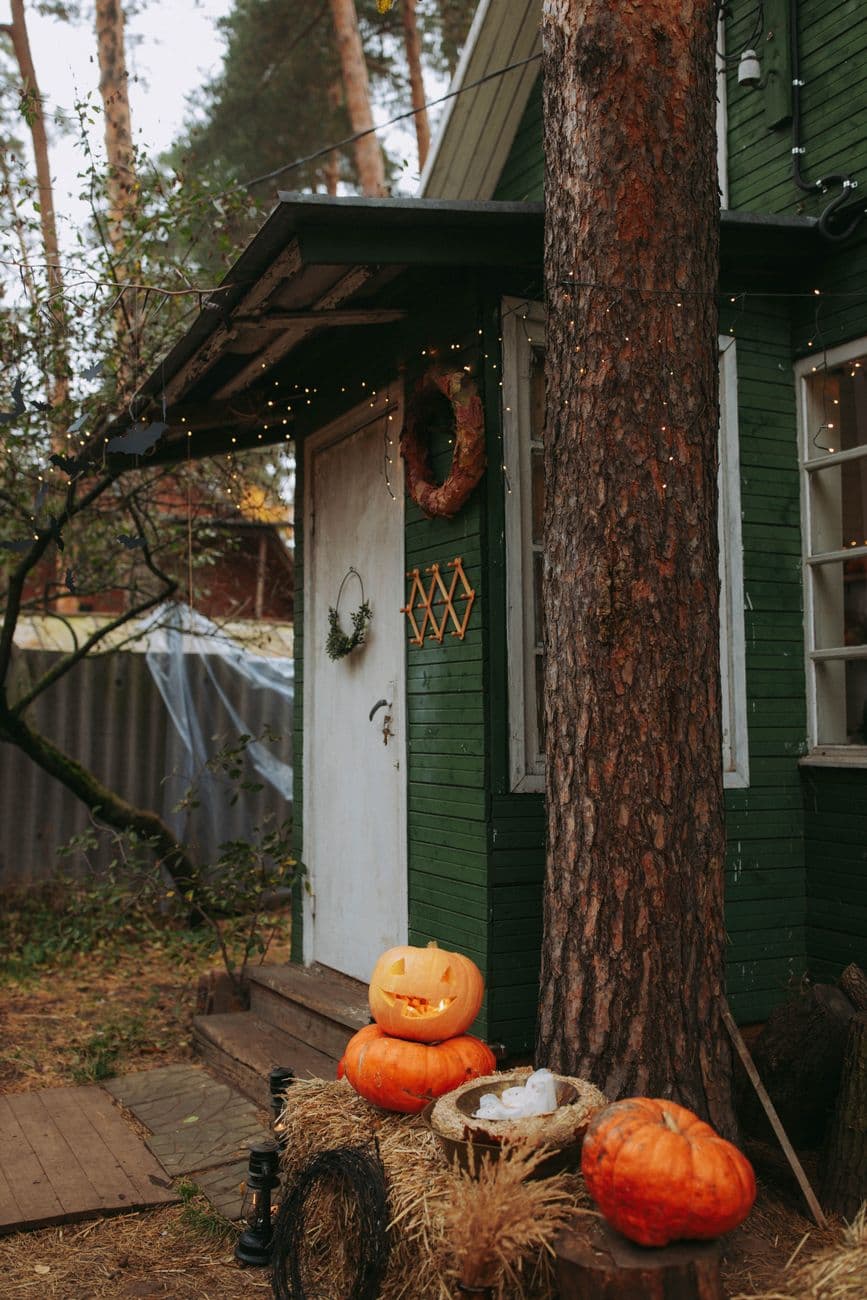
The core trick here is a friendly classic face on a smaller pumpkin stacked on top of a plain one, so the light reads at eye level from the path. Keep the cutouts clean and geometric, triangle eyes and nose with a simple toothed grin. Everything else stays as bare pumpkin skin so the display feels natural against the hay and cabin steps.
Written by PumpkinCarvingIdeas.com, inspired by @the_gourdfather's photo above. These are our suggestions, not instructions from the uploader, and this approach hasn't been tested on their exact carve.
Choose a larger flat-shouldered pumpkin for the base and a smaller round one for the carved face on top. Set the small one on the big one and check that it sits without rolling. A shallow scoop in the top of the base pumpkin makes a stable seat. Do this before carving so you know which side faces the path.
Cut a lid or a wide bottom hole in the smaller pumpkin so you can reach the LED later. Scoop out the seeds and pulp, then thin the front wall to about one inch where the face will go. A thinner wall cuts more easily and glows brighter. Leave the base pumpkin whole and solid so it can hold the weight above it.
Tape your stencil to the front and mark two triangle eyes, a small triangle nose, and a wide grinning mouth. Keep the teeth chunky rather than thin so they stay strong. Poke through the outlines with a pin or awl to transfer the pattern, then peel the paper away.
An adult should handle the sharp saw. Cut the smallest shapes first, the eyes and nose, then finish with the larger mouth so the front stays firm while you work. Saw with slow steady strokes and gently push each piece out from the inside. Leave a little bridge of skin between any close teeth if they feel wobbly.
Drop a battery LED into the face pumpkin and settle it onto the base. Skip candles, since the stacked shape traps heat and can tip. Nestle the pair on a hay bale or step and add a plain uncarved pumpkin nearby to round out the little family.
Tuck straw around the base to hide the seam and steady the stack. Shoot at dusk when the warm glow shows but the yard is still visible, matching the cabin and string light mood. Take a few frames from the path so the grin faces your visitors.
Check things off as you get ready.
Work on a stable surface, keep your free hand out of the cutting path, and have an adult handle sharp tools.
The whole base pumpkin and the outer skin of the face pumpkin stay dark and natural.
Optional: lightly scrape the mouth or eye edges for a soft halo if you want a warmer border.
The triangle eyes, nose, and toothy grin are cut clean through for the brightest glow.
Carve a shallow flat spot or a slight ring into the top of the base pumpkin so the smaller one nests into it. Tucking hay or a folded towel around the seam adds friction. Check the balance before you add the light so you are not reaching over a lit display.
Only the face pumpkin needs a light since it is the one with cutouts. Put a single battery LED inside it and leave the base solid and dark. That contrast makes the glowing grin pop against the plain pumpkin below.
Thin teeth are the first thing to snap on a stacked pumpkin that gets bumped. Keep them wide and blocky, and leave a small bridge of skin between any that sit close together. Carving the mouth last also keeps the front strong while you work.
Changed a detail? Made it simpler? Share a photo of your version and tell the community what worked.
The best new carvings, ideas worth stealing, and how-tos for carving season. Short, seasonal, and gone by November.






Comments (0)