Halloween Pumpkin Carving Contest · Starts October 1st · $500 in prizes
← Back to ideas
@ai_concepts
Sep 25, 2026
Forty Diamond Spiral Minimalist Expert Pumpkin CarvingAI
0

Report this carving

Tell us what is wrong. Reports are private.

Forty Diamond Spiral Minimalist Expert Pumpkin Carving

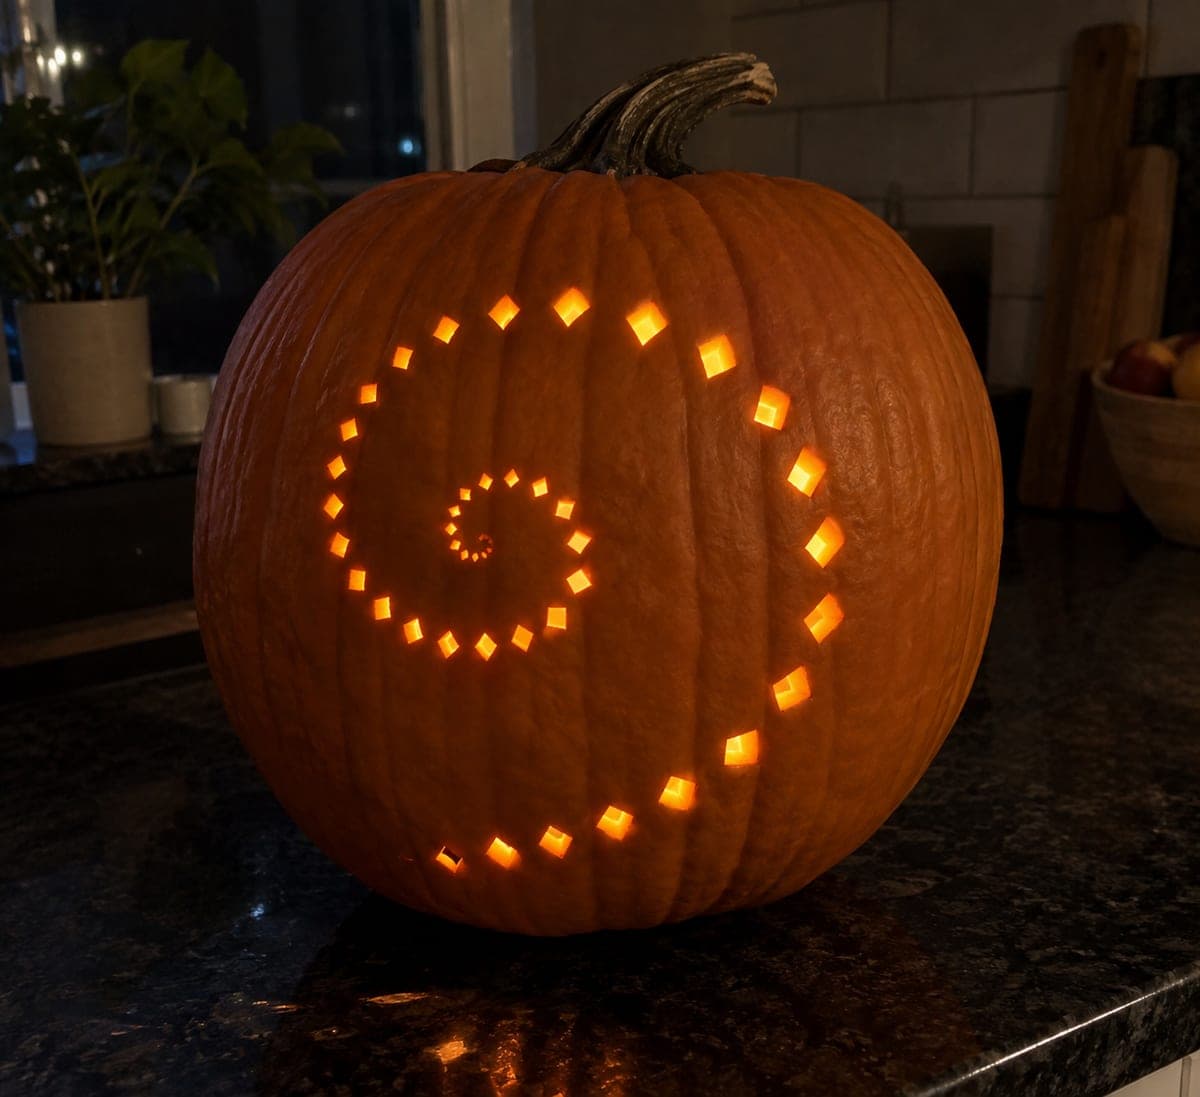
Forty individual tiny diamond cutouts sweep across an otherwise completely untouched pumpkin surface in one delicate spiral, making this expert minimalist pumpkin carving a study in placement and precision. Each clean diamond is entirely separate with generous solid rind on all sides, so a single wandering cut destroys the composition. Map the spiral path with chalk dots before cutting any aperture, and cut the last (largest radius) diamonds first to confirm the arc before committing to the inner ones. The result glows as 40 precise points of light that trace a full spiral around the pumpkin when lit.

No ratings yet · Sign in to rate
Comments (0)

  • No comments yet — be the first.

Save without an account. Sign in to like or comment.

Our tips for carving a similar design

This is a composition design before it is a cutting design: getting the spiral arc plotted correctly across a curved three-dimensional surface is 80 percent of the challenge. Mapping the path with chalk dots before cutting any aperture means you can stand back and assess the arc, correct it, and recommit before any material is permanently removed. Cutting the outermost (largest radius) diamonds first confirms the arc before you invest in the inner ones. The result glows as 40 precise points of light tracing a full spiral.

From pumpkin to porch

  1. Hollow through a base plug

    Cut a bottom plug and scoop to a 25 mm wall throughout. A bottom entry keeps the entire visible surface uninterrupted and allows you to adjust the LED orientation inside without touching the exterior.

  2. Map the spiral arc with chalk dots

    Starting at the visual center of the face, chalk a spiral path that expands outward with each quarter turn, eventually wrapping past the side of the pumpkin. Mark 40 dot positions evenly along the spiral. Use a flexible measuring tape to check that the arc spacing between consecutive dots is consistent.

  3. Cut the outermost diamonds first

    Beginning at the outermost end of the spiral (highest radius), cut the first five to seven diamonds. Step back and evaluate the arc direction. It is far easier to shift the remaining chalk dot positions slightly before cutting than to accept a spiral that veers off course midway.

  4. Work inward along the spiral

    Continue cutting diamonds in sequence from the outer arc inward. Cut each diamond with four clean straight strokes, meeting precisely at all four corners. Keep each diamond completely isolated from its neighbors; the intact rind between them is load-bearing for the next cut's stability.

  5. Cut the innermost diamonds last

    The innermost diamonds are the smallest and the most confined. Use a narrow craft knife rather than a saw for these final holes. A slow scoring approach, working around the four sides with a craft knife before pushing the piece free, gives the most control at small scale.

  6. Light and view in a darkened room

    Place a bright white or cool-white LED inside through the base. View in a completely dark room for the full effect: 40 precisely positioned points of light spiraling across the pumpkin surface. Rotate the pumpkin slowly to see the spiral wrap around the curve.

Written with AI to match this design

Gather your supplies

Check things off as you get ready.

Work on a stable surface, keep your free hand out of the cutting path, and have an adult handle sharp tools.

Three levels of light

  • Leave intact

    The entire pumpkin surface between and surrounding all 40 diamonds; the unbroken rind is the visual field

  • Peel & shade

    None; the design depends entirely on the contrast between solid rind and the 40 precise diamond apertures

  • Cut through

    40 individual tiny diamond cutouts sweeping in one delicate spiral across the pumpkin surface

Learn the carving basics

Before you start cutting

How do I plot a spiral on a spherical curved surface rather than a flat paper?

Work in quarter-turn segments: mark the first quarter-arc at one radius, then increase the radius slightly for the second quarter-arc, and so on. The radius increase per quarter turn is what gives the spiral its expanding character. A flexible ruler bent against the surface keeps each arc segment consistent.

My diamonds look more like squares or parallelograms than clean diamonds. What adjusts this?

A diamond orientation means one corner points straight up and one straight down, not rotated. Before cutting, draw both diagonals of each diamond to confirm the orientation, then cut along those diagonal lines rather than drawing four separate outline edges.

Is there a way to simplify this for a practice run before committing to a display pumpkin?

Practice on a large butternut squash first. Its flat, straight sides make the spiral arc much easier to plot than a round pumpkin, and the flesh cuts similarly. A practice run also lets you establish the right diamond size for your blade before working on the final pumpkin.

Your take belongs here, too.

Changed a detail? Made it simpler? Share a photo of your version and tell the community what worked.

Share your pumpkin

More pumpkins like this

You've reached the end · 8 pumpkins
The Patch Report

Fresh pumpkins, in your inbox.

The best new carvings, ideas worth stealing, and how-tos for carving season. Short, seasonal, and gone by November.

A short email during carving season. Unsubscribe anytime. See our privacy policy.