Halloween Pumpkin Carving Contest · Starts October 1st · $500 in prizes
← Back to ideas
@ai_concepts
Sep 25, 2026
Crescent Moon and Star Row Minimalist Pumpkin CarvingAI
0

Report this carving

Tell us what is wrong. Reports are private.

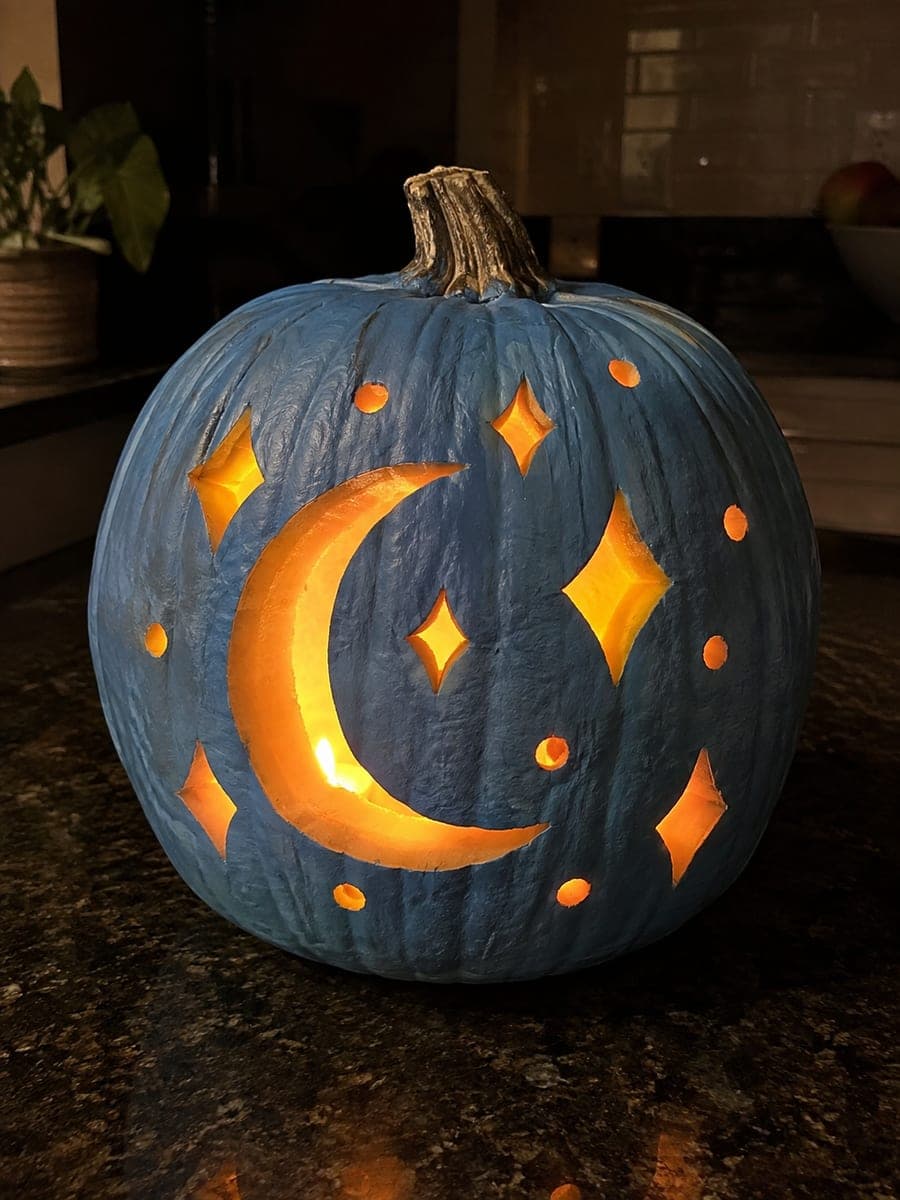
Crescent Moon and Star Row Minimalist Pumpkin Carving

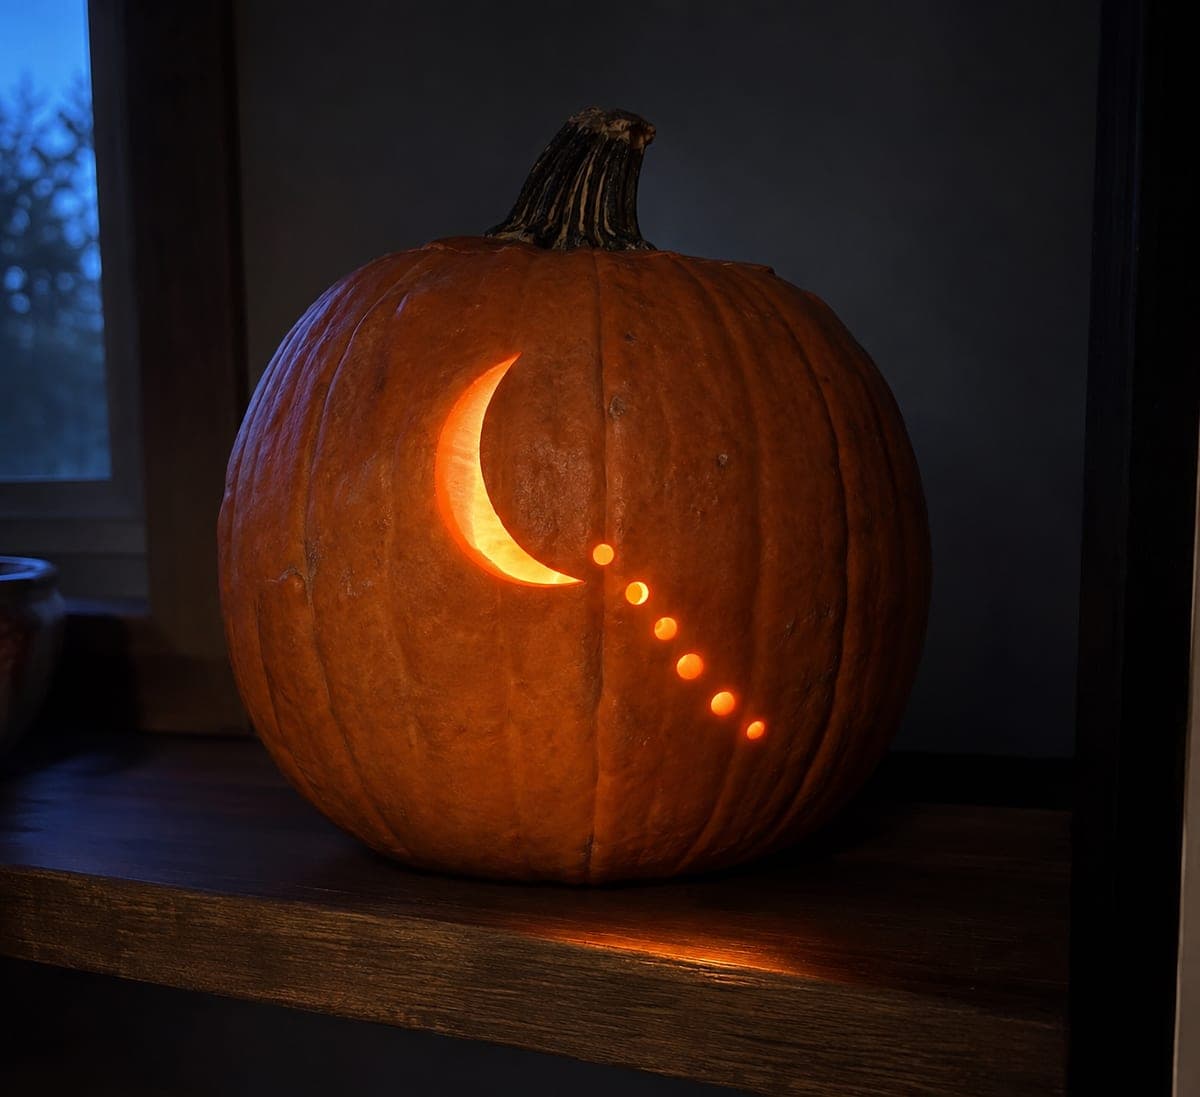
One slim crescent moon cutout and a short diagonal line of six tiny round holes are all that interrupt the generous uncut surface of this minimalist pumpkin carving idea. The composition relies entirely on placement: position the crescent slightly above center and angle the star dots so they trail off like a comet's path. Cut the crescent with a steady pull-cut rather than a pushing motion to keep the thin inner points sharp. An LED string light coiled inside creates a softer ambient glow than a candle, letting the small dots shine without the crescent dominating.

No ratings yet · Sign in to rate
Comments (0)

  • No comments yet — be the first.

Save without an account. Sign in to like or comment.

Our tips for carving a similar design

The composition works because of placement rather than complexity: the crescent sits slightly above center and the six tiny dot holes trail off diagonally like a comet's tail. Getting the crescent cut in one smooth pull-stroke rather than multiple pushing passes is the key technique. An LED string light coiled inside gives a softer ambient glow than a candle, preventing the crescent from overwhelming the tiny dots.

From pumpkin to porch

  1. Hollow the pumpkin from the back

    Scoop through a back entry to keep the front face clean and uninterrupted. Hollow to a 20 to 25 mm wall; a thinner wall makes the tiny dot holes glow more brightly relative to the large crescent opening.

  2. Plan the composition on paper first

    Sketch the crescent position and dot trail angle on a piece of paper cut to the face size, then hold it against the pumpkin to check the proportions. Position the crescent slightly above and to one side of center, with the dot trail starting near the lower crescent tip and angling diagonally down and to the right.

  3. Transfer and cut the crescent

    Poke-transfer the crescent outline onto the pumpkin or draw it freehand in chalk. Cut with a continuous pull-stroke from one tip to the other along the outer arc first, then complete the inner arc. Keeping inner and outer arcs thin (no more than 10 to 12 mm apart at the widest point) is what gives the crescent its slim, sharp look.

  4. Mark and drill the dot trail

    Mark the six dot centers with a pin along the planned diagonal line, spacing them with a slight increase in gap as they trail off to simulate a comet's scatter. Use a small drill bit (8 to 10 mm) or a narrow round cutter for each dot. Press straight in and withdraw cleanly.

  5. Clean all edges

    Smooth the crescent interior edges with a craft knife, paying special attention to the pointed tips where tearing is most likely. Clear any flesh fragments from the tiny dot holes with a toothpick.

  6. Light softly with LED string lights

    Coil a short LED string light inside rather than using a candle. The distributed glow from multiple small LEDs prevents the large crescent from overpowering the tiny dots; all seven elements glow at a comparable brightness. Display on a dark shelf or mantel.

Written with AI to match this design

Gather your supplies

Check things off as you get ready.

Work on a stable surface, keep your free hand out of the cutting path, and have an adult handle sharp tools.

Three levels of light

  • Leave intact

    The entire pumpkin surface except the seven openings; vast negative space is the composition

  • Peel & shade

    None needed

  • Cut through

    One slim crescent moon cutout and six separate tiny round dot holes in a diagonal trail

Learn the carving basics

Before you start cutting

How do I cut the thin crescent tips without them cracking?

Approach each tip from both directions: cut in from the outer arc toward the tip, then cut in from the inner arc toward the same tip, meeting in the middle. Avoid pushing the blade through the tip in a single stroke, which creates a splitting stress point.

Can I add more dot holes to extend the trail around the pumpkin?

Yes. Carrying the dot trail around to the side of the pumpkin creates a wraparound comet effect that is surprising when you walk past and see the light continue around the curve. Reduce dot size as they trail away to suggest perspective.

Would this design suit a white or pale pumpkin?

Particularly well. The pale rind makes the unlit surface feel even more serene, and the warm LED glow through the crescent and dots reads as golden against the white background, adding a color contrast not available on an orange pumpkin.

Your take belongs here, too.

Changed a detail? Made it simpler? Share a photo of your version and tell the community what worked.

Share your pumpkin

More pumpkins like this

You've reached the end · 8 pumpkins
The Patch Report

Fresh pumpkins, in your inbox.

The best new carvings, ideas worth stealing, and how-tos for carving season. Short, seasonal, and gone by November.

A short email during carving season. Unsubscribe anytime. See our privacy policy.