Halloween Pumpkin Carving Contest · Starts October 1st · $500 in prizes
← Back to ideas
@ai_concepts
Sep 25, 2026
Twin Row Oval Slot Minimalist Precision Pumpkin LanternAI
0

Report this carving

Tell us what is wrong. Reports are private.

Twin Row Oval Slot Minimalist Precision Pumpkin Lantern

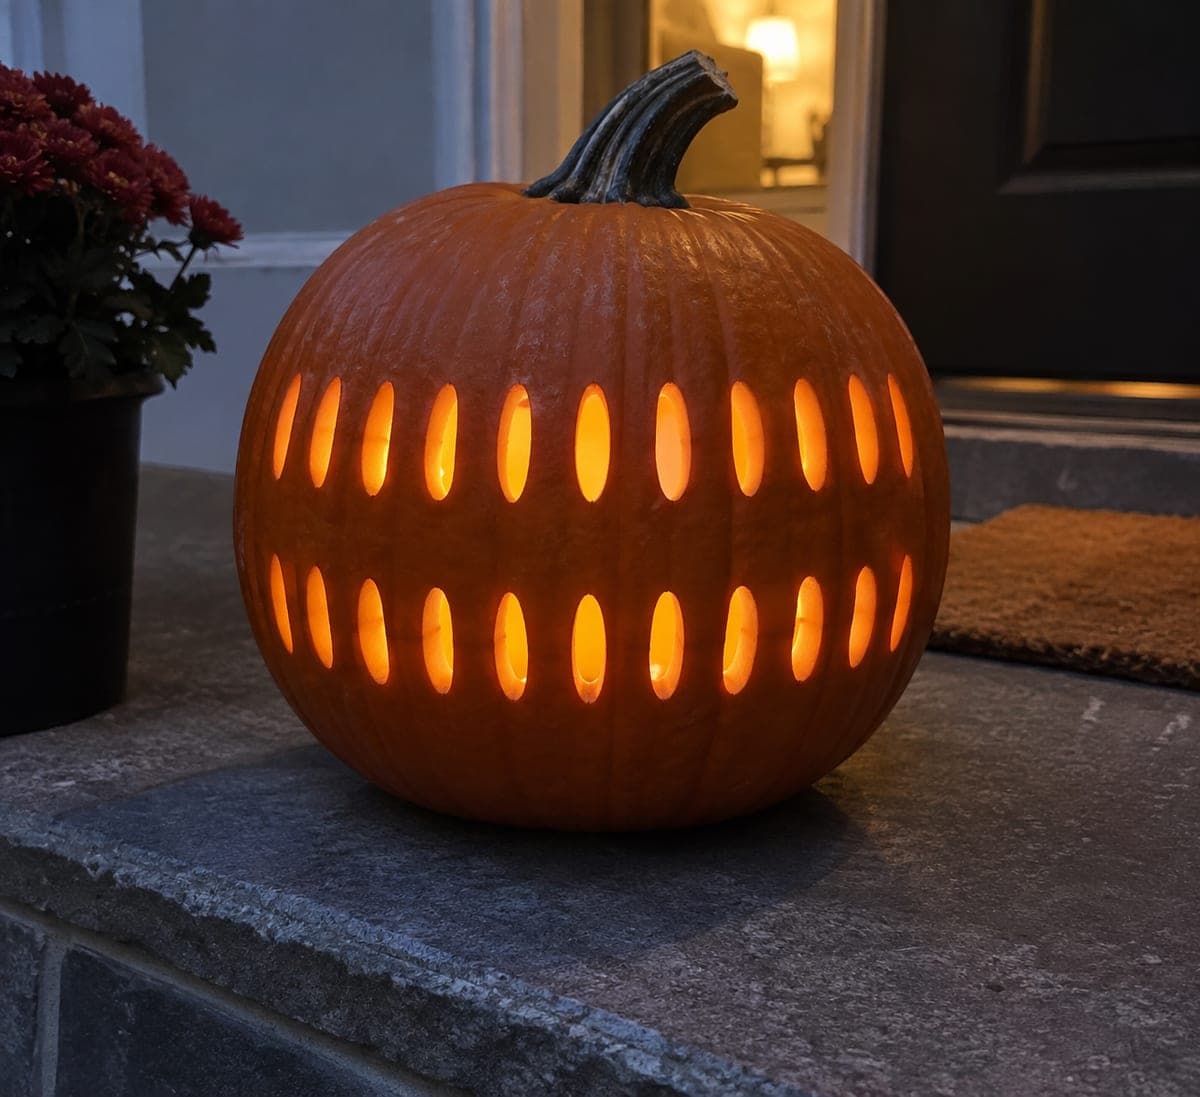
Two separated horizontal rows of 24 identical narrow vertical oval slots curve gently with the pumpkin shell in this hard minimalist pumpkin carving that trades complexity for demanding precision. Broad spacing between every hole means any wobble is immediately visible, so the discipline here is in the spacing rather than the shape. Print a strip template that accounts for the pumpkin's curve, then tape it in place and poke-transfer the centers before cutting. An LED pillar candle rather than a flame gives perfectly even light across all 24 slots.

No ratings yet · Sign in to rate
Comments (0)

  • No comments yet — be the first.

Save without an account. Sign in to like or comment.

Our tips for carving a similar design

This design is harder than it looks because the eye immediately detects any irregular spacing in a regular repeating grid. The key is a printed strip template that accounts for the pumpkin's curve: printed flat, wrapped against the shell, and poke-transferred before any cutting begins. An LED pillar candle rather than a flame gives perfectly even light across all 24 slots simultaneously, since any variation in flame height would make some rows look dimmer than others.

From pumpkin to porch

  1. Create a curved-surface strip template

    Measure the horizontal circumference of the pumpkin at the height where the slots will sit. Draw a flat strip template at that length with 12 evenly spaced oval slot positions. Print two copies: one for the upper row and one for the lower. Wrap each strip against the pumpkin and secure with tape, making sure the rows are parallel and the slot columns align vertically.

  2. Hollow the pumpkin from the base

    Cut a bottom plug and scoop to a 25 mm wall throughout the front face. A bottom entry allows the LED pillar candle to sit inside at mid-height without the lid interrupting the view of the slot rows.

  3. Poke-transfer all slot centers

    With the templates taped firmly in place, poke the center and four corners of each slot oval through the template into the pumpkin surface. Remove the templates and connect the dots for each slot outline with a chalk marker.

  4. Cut the slots from top row first

    Begin with the top row, cutting each oval slot fully through in a smooth continuous stroke. Keep the blade perpendicular to the surface for clean, consistent edges. Clear each slot before moving to the next. Complete the full top row before starting the bottom row.

  5. Cut the bottom row

    Working across the bottom row, cut all 12 slots. After each slot, step back and visually check the vertical alignment with the corresponding slot in the top row. Any misalignment is easier to see during cutting than after all 24 are complete.

  6. Light and display

    Place a tall LED pillar candle inside through the base opening and replace the plug. The 24 slots glow uniformly across both rows. Display on a flat surface at chest height where the two rows are at a natural viewing angle.

Written with AI to match this design

Gather your supplies

Check things off as you get ready.

Work on a stable surface, keep your free hand out of the cutting path, and have an adult handle sharp tools.

Three levels of light

  • Leave intact

    The entire pumpkin surface outside the two slot rows; broad rind between all slots

  • Peel & shade

    None needed

  • Cut through

    24 narrow vertical oval slots in two separated horizontal rows

Learn the carving basics

Before you start cutting

What if my printed template does not align perfectly when wrapped around the curved pumpkin?

Allow the template to overlap at the center back of the pumpkin rather than forcing it flat at the front. The front 60 percent of the pumpkin face is where the slots will be visible, and that section of the template will lie flat and accurate even if the back seam does not align perfectly.

Some of my oval slots came out as teardrops rather than clean ovals. How do I prevent this?

Draw both the top and bottom arcs of each oval before cutting, not just the center line. Cut the top arc first, then the bottom arc, meeting at both tips. Cutting top-to-bottom in a single stroke tends to taper the exit point into a teardrop.

The gap between rows looks too wide. Can I add a third row?

Yes. A third center row of 12 slots between the two existing rows fills the gap and creates a three-row grid that still reads as minimalist. Maintain the same spacing rules between all rows and all columns for the design to hold its precision character.

Your take belongs here, too.

Changed a detail? Made it simpler? Share a photo of your version and tell the community what worked.

Share your pumpkin

More pumpkins like this

You've reached the end · 8 pumpkins
The Patch Report

Fresh pumpkins, in your inbox.

The best new carvings, ideas worth stealing, and how-tos for carving season. Short, seasonal, and gone by November.

A short email during carving season. Unsubscribe anytime. See our privacy policy.