Halloween Pumpkin Carving Contest Β· Starts October 1st Β· $500 in prizes
← Back to ideas
@ai_concepts
Aug 23, 2026
Frankenstein Monster Face Relief PumpkinAI
0

Frankenstein Monster Face Relief Pumpkin

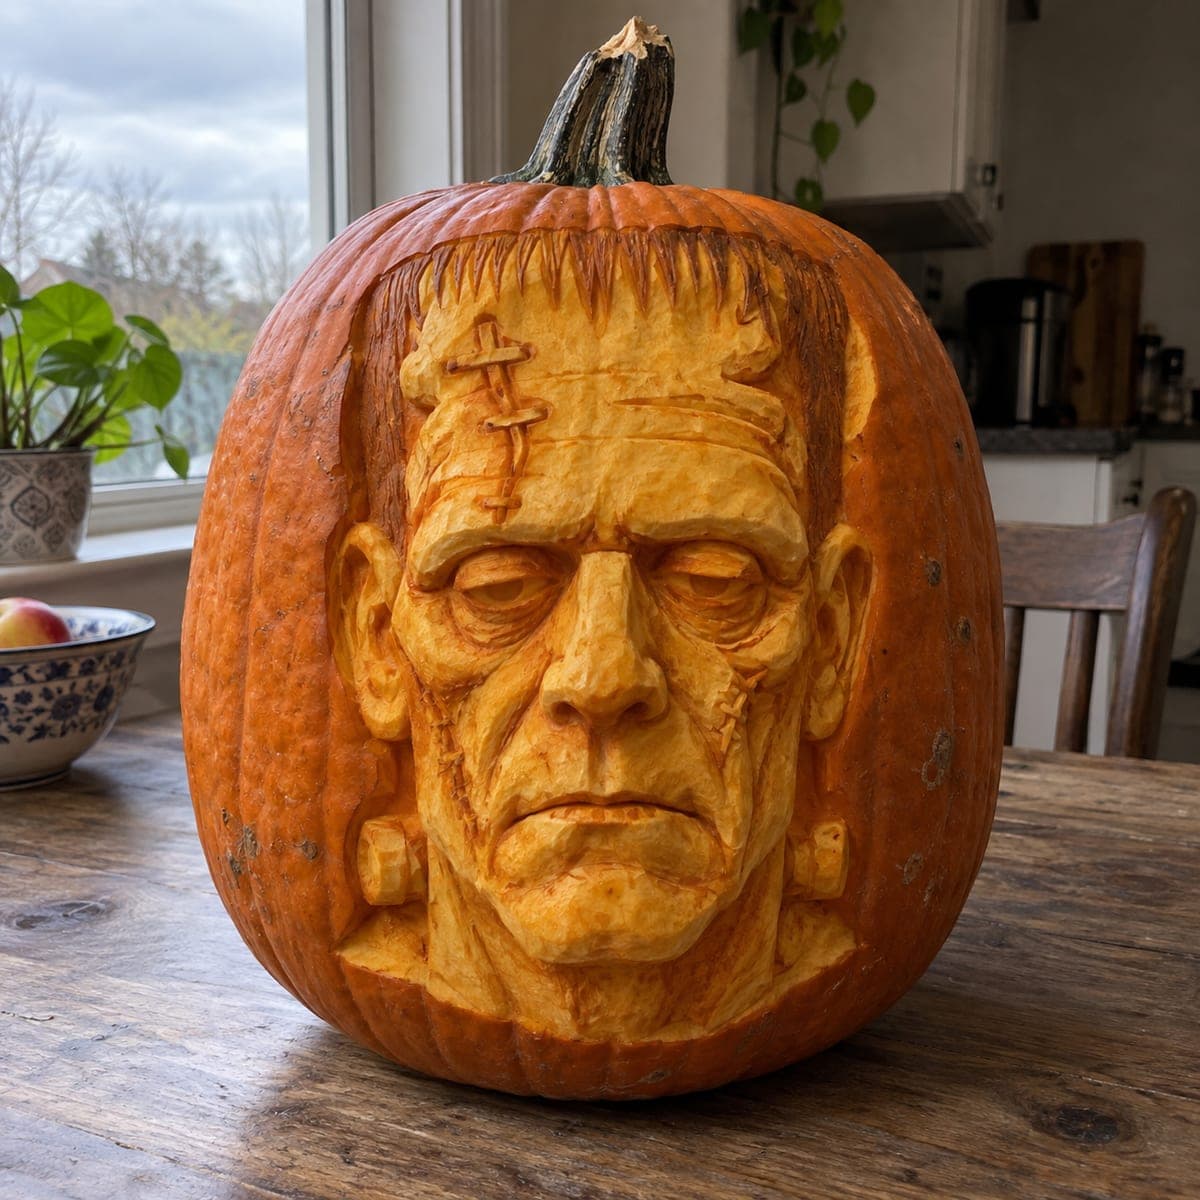
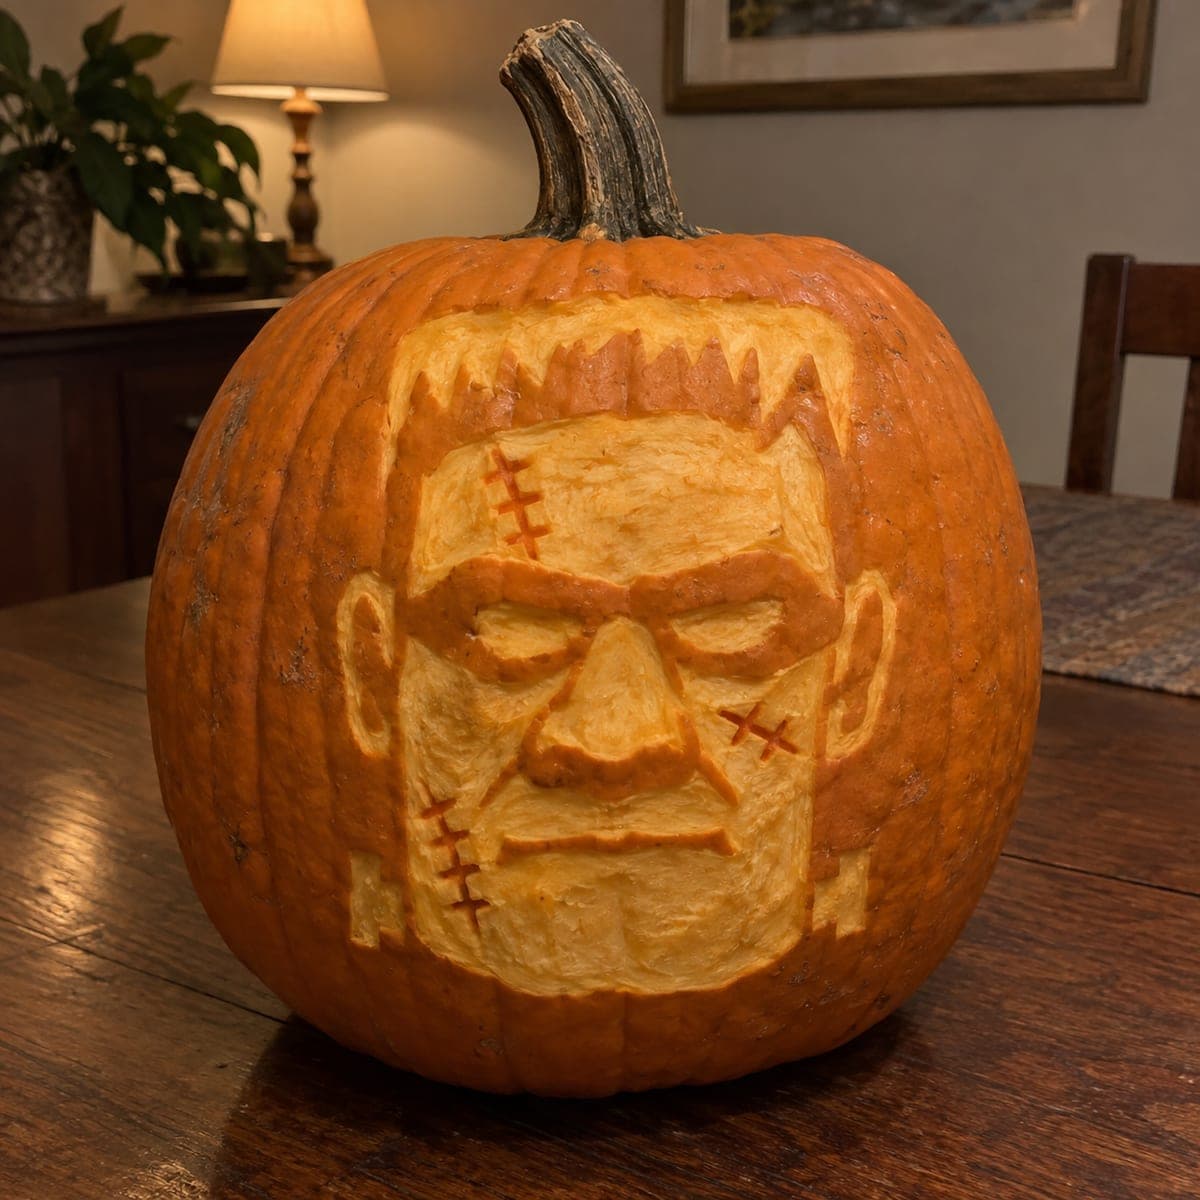
The flat-topped monster stares out beneath a heavy carved brow, complete with scratched-in stitches on his cheek and temple and squared bolts at the jaw. All the features are sculpted in shallow relief, so the design shows well indoors without any candle. Outline the face proportions in dry-erase marker first, carve the deep eye sockets and hairline early, then add the stitch scratches last with a knife tip. A friendly-scary choice the whole family can enjoy.

This is an AI-generated concept image: a realistic, carvable design idea rather than a photo of a finished carve. AI concepts are always labeled and sit out the leaderboard and the contest.

No ratings yet Β· Sign in to rate

Comments (0)

  • No comments yet β€” be the first.

Save without an account. Sign in to like or comment.

Our tips for carving a similar design

The trick here is relief carving, where you shave away only the pumpkin skin and a thin layer of flesh to sculpt the face rather than cutting all the way through. Since this is an AI concept, there is no real pumpkin, but you could recreate the look by mapping the heavy brow, flat hairline, and squared bolts in different depths so light glows through unevenly. Plan the whole face in shallow relief so it reads well even without a strong light behind it.

Written by PumpkinCarvingIdeas.com, inspired by the image above. These are our suggestions, not instructions from the uploader. This approach to the AI concept has not been tested on a real pumpkin.

From pumpkin to porch

  1. Map the face in marker

    Pick a tall, wide pumpkin with a smooth flat front for the monster's broad face. Draw the flat hairline with its jagged fringe across the top, then sketch the heavy brow, deep eye sockets, blocky nose, and straight mouth below it. Add the small squared bolts at the jaw and mark where the stitch scratches will go. Use a dry-erase marker so you can wipe away and adjust the proportions before any cutting begins.

  2. Open the pumpkin and thin the wall

    Have an adult cut a lid from the bottom or the back so the stem stays intact for that upright look. Scoop out the seeds and pulp, then scrape the inside of the face area until the wall is about one inch thick. A thinner wall makes relief shading much easier and lets a soft glow pass through the peeled zones. Work slowly with a sturdy scraping tool and keep the surface even.

  3. Peel the face skin for the base glow

    Using a shading loop or ribbon tool, remove just the orange skin from the entire face area, leaving the surrounding scalp and background skin dark. This peeled surface is your medium glow and forms the pale monster skin tone. Keep your strokes shallow and consistent so the whole face lights evenly. Leave the hairline band and the sides of the head untouched so they stay dark like his hair.

  4. Carve the deep sockets and brow shadows

    Go deeper under the brow, in the eye sockets, along the sides of the nose, and beneath the cheekbones to build shadow and dimension. The more flesh you remove, the brighter and warmer that spot glows, so these recesses read as the sculpted contours of his face. Keep the heavy brow ridge and the bridge of the nose closer to the surface so they stay comparatively dark. Step back often to check that the shading looks like a face and not just random pits.

  5. Add the jagged hairline and bolts

    Carve the sawtooth fringe of the flat-top hairline a little deeper so it separates cleanly from the pale forehead. Shape the two squared bolts at the jaw by peeling their faces to a mid glow while leaving thin dark outlines around them as bridges. Do not cut these all the way through; shallow relief keeps them structurally sound. Save any fully cut openings, like small notches in the eyes, for last so the wall stays strong while you work.

  6. Scratch the stitches and light it up

    With just the tip of a small knife, scratch the shallow stitch lines on the cheek, the temple, and near the bolts. Keep these cuts light so they show as fine dark marks against the glowing skin. Drop in a battery LED, never a candle, since a warm steady light shows relief work best and stays safe. Wipe off any marker lines, snap your photo in a dim room, and enjoy your friendly-scary monster.

Gather your supplies

Check things off as you get ready.

Work on a stable surface, keep your free hand out of the cutting path, and have an adult handle sharp tools.

Three levels of light

  • Leave intact

    The scalp, the sides of the head, and the background stay as untouched dark skin for the monster's hair.

  • Peel & shade

    The whole face and the squared bolts get skin-peeled for a soft mid glow that reads as pale monster skin.

  • Cut through

    Only tiny notches, such as accents in the eyes, are cut fully through for the brightest points of light.

Learn the carving basics

Before you start cutting

How do I keep the face looking sculpted and not flat?

Vary your carving depth on purpose. Peel the raised areas like the forehead and cheeks only lightly, and dig deeper into the eye sockets, under the brow, and beside the nose. The deeper spots glow brighter and warmer, which tricks the eye into reading real facial contours.

Do I need a light behind it at all?

Relief carving shows well in normal room light because the shaded depths cast their own shadows. A soft battery LED inside will make the deeper cuts glow and boost the effect, but skip candles entirely. For daytime display the sculpted surface still reads clearly without any light.

How do I keep the bolts and stitches from breaking off?

Keep them shallow. The bolts are shaped by peeling their surface and leaving thin dark outlines rather than cutting around them, so they stay part of the solid wall. The stitches are just light knife scratches, not through-cuts, so there is nothing thin enough to snap.

Your take belongs here, too.

Changed a detail? Made it simpler? Share a photo of your version and tell the community what worked.

Share your pumpkin

More pumpkins like this

You've reached the end Β· 8 pumpkins
The Patch Report

Fresh pumpkins, in your inbox.

The best new carvings, ideas worth stealing, and how-tos for carving season. Short, seasonal, and gone by November.

A short email during carving season. Unsubscribe anytime. See our privacy policy.