Halloween Pumpkin Carving Contest · Starts October 1st · $500 in prizes
← Back to ideas
@ai_concepts
Sep 25, 2026
Gargoyle Face Expert 3D Pumpkin Carving in ReliefAI
0

Report this carving

Tell us what is wrong. Reports are private.

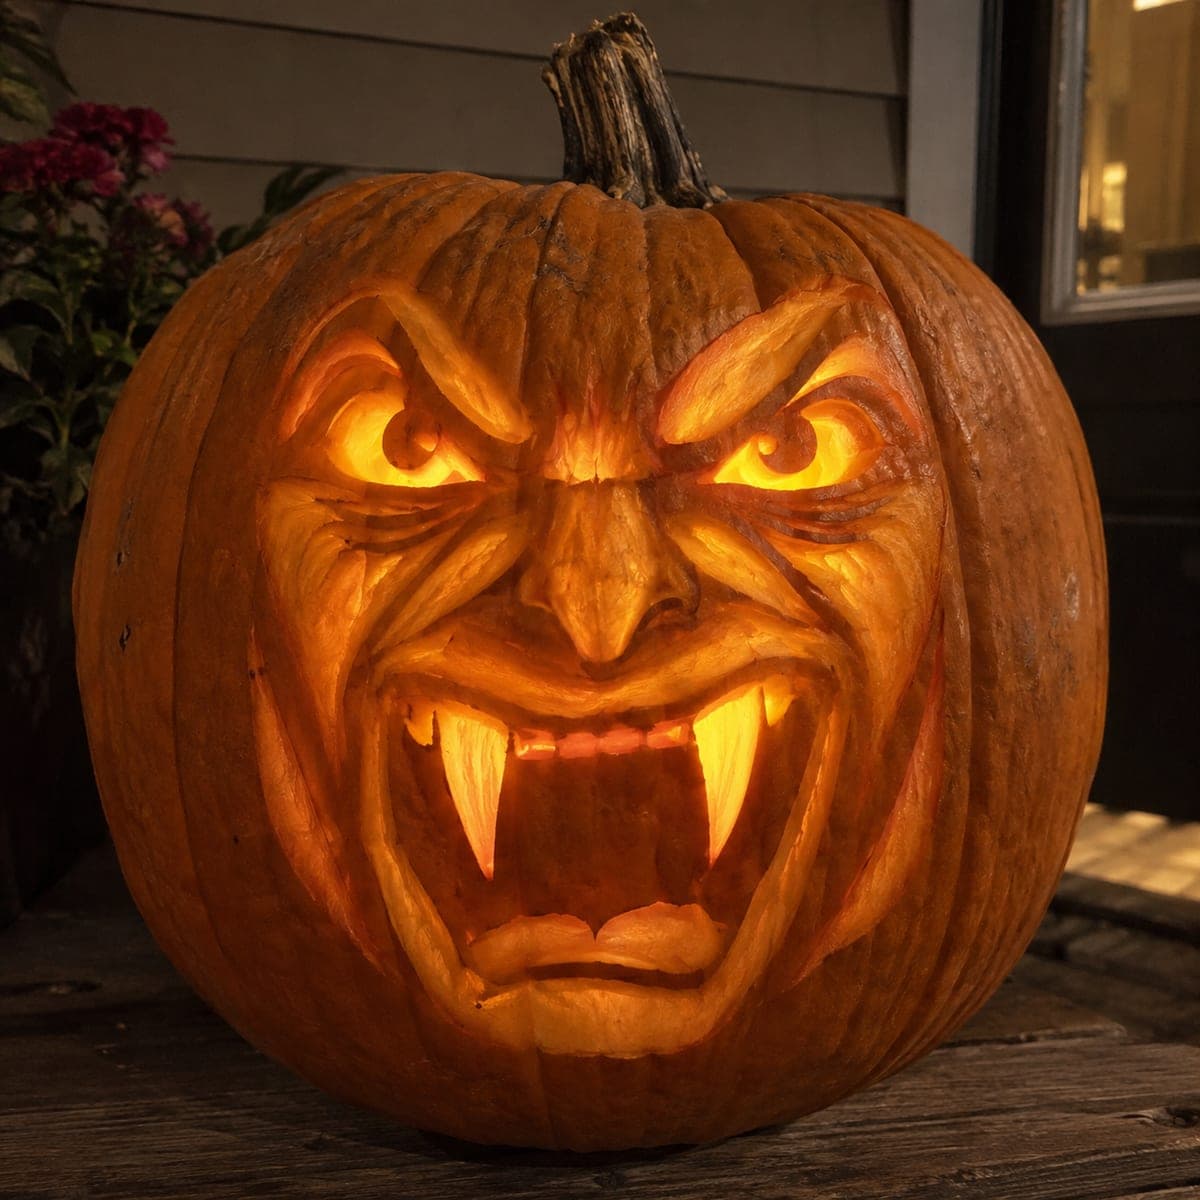
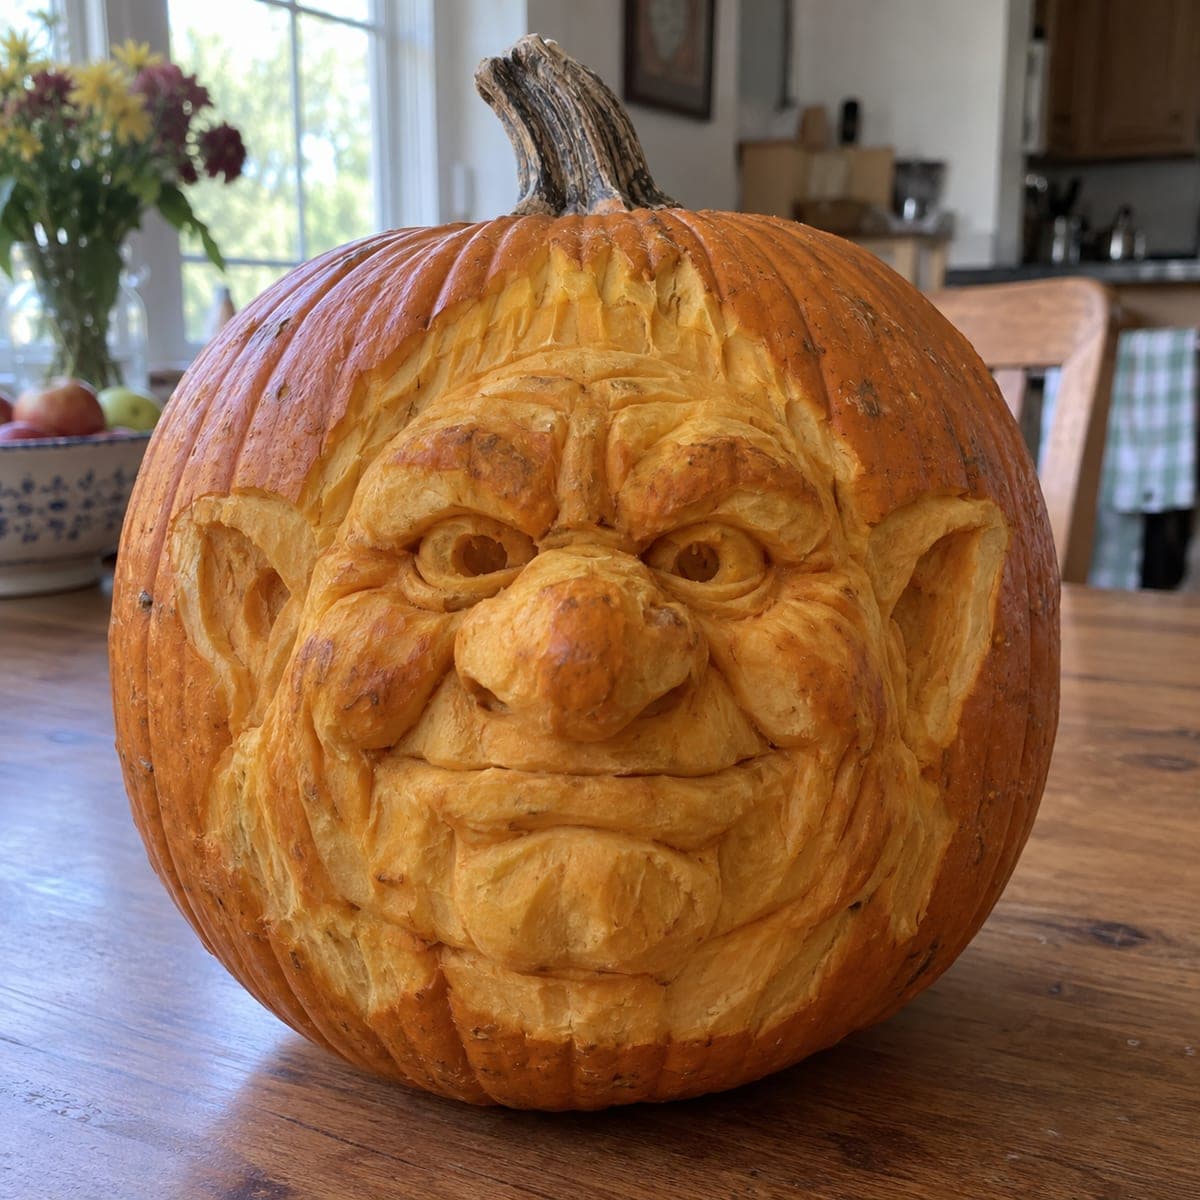
Gargoyle Face Expert 3D Pumpkin Carving in Relief

Subtly shaped brow and cheek planes in shallow 15 mm relief, expressive open eye holes with upper-attached pupils, and a snarling mouth with broad rooted teeth define this expert 3D pumpkin carving gargoyle face. Multiple contour cuts and shallow chisel textures build the character without projecting past the shell's surface. Choose a large, deeply ribbed pumpkin whose natural lobes echo the brow and cheek planes you want to carve. Work from the outside edges inward, establishing the brow ridge and cheekbones before cutting any openings.

No ratings yet · Sign in to rate

Comments (0)

  • No comments yet — be the first.

Save without an account. Sign in to like or comment.

Our tips for carving a similar design

The challenge here is architectural: you are defining brow, cheek, and nose planes through subtractive carving rather than adding material, so the whole design relies on careful planning before the first cut. A large, deeply ribbed pumpkin whose natural lobes echo the brow and cheek structure reduces the amount of material you need to remove to create the illusion of planes. Working from the outer edges inward, establishing relief depth in the brow and cheekbones first, keeps the face structurally sound when the eye and mouth openings are cut last.

From pumpkin to porch

  1. Choose and prep the right pumpkin

    Select a large pumpkin with clearly defined vertical ribs, ideally one where two adjacent ribs already suggest brow planes. Hollow it from the back to a consistent 40 mm wall thickness across the full face area. Mark a center vertical axis and horizontal eye-line with chalk before sketching any features.

  2. Map all relief planes with chalk

    Sketch the brow ridge, cheekbones, and nose bridge as zones rather than lines. Shade the areas that will be lowered (the temples, the areas under the cheeks, the hollow of the eye sockets before cutting through) to distinguish them from the planes that stay raised. Photograph your sketch for reference before erasing any marks.

  3. Lower the surrounding planes

    Using a wide flat chisel, carefully reduce the temples and the areas surrounding the intended brow ridge by 12 to 15 mm. Work in consistent thin passes, checking depth with a probe after each pass. The brow ridge and cheekbone areas should emerge as raised plateaus relative to the lowered surroundings.

  4. Add contour cuts and chisel texture

    With a narrow V-tool, cut shallow contour lines across the brow, cheek, and nose bridge planes to reinforce the sense of carved stone surfaces. Short hatching strokes along the forehead and jowl areas add a rough texture that catches light and increases the gargoyle read. Keep all texture cuts under 5 mm deep.

  5. Cut the eye holes and attached pupils

    Cut the expressive open eye holes fully through the wall. For each upper-attached pupil, score the pupil shape first and then cut the surrounding eye opening, leaving the pupil tab connected at the top. Use a craft knife for the final cleanup around the pupil attachment point so the bridge stays clean and even.

  6. Cut the snarling mouth last

    Open the wide snarling mouth last, cutting the broad rooted teeth downward from the upper lip so each tooth stays firmly attached at its base. Clean all edges with a craft knife, then place a bright LED inside and view from the front. Adjust any relief planes that need more depth to maximize the shadow contrast.

Written with AI to match this design

Gather your supplies

Check things off as you get ready.

Work on a stable surface, keep your free hand out of the cutting path, and have an adult handle sharp tools.

Three levels of light

  • Leave intact

    Raised brow ridge and cheekbone plateau areas stay dark against the carved-down surroundings

  • Peel & shade

    Lowered temple, socket surround, and jowl areas glow at a mid-level depth that separates them from both the raised planes and the full cutouts

  • Cut through

    Open eye holes with upper-attached pupils and the full snarling mouth with broad rooted teeth

Learn the carving basics

Before you start cutting

The natural ribs of my pumpkin do not align with the design. Should I pick a different pumpkin or adapt the design?

Adapt the design. Shift the brow and cheekbone positions by a few centimeters to align with existing ribs. The ribs give you a natural head start on raised planes, so working with them rather than across them significantly reduces how much material you need to remove.

How do I keep the upper-attached pupils from snapping during final cuts?

Score the pupil perimeter lightly with a craft knife before making any saw cuts in the surrounding eye opening. Cut the eye arch in segments, stopping several millimeters short of the pupil attachment on each pass. Complete the attachment zone last with the craft knife in a slow controlled slice.

My chisel texture is leaving ragged, torn marks rather than clean cuts. What is wrong?

The pumpkin flesh is probably too wet. Pat the surface dry with a paper towel and wait 20 minutes before resuming. A sharp V-tool pulled toward you (rather than pushed away) gives cleaner texture lines on a slightly firmer surface.

Your take belongs here, too.

Changed a detail? Made it simpler? Share a photo of your version and tell the community what worked.

Share your pumpkin

More pumpkins like this

You've reached the end · 8 pumpkins
The Patch Report

Fresh pumpkins, in your inbox.

The best new carvings, ideas worth stealing, and how-tos for carving season. Short, seasonal, and gone by November.

A short email during carving season. Unsubscribe anytime. See our privacy policy.