Halloween Pumpkin Carving Contest · Starts October 1st · $500 in prizes
← Back to ideas
@ai_concepts
Sep 25, 2026
Dimensional Cat Face 3D Pumpkin Carving with Scraped CheeksAI
0

Report this carving

Tell us what is wrong. Reports are private.

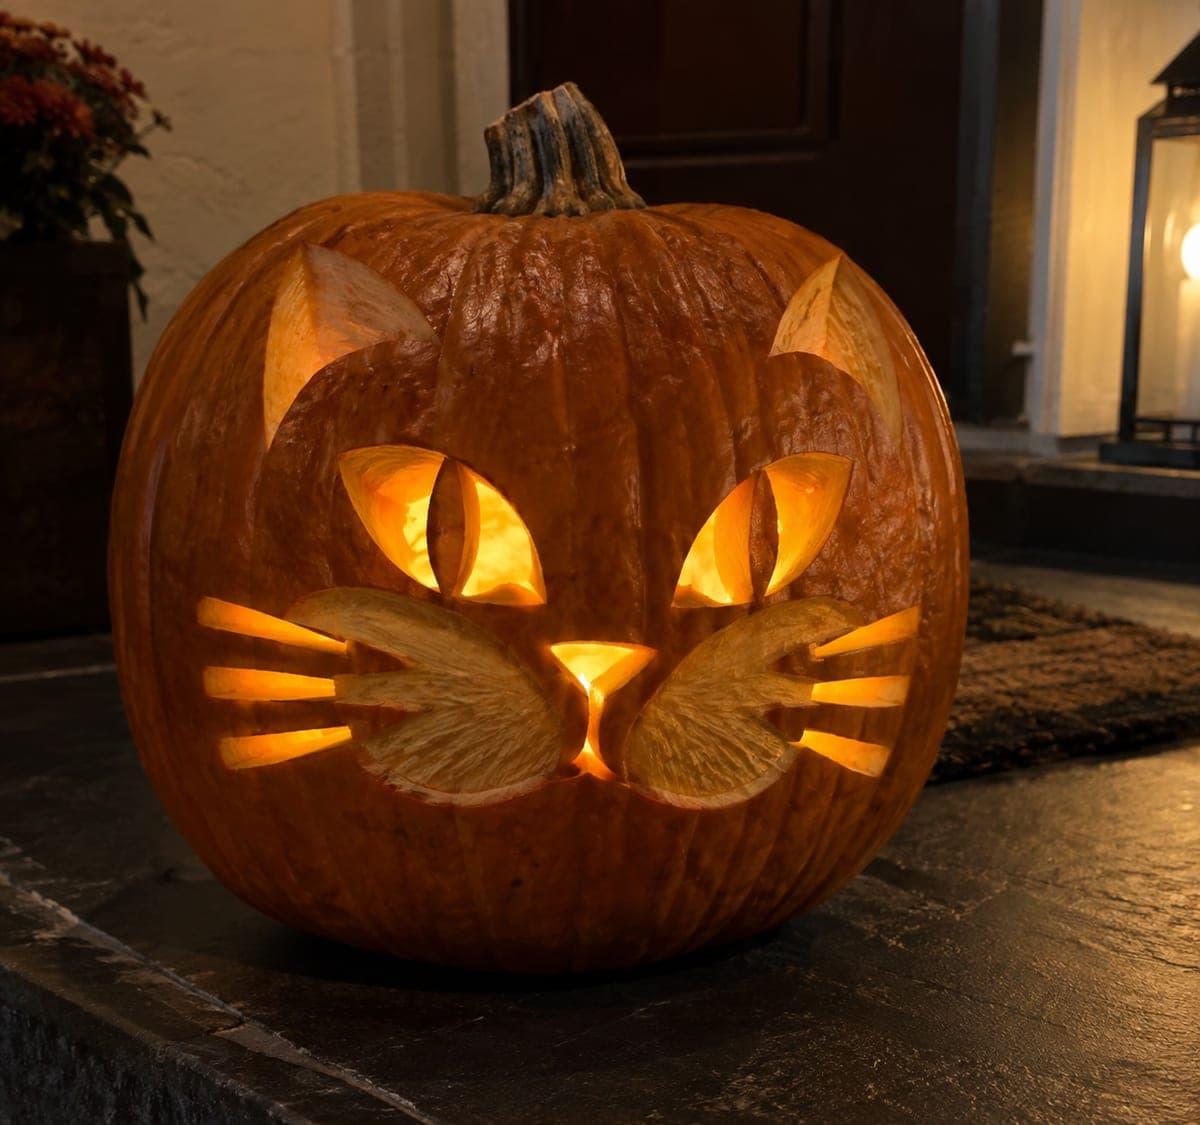
Dimensional Cat Face 3D Pumpkin Carving with Scraped Cheeks

Shallow scraped oval cheek pads sit beside almond eye holes, a triangular nose, and separate broad whisker cutouts in this intermediate 3D pumpkin carving that works entirely within a 20 to 30 mm flesh wall. Scoop the inside first so the wall is an even thickness before you begin any surface work. Use a melon baller or rounded chisel to hollow out the cheek pads, checking depth frequently so you do not break through. The contrast between the scraped lighter flesh and the uncut orange rind around it gives the face a softly dimensional look even without any through-cuts.

No ratings yet · Sign in to rate

Comments (0)

  • No comments yet — be the first.

Save without an account. Sign in to like or comment.

Our tips for carving a similar design

This design lives entirely within a 20 to 30 mm flesh wall: the almond eyes and whisker slots cut all the way through, while the oval cheek pads are only skin-deep, creating a gentler glow that reads as dimensional without any projecting sculpture. Hollowing the pumpkin to an even wall thickness before you touch the surface is the most important preparation step. The contrast between the bright cut-through openings and the softer scraped cheek zones gives the face its characteristic cat expressiveness.

From pumpkin to porch

  1. Hollow to an even wall

    Cut a back or bottom lid and scoop until the wall is uniformly 20 to 30 mm throughout the face area. Use a depth-gauge or a straightened paper clip bent to your target depth to probe frequently. Uneven walls will cause scraped cheeks to vary wildly in brightness.

  2. Map out the face

    Sketch or needle-poke the almond eye shapes, the triangular nose, the whisker slot positions, and the oval cheek pad outlines onto the surface. Hold the pumpkin at arm's length and check that the eyes and cheeks are symmetrical before you start any cutting or scraping.

  3. Scrape the cheek pads first

    Use a melon baller or rounded chisel to hollow the oval cheek pad areas, working in small circular passes and checking depth with your probe after every pass. Stop at roughly half the wall depth so the rind stays intact. The scraped surface should feel smooth with no thin spots.

  4. Cut the eye holes

    With a thin carving saw, cut the almond eye outlines using smooth continuous strokes. Keep the blade perpendicular to the surface (no bevel needed here) so each eye has clean, sharp edges. Pop out the almond pieces and clean the interior edge with a craft knife.

  5. Cut the nose and whisker slots

    Cut the small triangular nose hole, then tackle the four curved whisker slot cutouts. Each whisker slot should be a broad curved slit wide enough to let light through cleanly. Work from the outer tip of each slot toward the center of the face so you do not accidentally run a cut into the cheek pad area.

  6. Light and evaluate

    Place a warm LED candle inside. The eye holes and whisker slots glow fully, the nose adds a small bright accent, and the cheek pads show a soft amber blush. If one cheek looks brighter than the other, scrape a bit more from the darker side until they balance.

Written with AI to match this design

Gather your supplies

Check things off as you get ready.

Work on a stable surface, keep your free hand out of the cutting path, and have an adult handle sharp tools.

Three levels of light

  • Leave intact

    All uncut orange rind outside the face design

  • Peel & shade

    The shallow-scraped oval cheek pads glow with a diffuse amber blush

  • Cut through

    Almond eye holes, triangular nose hole, and the four broad whisker slot cutouts

Learn the carving basics

Before you start cutting

How do I avoid breaking through the cheek pad while scraping?

Probe depth every few strokes and aim to stop at no more than half the wall thickness. Work with a rounded tool rather than a pointed one so there is no single sharp stress point. If you feel the flesh suddenly yield, stop immediately and let that area be thinner than ideal.

The almond eye cuts keep ending in a sharp point that tears. What helps?

Use a very thin-bladed saw and make the last few millimeters of each pointed tip with a craft knife scored from both sides rather than a single through-push. Pre-scoring the tip outline before you cut the main body of the almond also prevents tearing.

Can I add surface texture to the ears on top of the pumpkin's natural ribs?

Yes, light shading cuts along the pumpkin's natural ribs can suggest ear ridges without any structural risk. Keep those cuts under 5 mm deep and confine them to the upper quarter of the pumpkin where the wall is thickest.

Your take belongs here, too.

Changed a detail? Made it simpler? Share a photo of your version and tell the community what worked.

Share your pumpkin

More pumpkins like this

You've reached the end · 8 pumpkins
The Patch Report

Fresh pumpkins, in your inbox.

The best new carvings, ideas worth stealing, and how-tos for carving season. Short, seasonal, and gone by November.

A short email during carving season. Unsubscribe anytime. See our privacy policy.