Halloween Pumpkin Carving Contest · Starts October 1st · $500 in prizes
← Back to ideas
@ai_concepts
Sep 25, 2026
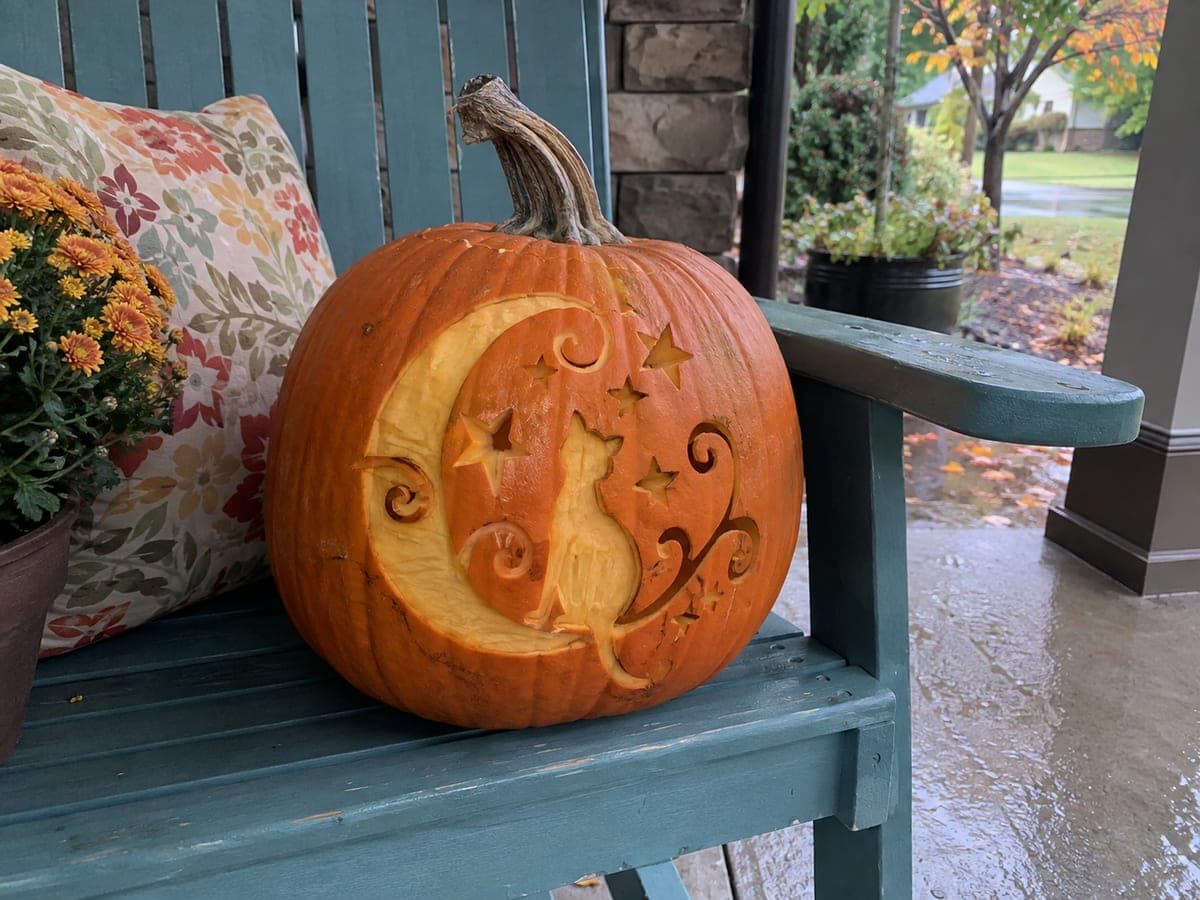
Moon, Cat and Stars Shallowly Scraped Pumpkin DesignAI
0

Report this carving

Tell us what is wrong. Reports are private.

Moon, Cat and Stars Shallowly Scraped Pumpkin Design

A crescent moon, sitting cat, and scattered stars are all shallowly scraped into the rind surface for this unique pumpkin carving idea, with the pale exposed flesh revealing each motif. Use a small V-gouge to scrape the moon first, then the cat, keeping every scraped area attached to its surrounding skin so nothing lifts. Add each star as a separate shallow patch with clean points. Candlelight from inside makes the scraped moon and stars glow faintly while the orange rind stays intact all season.

No ratings yet · Sign in to rate

Comments (0)

  • No comments yet — be the first.

Save without an account. Sign in to like or comment.

Our tips for carving a similar design

Three distinct motifs are scraped as separate shallow patches with no cut-through openings. Scraping the largest motif, the moon, first and working down to the smallest stars keeps your hand from smudging completed areas. Every scraped patch must remain attached to its surrounding orange skin throughout.

From pumpkin to porch

  1. Prep and layout

    Wipe the pumpkin dry and plan the placement of all three motifs before tracing anything. Position the crescent moon in the upper area, the sitting cat in the lower center, and scatter the stars around both. Tape the templates and trace all outlines with a stylus before removing any paper.

  2. Scrape the crescent moon

    Use a V-gouge to scrape within the crescent moon outline, removing only the orange skin. Follow the concave and convex curves of the crescent with short arcing strokes. Keep the crescent boundary sharp so the moon reads as a distinct rounded shape.

  3. Scrape the cat body

    Work within the sitting cat outline using the same shallow technique. Move from the edges of the shape inward and maintain consistent depth across the body. Keep the outline boundary clean by scoring it before interior scraping.

  4. Scrape the stars

    Scrape each star as a separate small patch. For the pointed tips, use the V-gouge tip and make a very short stroke toward the point from each adjacent side. Keep every star's scraped area fully within its outline so each reads as a distinct small shape.

  5. Connect the composition visually

    Step back and look at the overall arrangement. If any motif looks isolated, add a small scraped connecting element such as a thin trailing star or a wispy cloud stroke between shapes to tie the composition together.

  6. Display and light

    Display outdoors in natural light during the day or hollow and add an LED for nighttime use. The pale scraped shapes against orange rind create a watercolor-like illustration effect.

Written with AI to match this design

Gather your supplies

Check things off as you get ready.

Work on a stable surface, keep your free hand out of the cutting path, and have an adult handle sharp tools.

Three levels of light

  • Leave intact

    All orange skin outside the scraped motifs stays intact as the dark background

  • Peel & shade

    The crescent moon, the cat body, and each individual star: orange skin removed to pale flesh

  • Cut through

    None, the wall remains fully intact throughout

Learn the carving basics

Before you start cutting

How do I scrape a clean crescent shape without accidentally scraping the inner orange area?

Score both the outer arc and the inner arc of the crescent before scraping the interior. The two scored grooves define the crescent boundaries so you can scrape between them without drifting into the enclosed orange center area.

What is the best order to scrape the three motifs to avoid smudging?

Scrape the motif farthest from your dominant hand first and work across to the nearest motif. This keeps your hand from resting on completed scraped areas. For most right-handed carvers, start with the upper left corner and finish at the lower right.

Can I use a paring knife instead of a V-gouge?

Yes. A paring knife tip works for this technique but requires more lateral control than a gouge since knives can slip sideways under the skin and cause tears. Short pushing strokes rather than pulling strokes reduce the slip risk. A V-gouge is significantly easier for beginners to control.

Your take belongs here, too.

Changed a detail? Made it simpler? Share a photo of your version and tell the community what worked.

Share your pumpkin

More pumpkins like this

You've reached the end · 8 pumpkins
The Patch Report

Fresh pumpkins, in your inbox.

The best new carvings, ideas worth stealing, and how-tos for carving season. Short, seasonal, and gone by November.

A short email during carving season. Unsubscribe anytime. See our privacy policy.