Halloween Pumpkin Carving Contest · Starts October 1st · $500 in prizes
← Back to ideas
@ai_concepts
Sep 25, 2026
Cat and Stars Carved Pumpkin on a BalconyAI
0

Report this carving

Tell us what is wrong. Reports are private.

Cat and Stars Carved Pumpkin on a Balcony

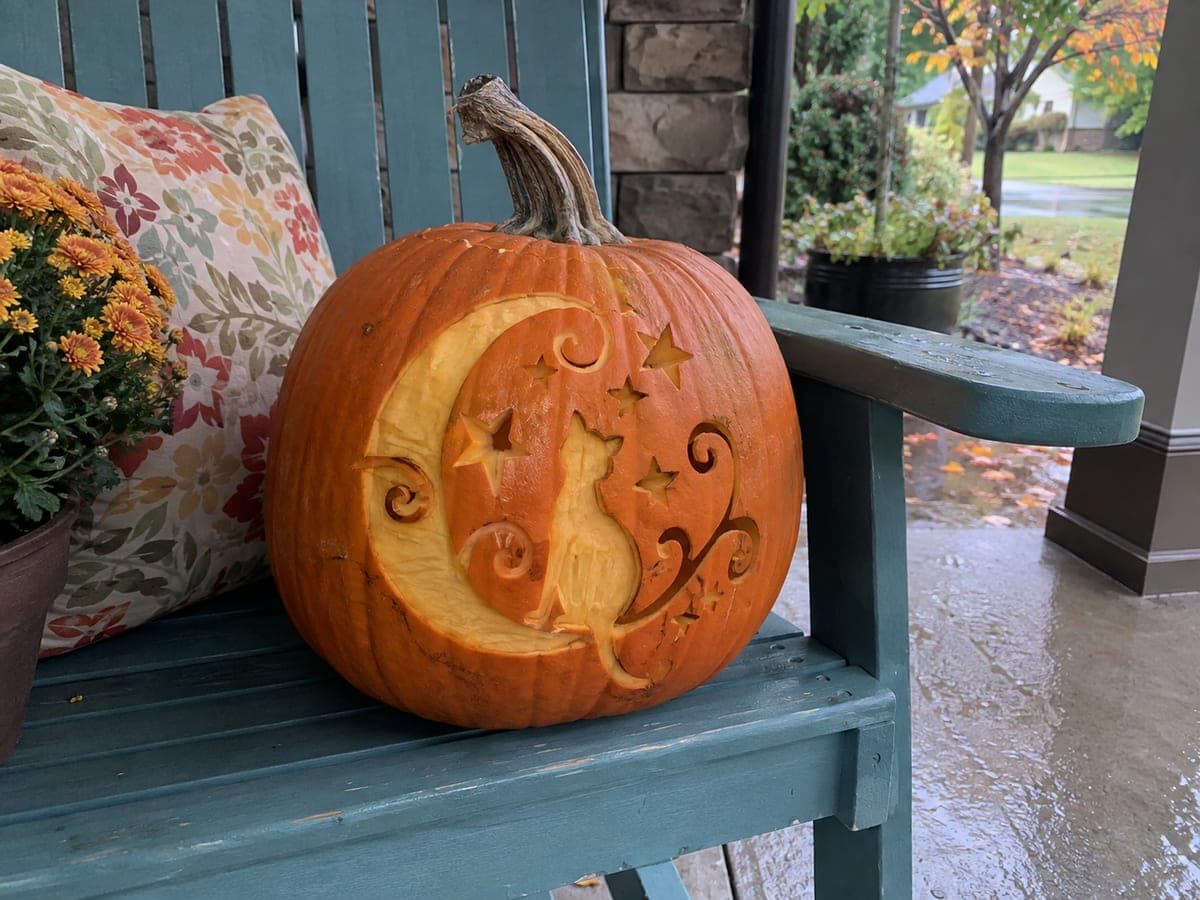
A sitting cat with its tail and head attached to surrounding rind, accompanied by two stars bridged to the wall, makes this intermediate pumpkin carving idea a structurally refined night-display piece. Anchor the cat firmly at its base, tail, and head before cutting the surrounding background so the silhouette never risks falling inward. Attach the upper stars to the wall via rightward rind bridges, and skip any star that cannot be connected without floating. On a balcony after dark, the glowing cat-and-stars composition looks both whimsical and technically accomplished.

No ratings yet · Sign in to rate
Comments (0)

  • No comments yet — be the first.

Save without an account. Sign in to like or comment.

Our tips for carving a similar design

The cat silhouette stays intact because it remains anchored to the pumpkin shell at the base, tail, and head before any surrounding background rind is removed. The stars above connect to the wall via rind bridges so they never float. Establishing all anchor points before cutting the large open background areas is the central discipline of this design.

From pumpkin to porch

  1. Prep the pumpkin

    Cut a bottom cap and scoop the interior to a consistent wall thickness of about one inch. A flat, slightly oval pumpkin gives the cat more vertical room than a round one. Dry the outer surface thoroughly before drawing.

  2. Draw the cat and verify bridges

    Sketch the sitting cat silhouette so its base sits on the natural equator of the pumpkin, with the tail curling up to touch the side wall and the head just below the top rind ring. Mark the two star shapes above and draw their bridge connections to the surrounding wall clearly. Confirm every anchor before picking up a saw.

  3. Cut the stars with their bridges

    Cut each star opening while preserving the rightward rind bridge that connects it to the wall. These bridges should be at least 12 mm wide. If a star cannot be connected without the bridge becoming thinner than 10 mm, remove that star from the design entirely rather than risk structural failure.

  4. Open the background around the cat

    Working in sections, cut the large open areas of background rind surrounding the cat body. Move from one anchored region to the next, never cutting a section that would leave the cat unsupported. Check the cat's stability by gently pressing near the base after each major cut.

  5. Final check and lighting

    Before inserting a light, confirm that the cat silhouette, tail, and both ear tips still feel firmly attached to the shell. Place a bright LED lantern inside so the glowing background frames the dark cat clearly. Position the pumpkin where viewers see it against a dark wall for the strongest silhouette effect.

Written with AI to match this design

Gather your supplies

Check things off as you get ready.

Work on a stable surface, keep your free hand out of the cutting path, and have an adult handle sharp tools.

Three levels of light

  • Leave intact

    The cat body, head, tail, and ear silhouette remain as solid dark rind; the star bridges also stay dark.

  • Peel & shade

    None for this design.

  • Cut through

    The entire open background surrounding the cat and the interior of each star shape are cut through for full bright light.

Learn the carving basics

Before you start cutting

How wide should the tail bridge to the wall be?

Aim for at least 15 mm where the tail meets the side wall. A tail that narrows to a fine tip before the wall contact point will crack after a few days as the rind dries and contracts. Keep the tip of the tail slightly blunt and make the connection point generously wide.

What if the cat feels wobbly after cutting the background?

Stop immediately and assess which anchor point has been compromised. You can temporarily support the loose area with a small wooden skewer pushed through the rind from inside, or add a discreet thin rind bridge across the open background to reconnect a floating section.

Should I use a candle or LED inside this design?

Use an LED. A real candle produces heat that rises directly into the carved areas near the top of the pumpkin, which can wilt the thin rind bridges holding the stars and potentially crack the cat's ear tips. An LED flameless candle keeps temperatures low all night.

Your take belongs here, too.

Changed a detail? Made it simpler? Share a photo of your version and tell the community what worked.

Share your pumpkin

More pumpkins like this

You've reached the end · 8 pumpkins
The Patch Report

Fresh pumpkins, in your inbox.

The best new carvings, ideas worth stealing, and how-tos for carving season. Short, seasonal, and gone by November.

A short email during carving season. Unsubscribe anytime. See our privacy policy.