Halloween Pumpkin Carving Contest · Starts October 1st · $500 in prizes
← Back to ideas
@ai_concepts
Sep 25, 2026
Simple Cat Face Pumpkin Carving IdeaAI
0

Report this carving

Tell us what is wrong. Reports are private.

Simple Cat Face Pumpkin Carving Idea

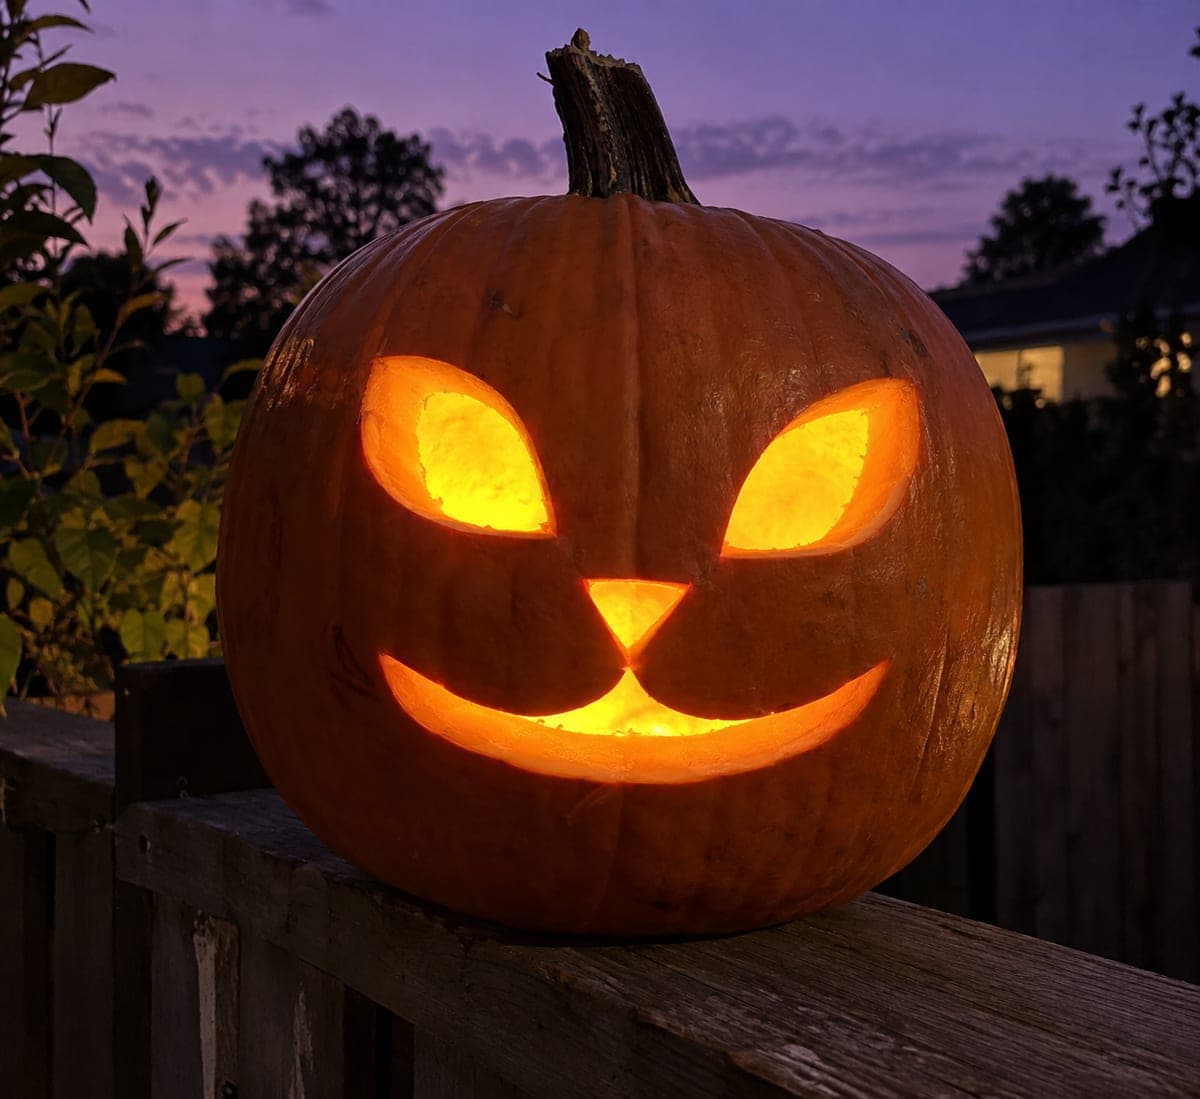
Almond eye holes, a tiny triangular nose, and one curved mouth cutout create a clean and instantly recognizable cat face in this easy realistic pumpkin carving. Four simple shapes with no fine fur detail means even beginning carvers can nail it. Sketch the face lightly on the rind with a dry-erase marker before cutting, and use a small keyhole saw for the curved mouth line. Backlight with a warm tealight and the almond eyes catch the glow in a way that feels genuinely feline.

No ratings yet · Sign in to rate

Comments (0)

  • No comments yet — be the first.

Save without an account. Sign in to like or comment.

Our tips for carving a similar design

Two almond eye holes, a tiny triangular nose, and one curved mouth cutout create a cat face that reads immediately as feline even with no fur detail at all. Because all four shapes are simple and independent, the design carries no structural complexity. Sketching the face with a dry-erase marker before cutting ensures the eyes are symmetrical and the nose is properly centered below them.

From pumpkin to porch

  1. Scoop the pumpkin

    Cut a bottom cap and scoop the interior walls to about an inch of thickness. The four shapes in this design are small enough that thinner walls are not required, but a clean, smooth inner surface makes removing the cut pieces easier. Wipe the outer surface dry before drawing.

  2. Sketch the cat face

    Using a dry-erase marker, draw two almond-shaped eyes in the upper half of the face, symmetrically placed. Draw a small equilateral triangle for the nose below the midpoint between the eyes. Add a short gentle curved line for the mouth below the nose, curving slightly upward at the ends for a contented cat expression.

  3. Cut the almond eyes

    Use a thin pumpkin saw to follow each almond outline, keeping the blade perpendicular to the surface throughout. The tapered ends of each almond require the blade to meet cleanly at a point; approach each tip from both sides rather than trying to turn the blade at the last moment. Pop both pieces inward.

  4. Cut the nose and mouth

    Cut the small triangle nose with three straight-line meeting cuts, pushing the piece inward. For the curved mouth, a small keyhole saw or detail blade works better than a wide pumpkin saw. Follow the curve in a single continuous motion rather than short hesitant passes.

  5. Light and position

    Insert a warm LED tea light inside. The almond eyes catch the glow in a way that feels genuinely feline, especially when the pumpkin is placed at eye level on a porch railing. The warm orange rind and simple face create a friendly, approachable display.

Written with AI to match this design

Gather your supplies

Check things off as you get ready.

Work on a stable surface, keep your free hand out of the cutting path, and have an adult handle sharp tools.

Three levels of light

  • Leave intact

    All rind surrounding the four holes stays solid and dark.

  • Peel & shade

    None for this design.

  • Cut through

    Both almond eye holes, the triangular nose hole, and the curved mouth hole are cut completely through for warm glowing light.

Learn the carving basics

Before you start cutting

How do I get the two almond eyes to match each other?

Draw one almond eye first, then fold a small piece of paper over that shape, trace it, flip the paper over, and use it as a template for the second eye. Alternatively, draw both eyes simultaneously by placing a ruler across the center of the face and marking equal distances from the centerline for each eye position.

Should the cat mouth curve up or down?

A slight upward curve at the ends reads as a satisfied cat expression, which pairs nicely with the simple almond eyes. A straight horizontal mouth gives a more neutral look. A downward curve makes the cat look displeased, which can be a fun contrast if you want a grumpy cat effect.

Can I add whisker cuts to the sides of the nose?

Yes. Short horizontal slot cuts extending outward from the nose area add a nice whisker detail. Use a detail blade to cut each whisker slot no longer than 20-25 mm and keep them at least 8 mm apart so the rind between them stays firm. Three whisker slots on each side is the classic cat look.

Your take belongs here, too.

Changed a detail? Made it simpler? Share a photo of your version and tell the community what worked.

Share your pumpkin

More pumpkins like this

You've reached the end · 8 pumpkins
The Patch Report

Fresh pumpkins, in your inbox.

The best new carvings, ideas worth stealing, and how-tos for carving season. Short, seasonal, and gone by November.

A short email during carving season. Unsubscribe anytime. See our privacy policy.