Halloween Pumpkin Carving Contest Β· Starts October 1st Β· $500 in prizes
← Back to ideas
@ai_concepts
Sep 25, 2026
Glowing Owl Face Realistic Pumpkin Carving StencilAI
0

Report this carving

Tell us what is wrong. Reports are private.

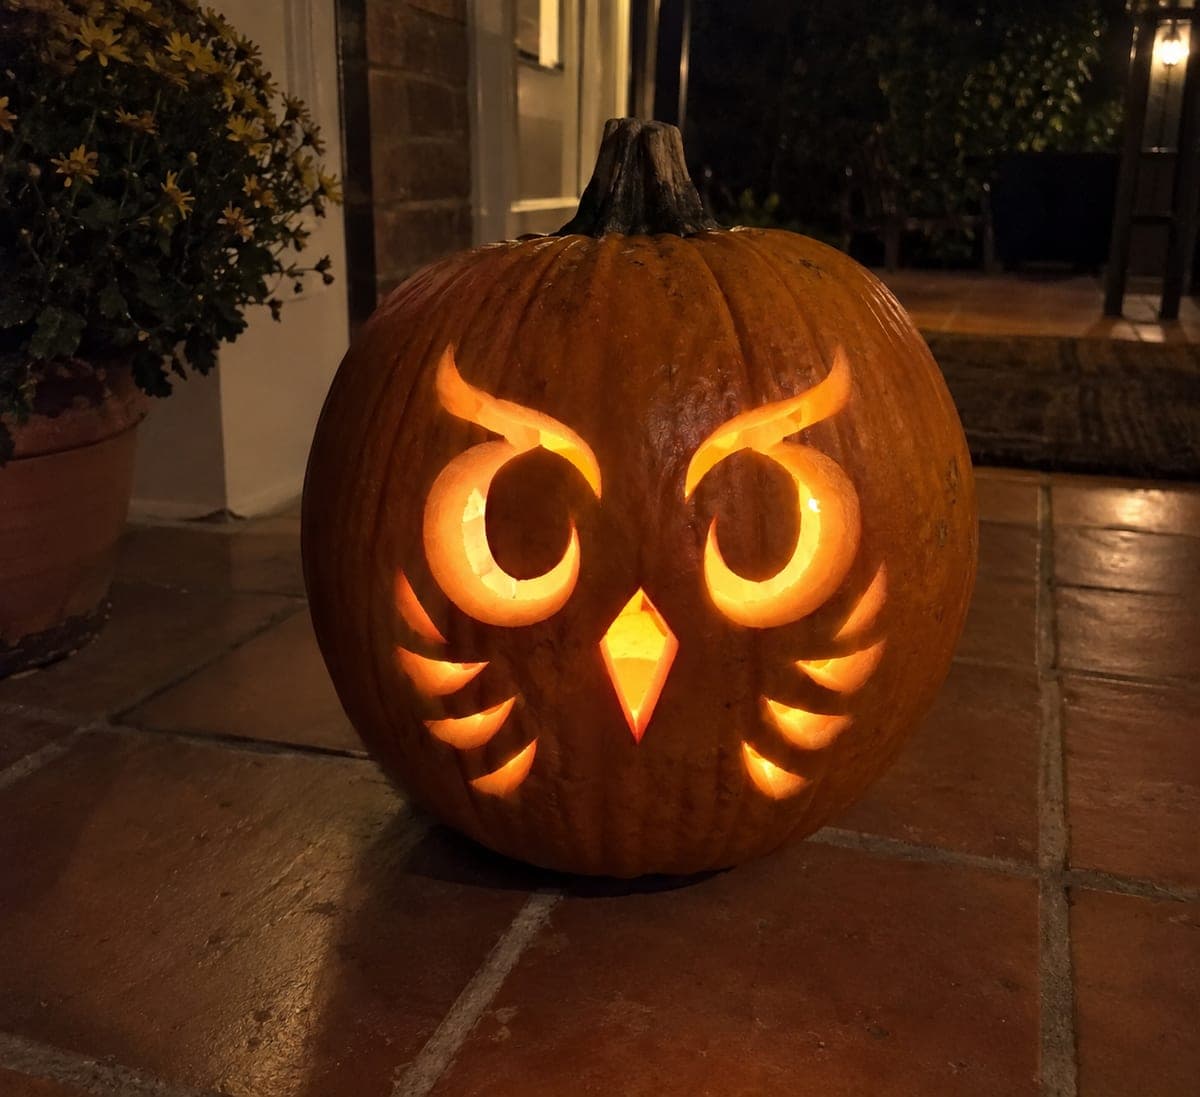
Glowing Owl Face Realistic Pumpkin Carving Stencil

Two oval glowing eyes with dark pupils anchored to thick upper brows, a small beak hole, and six pointed feather holes along the cheeks make this realistic pumpkin carving look like a true barn owl. Attach the pupils broadly at the top so they stay supported once the surrounding rind is cut away. Work the feather holes last since they are the most detail-oriented part of the design. Placing the pumpkin at eye level on a porch railing lets the glowing eyes meet trick-or-treaters straight on.

No ratings yet Β· Sign in to rate

Comments (0)

  • No comments yet β€” be the first.

Save without an account. Sign in to like or comment.

Our tips for carving a similar design

Two large oval eyes with dark pupils broadly anchored to thick upper brows, a small beak hole, and six pointed feather holes along the cheeks capture the look of a real barn owl face. The pupils must stay connected to the brow rind at the top of each eye to remain structurally supported. Working the feather holes last allows you to complete the focal eye area cleanly before moving to the surrounding texture.

From pumpkin to porch

  1. Scoop and map the face

    Cut a bottom cap and scoop to about three-quarters of an inch of wall thickness. Mark the center vertical axis and horizontal midpoint before drawing. The owl face reads most convincingly when the eye ovals are large and close together, occupying most of the upper half of the carveable area.

  2. Draw the eyes and pupils

    Draw two large oval eye openings side by side. At the top of each oval, draw the dark pupil disc so it connects broadly to the brow rind above, not as a floating island in the center. The pupil should share at least 15 mm of continuous rind with the brow at the top boundary.

  3. Draw the beak and feather holes

    Place a small rectangular or wedge-shaped beak hole centered below the eyes. Then sketch six pointed feather holes on the outer cheek areas, three on each side, keeping at least 10 mm of rind between each hole and between the holes and the outer eye boundaries.

  4. Cut the eye openings around the pupils

    Follow each oval outline carefully, stopping before severing the broad pupil-to-brow connection at the top of each eye. Pop each oval piece inward. Check that both pupils are firmly attached to their brow rind before moving on.

  5. Cut the beak and feather holes, then light

    Cut the beak hole with a fine detail blade for clean edges. Then work through the six feather holes one at a time using a narrow detail blade for the pointed tips. Insert a warm LED lantern at eye level on a porch railing so the glowing eyes greet visitors directly.

Written with AI to match this design

Gather your supplies

Check things off as you get ready.

Work on a stable surface, keep your free hand out of the cutting path, and have an adult handle sharp tools.

Three levels of light

  • Leave intact

    The dark pupil discs (connected to the top brow rind) and all rind between holes stay solid and dark.

  • Peel & shade

    None for this design.

  • Cut through

    Both large oval eye surrounds, the small beak hole, and all six pointed feather holes are cut through for full glowing light.

Learn the carving basics

Before you start cutting

How wide should the pupil-to-brow connection be?

At least 15 mm wide is the minimum for a reliable connection. The broader this attachment, the more securely the pupil disc stays in place as the surrounding rind is cut away. A connection that narrows to less than 10 mm is at risk of cracking when the pumpkin wall flexes under hand pressure during the cut.

What is the best tool for the pointed feather hole tips?

A fine detail blade or a narrow linoleum gouge gives the most control at the pointed tip of each feather hole. Approach each tip from both sides of the hole and let the two cuts meet cleanly at the point rather than trying to turn a wider blade at the last moment.

Can I place the pumpkin on its side to carve the cheek feather holes?

Yes, turning the pumpkin on its side so the cheek area faces upward is a good technique for the feather holes. It reduces the awkward angle you would otherwise need to hold your hand at and gives you a clearer view of the hole outline while cutting.

Your take belongs here, too.

Changed a detail? Made it simpler? Share a photo of your version and tell the community what worked.

Share your pumpkin

More pumpkins like this

You've reached the end Β· 8 pumpkins
The Patch Report

Fresh pumpkins, in your inbox.

The best new carvings, ideas worth stealing, and how-tos for carving season. Short, seasonal, and gone by November.

A short email during carving season. Unsubscribe anytime. See our privacy policy.