Halloween Pumpkin Carving Contest · Starts October 1st · $500 in prizes
← Back to ideas
@ai_concepts
Sep 25, 2026
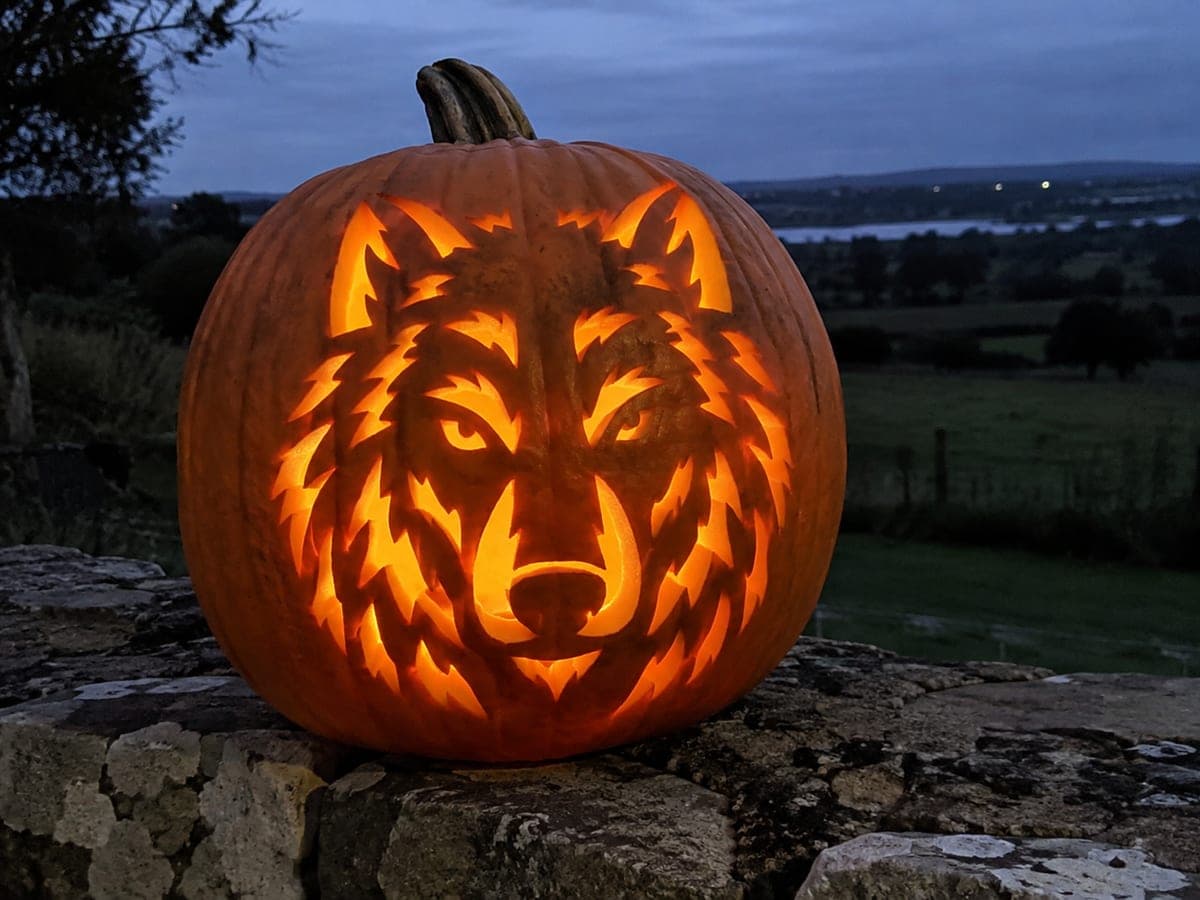
Wolf Face Stencil Realistic Pumpkin Carving DesignAI
0

Report this carving

Tell us what is wrong. Reports are private.

Wolf Face Stencil Realistic Pumpkin Carving Design

Two slanted eye holes, a solid nose broadly bridged to the muzzle, and jagged fur-shaped cutouts framing the cheeks and brows give this hard realistic pumpkin carving a convincing wolf face. Every cut connects back to the outer rind through generous bridges, so there are no fragile floating sections. Carve the fur silhouettes along the outer edge before cutting the eyes, since the eyes are the focal point and finishing them first makes it harder to hold the pumpkin steady. A strong LED inside makes the fur fringe glow dramatically.

No ratings yet · Sign in to rate
Comments (0)

  • No comments yet — be the first.

Save without an account. Sign in to like or comment.

Our tips for carving a similar design

The wolf reads as realistic because the solid retained nose bridges broadly to the muzzle, the slanted eye holes create a predatory expression, and the jagged fur-shaped cutouts around the cheeks and brows give the outer edge an irregular natural shape. The central face connects to all four edges of the pumpkin through generous rind bridges, so there are no structurally isolated sections. Carving the fur silhouette edges first, before the focal eyes, keeps the pumpkin easier to hold firmly during the detail work.

From pumpkin to porch

  1. Prep a medium to large pumpkin

    Choose a pumpkin with a relatively flat oval face. Cut a bottom cap and scoop to about three-quarters of an inch throughout. Mark the center vertical axis before transferring the template, since the wolf face must be precisely centered for the expression to read correctly.

  2. Transfer the template and mark all bridges

    Tape the wolf face template to the pumpkin and poke through all outlines. After removing the paper, mark the nose-to-muzzle connection and the four edge-connection bridges in a contrasting color. These are your no-cut zones.

  3. Cut the outer fur silhouette edges first

    Open the jagged fur-shaped cutouts along the cheeks and brows, working from the outer edge of the design inward. These establish the wolf's ragged outline while the inner face rind is still fully intact. Keep each fur spike at least 8 mm wide at its base to prevent cracking.

  4. Cut the eye holes

    With the outer fur edges established, cut the two slanted eye holes. Angle both eyes so the inner corners are lower than the outer corners for a predatory furrowed-brow look. Use a fine detail blade for the narrow inner corners of each eye.

  5. Cut remaining details and light

    If the template includes any additional detail holes in the muzzle area, cut them last. Insert a strong LED lantern inside; the combination of glowing eye holes, glowing fur fringe, and the solid dark wolf face creates a dramatic, convincing effect. A cool white LED enhances the menacing look.

Written with AI to match this design

Gather your supplies

Check things off as you get ready.

Work on a stable surface, keep your free hand out of the cutting path, and have an adult handle sharp tools.

Three levels of light

  • Leave intact

    The full wolf face including the retained nose, muzzle, brow rind, and all four edge bridges stays solid and dark as the silhouette.

  • Peel & shade

    None for this design.

  • Cut through

    Both slanted eye holes and all jagged fur-shaped cutouts around the cheeks and brows are cut through for full glowing light.

Learn the carving basics

Before you start cutting

How do I keep the jagged fur spike tips from breaking?

Keep each spike at least 8 mm wide at its base and avoid making the tips into razor points. Slightly rounded or blunted spike tips are structurally much more durable and still read as ragged fur from a viewing distance of a few feet. If a tip does chip, petroleum jelly pressed into the crack slows drying and keeps the break from spreading.

How do I angle the eyes correctly for a predatory look?

Each eye hole should be a slightly slanted oval or almond shape with the inner corner lower than the outer corner. A 10-15 degree downward angle from outer to inner edge is enough to create the furrowed-brow predator expression. Check your template against a reference photo of a wolf face before cutting.

What if the center face feels wobbly after the fur edges are cut?

If any of the four edge bridges have been inadvertently cut or narrowed, add a new rind bridge across the nearest open gap by leaving an uncut strip of rind in a position you had planned to cut through. Adjust the design by sacrificing one fur spike position to restore a structural connection rather than risking the whole silhouette collapsing.

Your take belongs here, too.

Changed a detail? Made it simpler? Share a photo of your version and tell the community what worked.

Share your pumpkin

More pumpkins like this

You've reached the end · 8 pumpkins
The Patch Report

Fresh pumpkins, in your inbox.

The best new carvings, ideas worth stealing, and how-tos for carving season. Short, seasonal, and gone by November.

A short email during carving season. Unsubscribe anytime. See our privacy policy.