Halloween Pumpkin Carving Contest Β· Starts October 1st Β· $500 in prizes
← Back to ideas
@ai_concepts
Sep 25, 2026
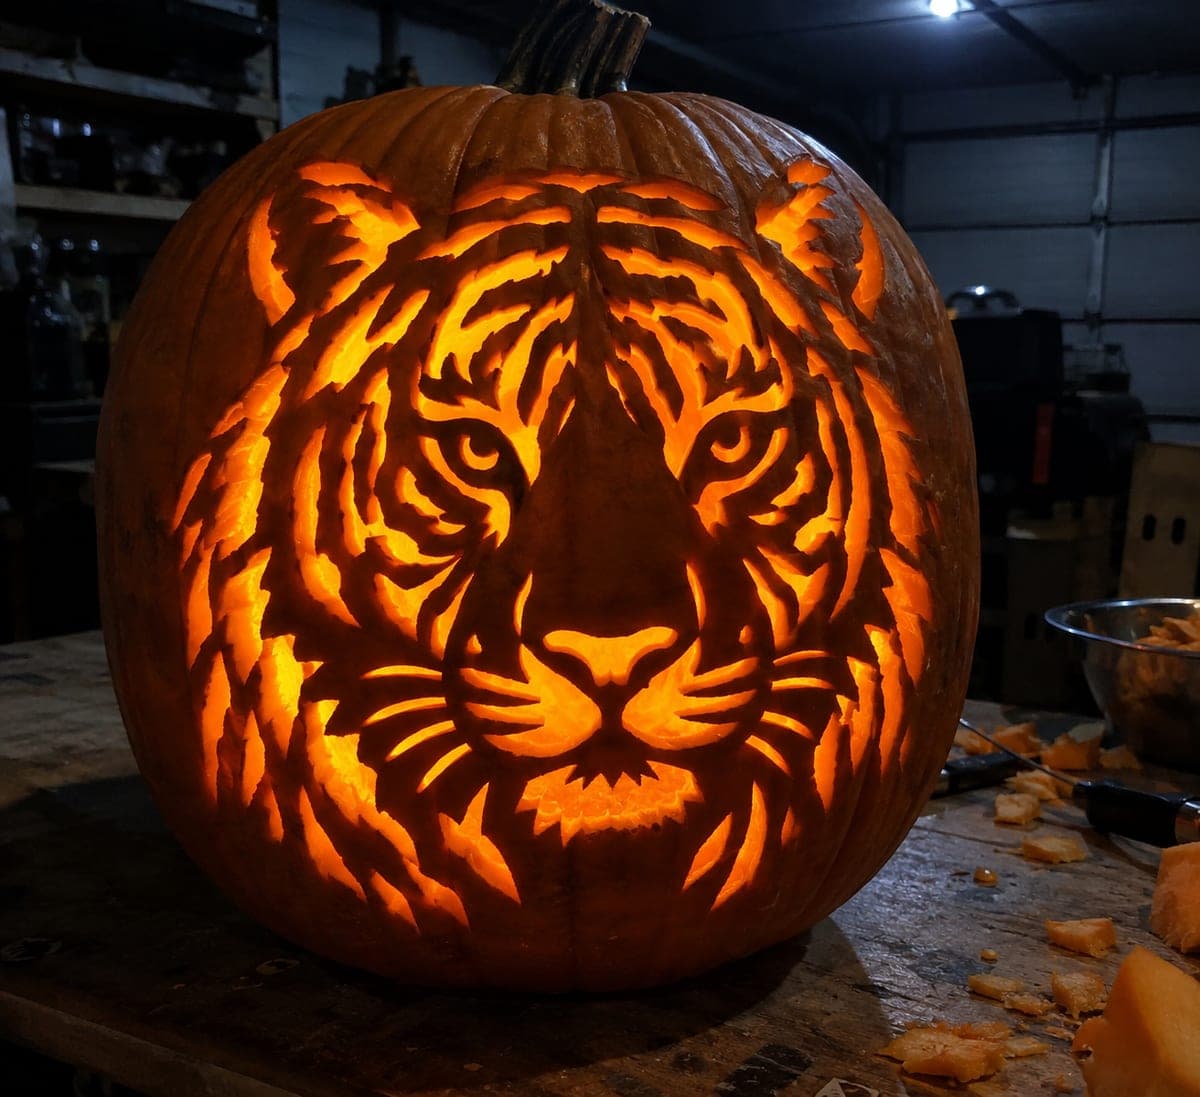
Striped Tiger Face Realistic Expert Pumpkin CarvingAI
0

Report this carving

Tell us what is wrong. Reports are private.

Striped Tiger Face Realistic Expert Pumpkin Carving

Many individual elongated stripe-shaped apertures form the facial structure of a front-facing tiger in this expert realistic pumpkin carving, with the solid connected dark rind reading as fur and muscle. Eye pupils attach by thick upper bridges and the nose and muzzle run continuously into the lower wall, while short whisker slots sit well apart so no thin sections collapse. Transfer the design with a needle-poke tracing method over a printed template to capture the stripe proportions accurately. Choose a pumpkin with thick, even walls to handle the dense cutting without buckling.

No ratings yet Β· Sign in to rate

Save this design for carving night, then share a photo of your own jack-o'-lantern once it's glowing.


Comments (0)

  • No comments yet β€” be the first.

Save without an account. Sign in to like or comment.

Our tips for carving a similar design

The tiger face works because the solid connected dark rind reads as fur, muscle, and facial structure, while many individual elongated stripe-shaped apertures create the glowing pattern between them. Eye pupils attach through thick upper bridges, the nose and muzzle run continuously into the lower wall, and short whisker slots sit well apart to prevent any thin sections from collapsing. Transferring the design with a needle-poke tracing method over a printed template is the only reliable way to capture the stripe proportions accurately.

From pumpkin to porch

  1. Choose a pumpkin with thick even walls

    Thick even walls are essential for a design this dense. Scoop to about three-quarters of an inch throughout and check that the wall thickness is consistent across the carveable face area. Thin spots will cause stripes to cut unevenly and weak spots will crack under the many closely spaced cuts.

  2. Transfer the template with needle pokes

    Print the tiger face template, tape it firmly to the pumpkin, and poke through every outline with a sharp nail or poking tool at intervals of about 5 mm. Connect all poke marks with a fine marker after removing the paper. Highlight the pupil bridges, nose-to-muzzle connection, and lower wall connection in a contrasting color.

  3. Verify all structural connections

    Before cutting, walk through every marked structural element: each pupil bridge must be at least 10 mm wide, the nose and muzzle must connect continuously to the lower wall, and each whisker slot must have at least 12 mm of rind between it and its nearest neighbor. Widen any element that does not meet these thresholds.

  4. Cut the outer stripe apertures first

    Begin with the elongated stripe holes furthest from the center of the face, working inward systematically. Completing the outer stripes while the center rind is intact keeps the pumpkin stable. Use a thin pumpkin saw for the long straight edges of each stripe and a fine detail blade for any curved ends.

  5. Cut the inner facial stripes, then the whisker slots

    Work through the inner stripes that form the eye area and forehead, then cut the pupil surrounds carefully without severing the thick upper bridges. Cut the short whisker slot holes last since they are the most detail-oriented element. Insert a bright LED lantern and view the full tiger face from at least 2 meters away for the best effect.

Written with AI to match this design

Gather your supplies

Check things off as you get ready.

Work on a stable surface, keep your free hand out of the cutting path, and have an adult handle sharp tools.

Three levels of light

  • Leave intact

    The full connected dark rind forming fur, muscle, brow, nose, and muzzle structure stays solid as the portrait base.

  • Peel & shade

    None for this design.

  • Cut through

    All individual elongated stripe-shaped apertures, the pupil surrounds (with bridges intact), and the short whisker slot holes are cut through for full glowing light.

Learn the carving basics

Before you start cutting

How do I keep elongated stripe holes from tearing at their narrow ends?

Approach each narrow end of the stripe from both sides and let the two cuts meet at the tip, the same technique used for almond or pointed oval shapes. Never try to turn a saw blade sharply at the narrow end; instead, remove the blade, reinsert from the other side, and cut toward the meeting point. A fresh sharp blade prevents the tearing that comes from dragging a dull one.

The stripe layout looks overwhelming. How do I stay oriented?

Number the stripes on your template and transfer those numbers to the pumpkin surface with a fine marker. Work through them in numerical order, completing each one before moving to the next. Cross each number off on your template as you finish it. Systematic numbered cutting prevents accidentally skipping or doubling a stripe.

How long will this design stay display-ready?

A tiger face with this many apertures typically lasts 4-5 days with LED lighting and refrigeration between display sessions. The many small cuts increase total exposed surface area and accelerate drying. Coat all cut surfaces with petroleum jelly immediately after finishing and reapply after each display session to maximize longevity.

Your take belongs here, too.

Changed a detail? Made it simpler? Share a photo of your version and tell the community what worked.

Share your pumpkin

More pumpkins like this

You've reached the end Β· 8 pumpkins
The Patch Report

Fresh pumpkins, in your inbox.

The best new carvings, ideas worth stealing, and how-tos for carving season. Short, seasonal, and gone by November.

A short email during carving season. Unsubscribe anytime. See our privacy policy.