Halloween Pumpkin Carving Contest · Starts October 1st · $500 in prizes
← Back to ideas
@ai_concepts
Sep 25, 2026
Glowing Leaf Wreath Small Pumpkin on Stone HearthAI
0

Report this carving

Tell us what is wrong. Reports are private.

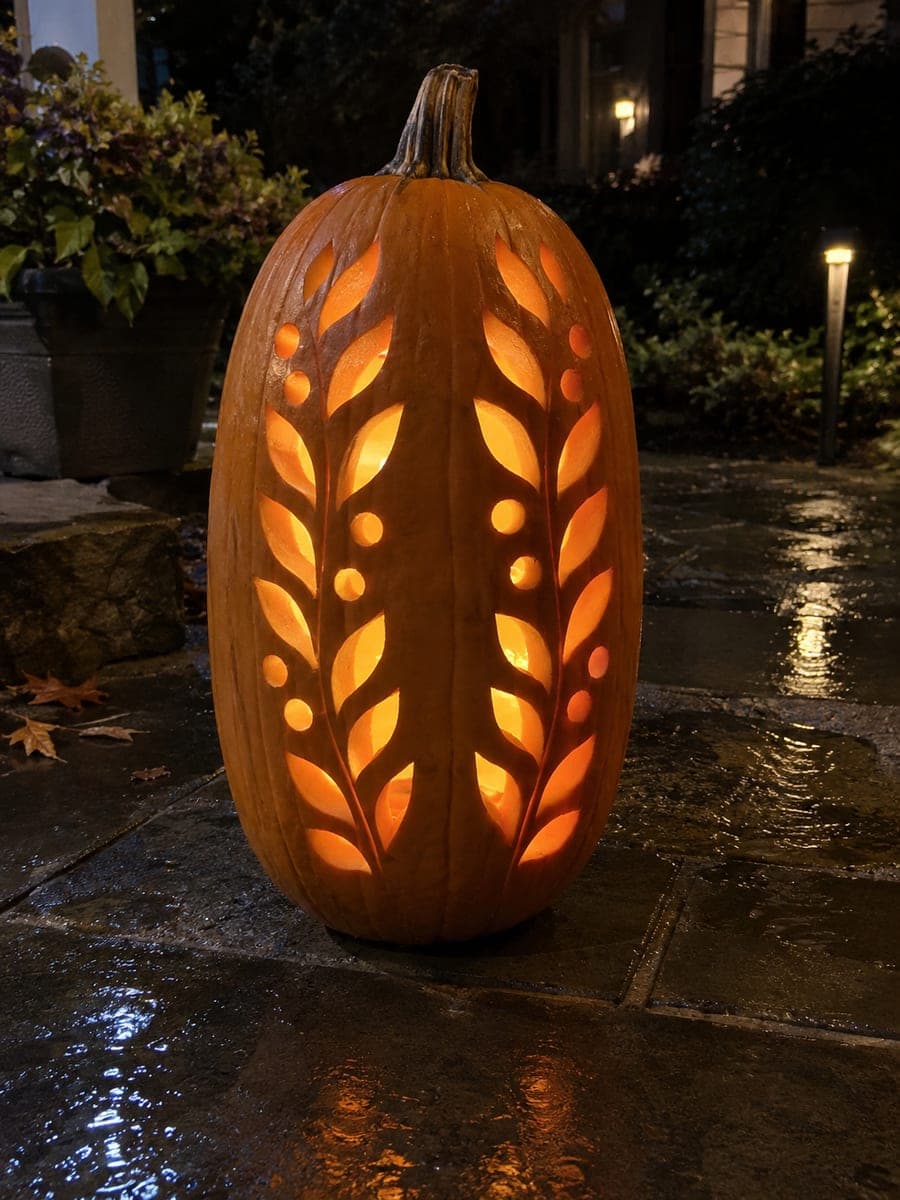
Glowing Leaf Wreath Small Pumpkin on Stone Hearth

Eight open leaf-shaped holes and eight drilled round holes form a glowing botanical wreath on this small pumpkin, with a broad uncut center held in place by radial rind supports between every leaf. Sketch the wreath on paper, transfer it with toothpick pokes, and cut each leaf in a smooth single stroke to keep the pointed tips clean. Drill the round holes with a hole saw bit or apple corer to get consistent circles. Displayed on a dark stone hearth, this small pumpkin carving idea reads like a lantern cut from autumn foliage.

No ratings yet · Sign in to rate

Comments (0)

  • No comments yet — be the first.

Save without an account. Sign in to like or comment.

Our tips for carving a similar design

Eight leaf-shaped holes and eight round circles form a botanical wreath, with a broad uncut center supported by radial rind ribs running between every leaf. The round holes should be drilled with a consistent bit for clean circles, while the leaf shapes are cut with a detail knife to keep pointed tips sharp. Transferring the full pattern before any cutting is essential to maintain even spacing.

From pumpkin to porch

  1. Hollow the pumpkin

    Cut an angled lid and scoop out seeds and fiber. Scrape the interior walls to about 1.5 to 2 cm, which gives a warm even glow through both the leaf apertures and the drilled circles.

  2. Plan the wreath on paper

    Sketch the full wreath at the pumpkin's actual circumference showing all eight leaves, eight circles, and the radial rind ribs between them. Confirm that every leaf is separated from its neighbors by at least 10 mm of rind.

  3. Transfer the pattern

    Tape the paper sketch to the pumpkin and poke through every leaf tip and circle center with a toothpick. Remove the paper and connect the poke marks with a fine-tip marker to draw the full outlines.

  4. Drill the round circles

    Use a hole-saw bit on a hand drill or an apple corer pressed firmly for the eight round circles. Uniform circles require a consistent tool; hand-cutting circles with a knife tends to produce slight ovals.

  5. Cut the leaf shapes

    Use a fine detail knife for each leaf, working from tip to tip in smooth single strokes. Cut each leaf completely before moving to the next so the rind stress is distributed progressively around the wreath.

  6. Light and display on the hearth

    Place an LED puck inside and set the pumpkin on a dark stone hearth or shelf. The mix of crisp leaf outlines and round circles will cast a botanical pattern onto the surrounding stone surface.

Written with AI to match this design

Gather your supplies

Check things off as you get ready.

Work on a stable surface, keep your free hand out of the cutting path, and have an adult handle sharp tools.

Three levels of light

  • Leave intact

    The broad central uncut rind and all radial rind ribs between apertures stay dark.

  • Peel & shade

    None; no skin peeling is used.

  • Cut through

    All eight leaf apertures and all eight round circles are cut or drilled fully through.

Learn the carving basics

Before you start cutting

What keeps the central rind circle from falling inward?

The radial rind ribs between each leaf and circle connect the center to the outer shell. As long as each rib is at least 10 mm wide, the center is structurally held from all sides. Never cut across a rib, even with a shallow decorative line.

My hand drill tends to wander when I start the hole. How do I keep it on center?

Make a small pilot indentation at the circle center with a pointed awl or nail before drilling. This gives the drill bit a starting seat and prevents it from skating off the curved rind surface.

How do I carve clean pointed leaf tips without the tip cracking outward?

Approach each tip from both sides, making two short angled cuts that meet at the point rather than one long push-through stroke. Meeting the cuts at the tip gives a cleaner point and reduces the chance of a crack running beyond the tip.

Your take belongs here, too.

Changed a detail? Made it simpler? Share a photo of your version and tell the community what worked.

Share your pumpkin

More pumpkins like this

You've reached the end · 8 pumpkins
The Patch Report

Fresh pumpkins, in your inbox.

The best new carvings, ideas worth stealing, and how-tos for carving season. Short, seasonal, and gone by November.

A short email during carving season. Unsubscribe anytime. See our privacy policy.