Halloween Pumpkin Carving Contest · Starts October 1st · $500 in prizes
← Back to ideas
@ai_concepts
Sep 25, 2026
Hard Glinda Portrait Pumpkin with Side Window AccentsAI
0

Report this carving

Tell us what is wrong. Reports are private.

Hard Glinda Portrait Pumpkin with Side Window Accents

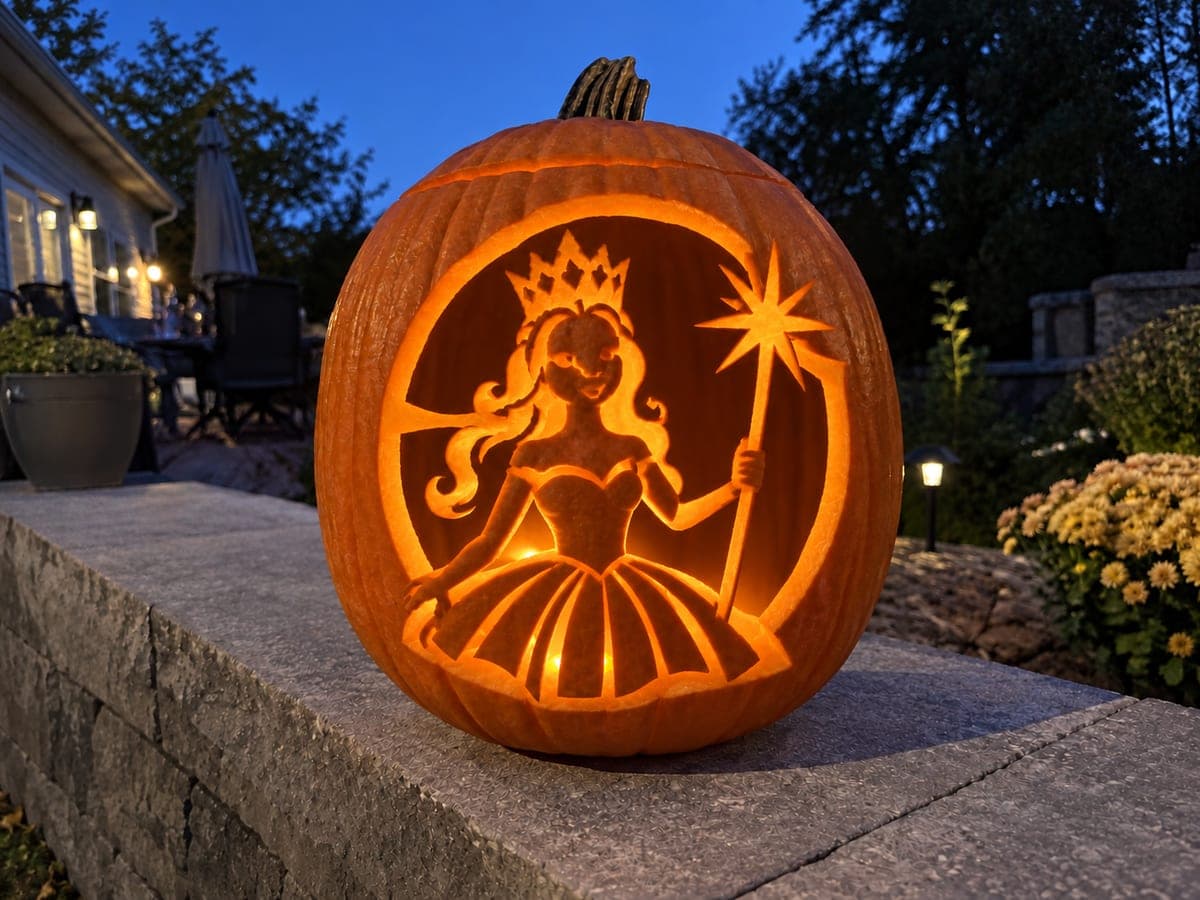
This hard Glinda pumpkin carving idea combines a shallow-backed portrait and crown with four empty side-background windows separated by broad rind bridges. The lower shoulders root to the shell for support, keeping the retained portrait section stable throughout carving. Cut the four side windows before touching the portrait area so the rind stays rigid while you work on the detailed shallow scoring. A bright LED inside makes the windows glow like stage footlights around the Good Witch.

No ratings yet · Sign in to rate
Comments (0)

  • No comments yet — be the first.

Save without an account. Sign in to like or comment.

Our tips for carving a similar design

The portrait and crown are shallow-backed for warm textured detail, while four fully open side windows separated by broad rind bridges provide bright glowing accents around the face. The lower shoulders root to the shell for support, keeping the entire retained portrait section stable as each window is opened. Cutting the four side windows before touching the portrait area is the sequencing rule that protects the detailed scoring work.

From pumpkin to porch

  1. Hollow and plan the layout

    Gut the pumpkin from the back and thin the front wall to three-quarters of an inch. Transfer the full design with a poking tool, placing the portrait centered and the four windows in two pairs flanking it. Mark the broad rind bridges between windows in red as structural zones that must not be cut.

  2. Cut the four side windows

    Open all four windows before doing any portrait work. Start with the two lower windows on each side, then the two upper ones. Cut each window in the same sequence: four straight lines meeting at clean right-angle corners. An adult handles all plunge entries at each corner.

  3. Verify bridge widths after each window

    After cutting each window, check that the rind bridge adjacent to it is still at least half an inch wide. If a bridge looks thinner than expected, stop and reassess the remaining window positions before continuing. Bridge integrity now protects all the portrait work that follows.

  4. Shallow-back the portrait area

    Switch to a linoleum gouge for the portrait. Work from the outer face contour inward, thinning the skin and a layer of flesh throughout the portrait zone. Glinda's curled hair should be scored with directional flowing strokes. The crown above the forehead gets thinned uniformly for an even glow.

  5. Score fine facial features

    Use a fine gouge tip to add brow arch, nose bridge, and lip contour scoring within the portrait. Keep these strokes shallow and confident rather than tentative and slow. Tentative strokes create jagged lines that break the smooth face surface.

  6. Light and angle for best effect

    Place a bright LED inside and view the pumpkin from in front. The four glowing windows should frame the softly lit portrait like stage footlights. Tilt the pumpkin very slightly backward on its display surface so the scored portrait area catches more of the interior light.

Written with AI to match this design

Gather your supplies

Check things off as you get ready.

Work on a stable surface, keep your free hand out of the cutting path, and have an adult handle sharp tools.

Three levels of light

  • Leave intact

    The outer rind border and the broad bridges between windows stay dark and intact.

  • Peel & shade

    The shallow-backed portrait, crown, and scored hair and facial detail zones glow as warm mid-tones.

  • Cut through

    The four side windows are cut fully through.

Learn the carving basics

Before you start cutting

Should the four windows all be the same size?

Matching size windows look most intentional and balanced. If your pumpkin is slightly taller than wide, you may want the upper windows slightly shorter than the lower ones to maintain visual balance with the portrait area. Mark all four on the pumpkin before cutting any of them to check proportions first.

How do I shallow-back a large area evenly without leaving visible gouge ridges?

Overlap each gouge stroke by about half its width so there are no un-thinned strips between passes. Work in a consistent direction across the whole zone, then make a second pass in a perpendicular direction to even out any high spots. Check evenness by holding the pumpkin up to a light source from behind.

Can I cut the windows after doing the portrait scoring instead?

It is strongly discouraged. Cutting windows after scoring means the portrait area is already thinned and weakened when the blade vibration from window cutting runs through the rind. This can crack or deepen the scoring unexpectedly. Always do structural through-cuts before decorative scoring.

Your take belongs here, too.

Changed a detail? Made it simpler? Share a photo of your version and tell the community what worked.

Share your pumpkin

More pumpkins like this

You've reached the end · 8 pumpkins
The Patch Report

Fresh pumpkins, in your inbox.

The best new carvings, ideas worth stealing, and how-tos for carving season. Short, seasonal, and gone by November.

A short email during carving season. Unsubscribe anytime. See our privacy policy.