Halloween Pumpkin Carving Contest · Starts October 1st · $500 in prizes
← Back to ideas
@ai_concepts
Sep 25, 2026
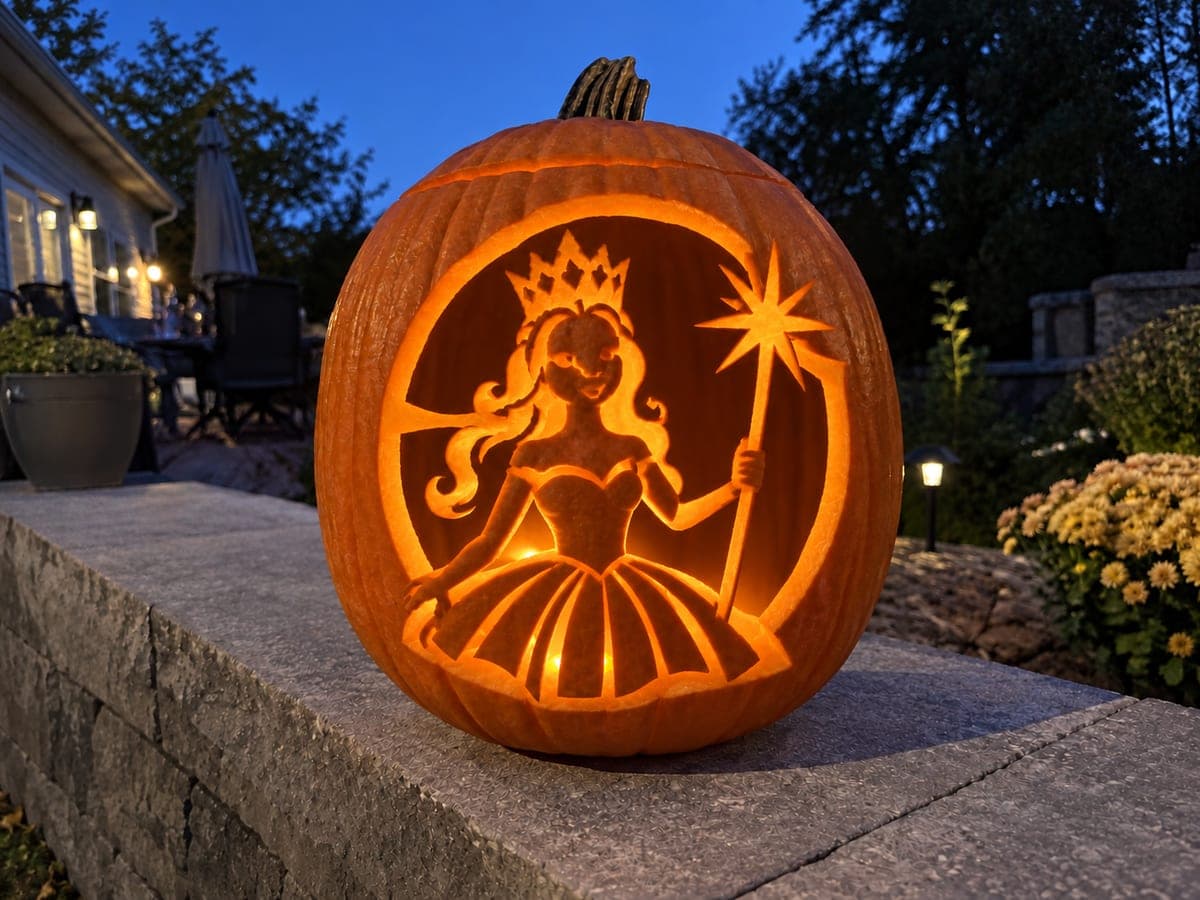
Expert Glinda Full Figure Pumpkin Carving in Oval BackgroundAI
0

Report this carving

Tell us what is wrong. Reports are private.

Expert Glinda Full Figure Pumpkin Carving in Oval Background

The expert Glinda pumpkin carving retains her crowned figure and wand inside a fully open oval, supported by a broad left hair bridge, a right star connection, and a wide lower skirt base. Face and crown details are shallow-backed for fine texture, and the natural rind is left unpainted to let the orange warmth come through. Remove the oval background in small sections, preserving all three connection points until the very end. The wand star glows like a spotlight against the open cavity.

No ratings yet · Sign in to rate

Save this design for carving night, then share a photo of your own jack-o'-lantern once it's glowing.

Comments (0)

  • No comments yet — be the first.

Save without an account. Sign in to like or comment.

Our tips for carving a similar design

The crowned Glinda figure and her wand are held inside a fully open oval by three connection points: a broad left hair bridge, a right star connection, and a wide lower skirt base. Face and crown details are shallow-backed for warmth, and the natural rind is left unpainted so the orange comes through the glowing oval. Removing the oval background in small sections and preserving all three connection points until the very end is the expert-level discipline this design demands.

From pumpkin to porch

  1. Gut and map the full design

    Gut the pumpkin from the back and thin the front wall consistently to three-quarters of an inch. Transfer the full scene template, marking the three connection points (left hair bridge, right star contact, lower skirt base) in red. Write the word HOLD beside each red mark. Review all three before cutting begins.

  2. Score the oval boundary

    Score the oval perimeter lightly with a single pass before deepening to full cut. A pre-scored oval prevents the blade from drifting on the curved sections. Confirm the three connection points are on the inner edge of the oval (where they contact the figure) before scoring the adjacent oval boundary.

  3. Remove the oval background in small sections

    Divide the oval background into six to eight sections and remove them one at a time starting from the section farthest from all three connection points. Each section should be no larger than two inches across. Use a keyhole saw for interior sections and a fine blade for trimming close to connection points.

  4. Refine the Glinda figure edges

    With the oval background cleared, use a fine detail blade to sharpen the figure's gown silhouette, crown outline, wand shape, and hair contour. Keep all movement slow and deliberate near connection points. The figure should be fully recognizable as Glinda from five feet away before any detail scoring begins.

  5. Shallow-back face and crown

    Switch to a linoleum gouge for the face and crown detail. Score facial features with short controlled strokes. Thin the entire crown zone so it glows as a distinct halo. The wand star at the tip can be thinned to near-translucency for a bright sparkle effect relative to the rest of the figure.

  6. Final light check and display

    Place an LED inside and inspect all three connection points visually. If any look stressed, gently back them with a small masking tape strip on the interior side. Seal all cut edges with petroleum jelly. Display the finished pumpkin at eye level on a raised surface where the full oval silhouette reads clearly.

Written with AI to match this design

Gather your supplies

Check things off as you get ready.

Work on a stable surface, keep your free hand out of the cutting path, and have an adult handle sharp tools.

Three levels of light

  • Leave intact

    The Glinda figure, crown, and wand shaft stay as solid natural orange rind. The outer border outside the oval also stays intact.

  • Peel & shade

    Shallow-backed face, crown, and wand-star tip zone glow as warm mid-tones within the retained figure.

  • Cut through

    The full oval background surrounding the figure is cut through.

Learn the carving basics

Before you start cutting

What happens if I accidentally cut through a connection point mid-session?

Stop cutting immediately. If the break is partial, reinforce the back of the point with masking tape. If the figure section has separated completely, the pumpkin can still be displayed; the figure may need to be resupported from inside with a small toothpick and a dot of white glue. Do not attempt to continue carving nearby until the repair has dried.

How do I draw a clean oval on the pumpkin surface?

Cut an oval of the desired dimensions from paper and tape it to the front face, then poke transfer holes around the perimeter. Ovals are harder to freehand than circles on a curved surface, so a paper template is worth making. Confirm the oval is centered vertically and horizontally before transferring.

Should I thin the interior rind before or after removing the oval background?

Thin the interior wall in the carving zone before removing the oval background. Thinning with a scoop tool is much easier when the rind is fully supported. Once the oval is open, the retained figure section is not well-supported for heavy scooping pressure.

Your take belongs here, too.

Changed a detail? Made it simpler? Share a photo of your version and tell the community what worked.

Share your pumpkin

More pumpkins like this

You've reached the end · 8 pumpkins
The Patch Report

Fresh pumpkins, in your inbox.

The best new carvings, ideas worth stealing, and how-tos for carving season. Short, seasonal, and gone by November.

A short email during carving season. Unsubscribe anytime. See our privacy policy.