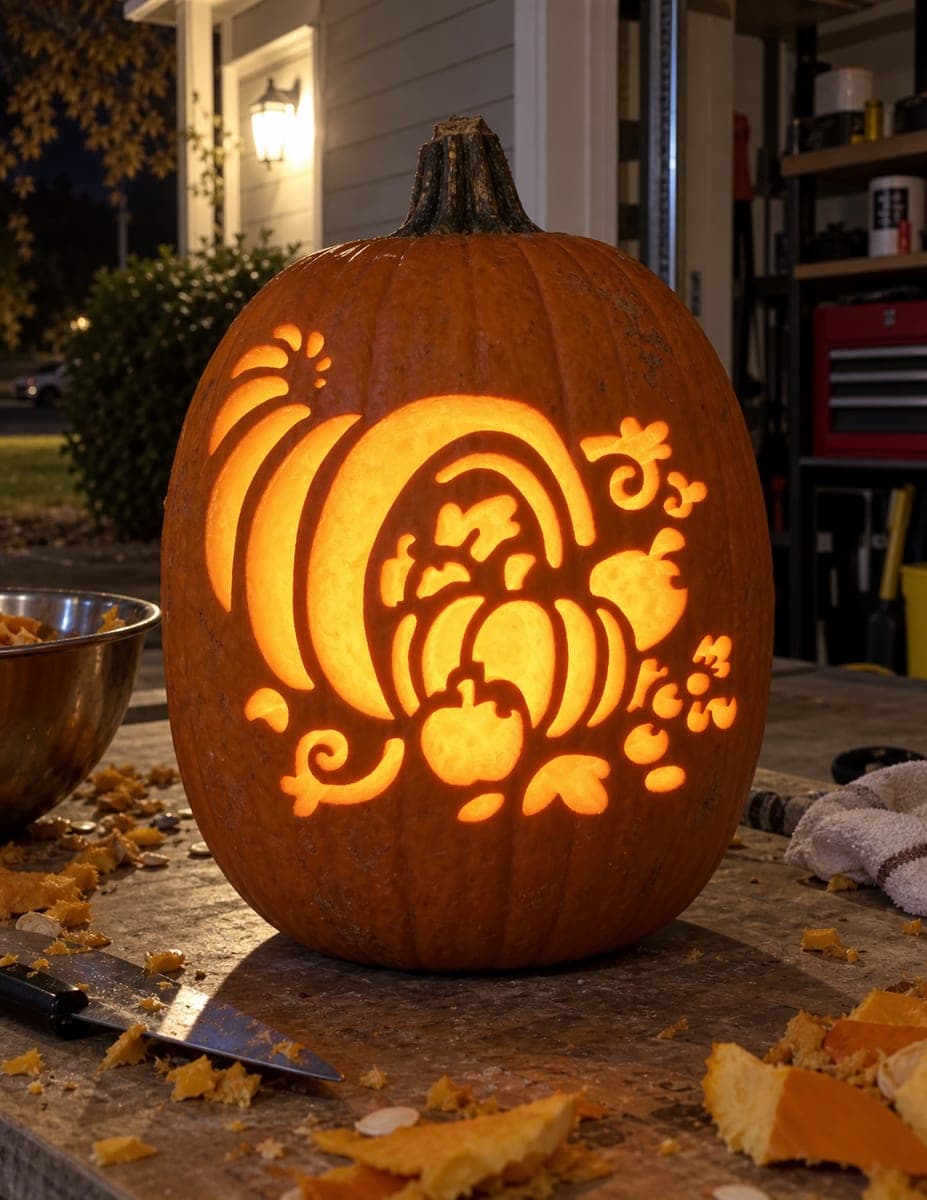
A cornucopia horn curves from upper-left to center-right, spilling out a large carved pumpkin, a small apple, and decorative swirl and floral motifs in this intricate harvest pumpkin carving idea. Every element -- the horn outline, the mini pumpkin lobes, and the curling swirls -- is pierced through, creating an elaborate composition with many small cutout segments connected by thin bridges. Work from the outermost curl tips and flower petals inward toward the horn, since those small details are most vulnerable to cracking and easiest to cut when the surrounding wall is intact.
This is an AI-generated concept image: a realistic, carvable design idea rather than a photo of a finished carve. AI concepts are always labeled and sit out the leaderboard and the contest.
The core trick here is a full cutout composition, where the horn, the tumbling pumpkin, the apple, and every swirl are pierced clean through and held together only by thin skin bridges. Because there is no shading, the whole design lives or dies on those bridges, so the plan is to map the pattern carefully and carve from the small, fragile outer curls inward toward the sturdy horn. Treat it as one connected web rather than separate shapes.
Written by PumpkinCarvingIdeas.com, inspired by the image above. These are our suggestions, not instructions from the uploader. This approach to the AI concept has not been tested on a real pumpkin.
From pumpkin to porch
1
Pick a sturdy pumpkin and transfer the pattern
Choose a tall, evenly shaped pumpkin with a smooth front panel and thick walls to support all the small bridges. Tape your printed cornucopia stencil flat against the front, snipping darts around the curve so it lies without wrinkles. Poke the outlines with a transfer tool or pushpin, spacing dots close together on the tight swirls and flower petals. Peel the paper and connect any faint gaps with a washable marker before you cut.
2
Open the lid and thin the front wall
Have an adult cut a lid from the bottom or the back rather than the top so the stem stays intact and the carved face stays clean. Scoop the pulp fully, then scrape the inside of the front panel down to about one inch thick. A thinner wall makes the many small cutouts far easier to push through and helps the light spread evenly. Keep a metal bowl handy for the guts, just like the one in the scene.
3
Cut the outer swirls and flower petals first
Start with the most vulnerable pieces, the curling swirl tips and the small floral shapes on the right side and lower left. Use a fine detail saw and make slow, straight in-and-out cuts, letting the blade do the work instead of forcing it sideways. Leave every marked bridge uncut so neighboring segments stay linked. Working these tiny shapes while the surrounding wall is still solid keeps them from cracking.
4
Carve the fruit and the horn interior
Move inward to the tumbling pumpkin lobes, the small apple, and the leaf shapes, cutting each lobe as its own opening separated by a thin bridge. Then open the ribbed interior lines of the cornucopia horn one narrow slot at a time. Rotate the pumpkin so your cutting hand always pulls toward open space, never toward a finished delicate area. Pop each piece out gently with a fingertip rather than prying with the blade.
5
Save the big horn opening for last
The large mouth of the cornucopia is the biggest single cutout, so cut it only after every small detail is finished and the wall still has maximum support. Score it in sections and remove the plug carefully to avoid tearing the bridges that frame the spilling fruit. Once it is out, run your saw back along any ragged edges to clean them. Test-fit a light before you call it done.
6
Light it and photograph the glow
Drop in one or two battery LED lights, warm white or amber, to mimic the deep orange glow in the picture. Avoid open candles, since the many thin bridges are dry and easy to scorch. Set the pumpkin on a porch or workbench, dim the surrounding lights, and shoot from slightly above to catch the whole scene. A little petroleum jelly on cut edges slows drying and keeps the details crisp for a few extra days.
Gather your supplies
Check things off as you get ready.
Work on a stable surface, keep your free hand out of the cutting path, and have an adult handle sharp tools.
Three levels of light
Leave intact
The untouched orange skin around the design and between the swirls stays dark, framing the harvest scene.
Peel & shade
Optional shallow skin-peeling along the horn ribs or leaf veins would give a dim orange glow if you want soft depth.
Cut through
The horn mouth, the pumpkin lobes, the apple, and every swirl and petal are cut clean through for the brightest light.
There are so many small cutouts. How do I keep the bridges from breaking?
Keep every marked bridge intact and never widen a cut toward one. Thin the front wall evenly so pieces release with light pressure instead of prying. Work outer curls first while the surrounding skin still braces them, and pop plugs out with a fingertip rather than the blade.
This is an AI concept image, so can a real pumpkin actually hold all these pieces?
Yes, with care. A real pumpkin can support this many cutouts if you choose thick walls, thin the interior, and keep generous bridges between the swirls and fruit. If a section looks too crowded to hold, widen a bridge or two on your stencil before cutting.
Should I carve the big horn opening early to get it out of the way?
No, save it for last. The horn mouth is the largest opening and removing it early weakens the wall that supports all the small details. Finish every swirl, petal, and fruit lobe first, then cut the big plug once the structure has done its job.
Your take belongs here, too.
Changed a detail? Made it simpler? Share a photo of your version and tell the community what worked.
 AI
AI
Comments (0)