Halloween Pumpkin Carving Contest · Starts October 1st · $500 in prizes
← Back to ideas
@ai_concepts
Sep 25, 2026
Heart-Pattern Jack-O-Lantern With Tiny Glowing Heart HolesAI
0

Report this carving

Tell us what is wrong. Reports are private.

Heart-Pattern Jack-O-Lantern With Tiny Glowing Heart Holes

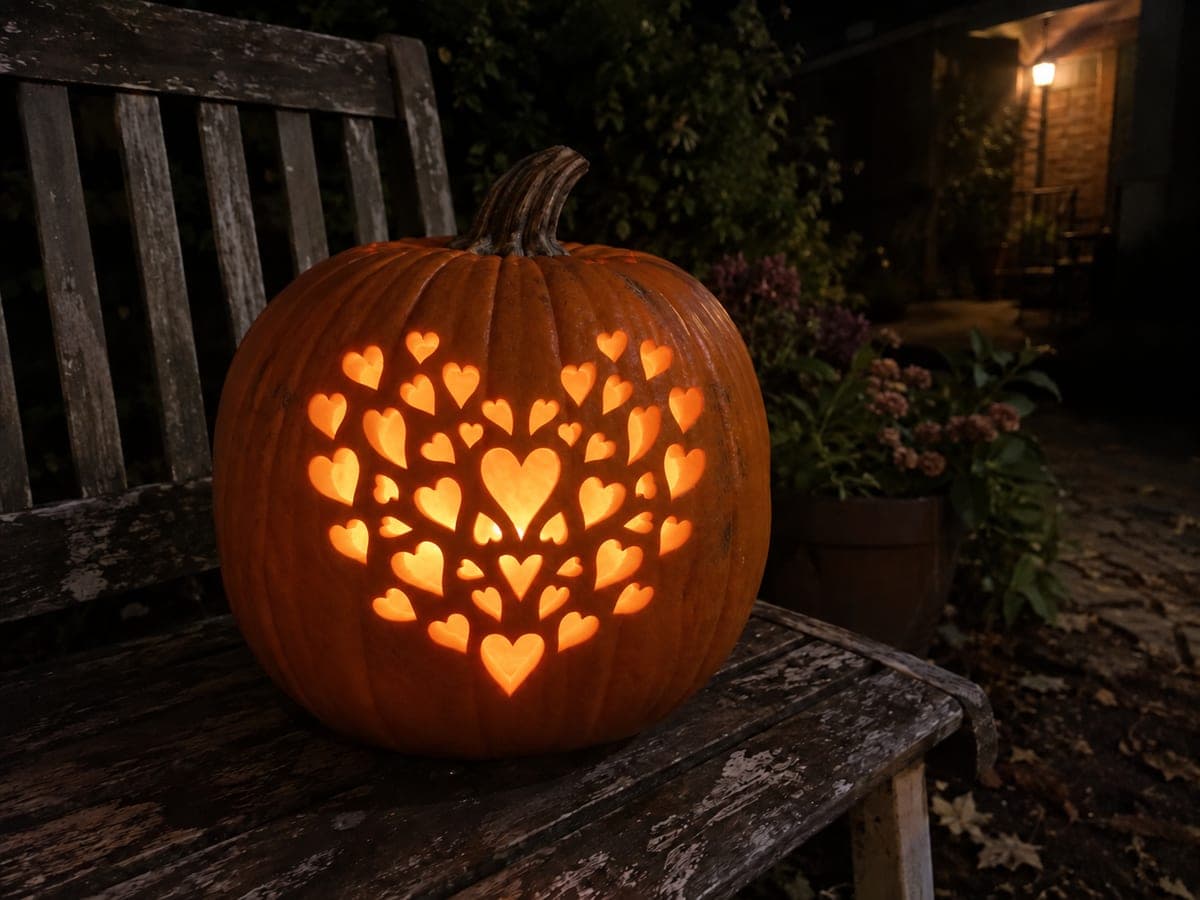
Dozens of small individual heart-shaped openings arranged across the rind in the outline of a large heart make this expert cute pumpkin carving idea one of the most delicate designs possible. Resist cutting any continuous perimeter outline around the large heart shape, instead letting the arrangement of small holes imply the shape against solid rind. Cut each tiny heart completely through one at a time, leaving generous dark rind between each opening so all the surrounding wall merges directly into the outer pumpkin border. Illuminated from within at night, the glowing heart pattern reads clearly from across the room.

No ratings yet · Sign in to rate

Comments (0)

  • No comments yet — be the first.

Save without an account. Sign in to like or comment.

Our tips for carving a similar design

The visual trick here is that no continuous outline surrounds the large heart. Instead, the shape is implied entirely by the arrangement of many small individual heart holes cut through an otherwise intact rind surface. Each tiny heart must be cut cleanly and completely through, while the solid orange rind between every pair of holes merges seamlessly into the outer pumpkin wall. When lit from inside, the cluster of glowing hearts reads as one large heart from across a room.

From pumpkin to porch

  1. Map the full layout before cutting

    Draw the large heart guide shape on the pumpkin surface with a washable marker. Then, working inside that guide, mark the position of every individual small heart hole, spacing them so there is at least 10 mm of solid rind between each one and between the outermost holes and the guide boundary. Do not cut the guide shape itself at any point.

  2. Make a pilot hole for each heart

    Use a small drill bit or a poker tool to pierce the center of each marked heart hole before switching to the saw. A pilot hole gives the fine-tooth blade somewhere to start without the saw skipping across the rind. Work methodically across the design in rows so you do not lose track of which holes are done.

  3. Cut each heart individually

    Insert the fine-tooth blade into the pilot hole and cut around each heart outline in one smooth loop. Keep the blade perpendicular to the surface throughout so the hole is the same width inside and outside. Pop each tiny offcut free from inside with a fingertip and set it aside without pressing on the surrounding rind.

  4. Work from the center of the large heart outward

    Cut the holes at the center of the large heart arrangement first and work progressively toward the outer rows. This keeps the maximum amount of intact rind supporting the area you are currently cutting. Pause every ten holes to press gently on the surrounding surface and confirm the rind is still rigid.

  5. Erase the guide line

    Once all holes are cut, wipe the large heart guide line away with a damp cloth before the marker sets permanently. The guide perimeter must not appear as a visible mark on the finished display since the design relies on the implied shape, not an outlined one.

  6. Light and photograph

    Insert a bright battery LED and view the pumpkin from about three metres in a darkened room. The implied large heart should read clearly as a shape. Photograph from the same distance with a short exposure to capture the glowing heart pattern without washing out the surrounding dark rind.

Written with AI to match this design

Gather your supplies

Check things off as you get ready.

Work on a stable surface, keep your free hand out of the cutting path, and have an adult handle sharp tools.

Three levels of light

  • Leave intact

    All solid rind between and around the individual heart holes stays completely dark, giving the overall heart shape its implied boundary

  • Peel & shade

    None, every element is either fully cut or fully intact

  • Cut through

    Each of the many individual small heart shapes is cut completely through the rind for a point of full interior glow

Learn the carving basics

Before you start cutting

How do I keep the small heart holes from looking ragged?

Work slowly with a fine-tooth blade and cut on the pull stroke only. After freeing each offcut, run the tip of a thin paring knife around the inside of the hole to trim any jagged edges. Clean holes let the light escape in a crisp, defined shape rather than a blurry glow.

What if I accidentally cut the guide perimeter outline?

If the cut is short, you may be able to fill it with a small patch of rind held in place from inside with a dab of food-safe adhesive. If the perimeter cut is long enough to read as a visible outline, lean into it and add more small heart holes along the edge to blend the cut into the design.

How long will this pumpkin last given how much is cut away?

A large number of small openings exposes a lot of inner pulp surface to air, which accelerates drying. Rub petroleum jelly on every cut edge immediately after carving, store the pumpkin in a cool spot when not on display, and expect five to seven days of good display life rather than the ten you might get from a simpler carving.

Your take belongs here, too.

Changed a detail? Made it simpler? Share a photo of your version and tell the community what worked.

Share your pumpkin

More pumpkins like this

You've reached the end · 8 pumpkins
The Patch Report

Fresh pumpkins, in your inbox.

The best new carvings, ideas worth stealing, and how-tos for carving season. Short, seasonal, and gone by November.

A short email during carving season. Unsubscribe anytime. See our privacy policy.