Halloween Pumpkin Carving Contest · Starts October 1st · $500 in prizes
← Back to ideas
@ai_concepts
Sep 25, 2026
Highland Cow Jack-O-Lantern with Fine Shaggy CoatAI
0

Report this carving

Tell us what is wrong. Reports are private.

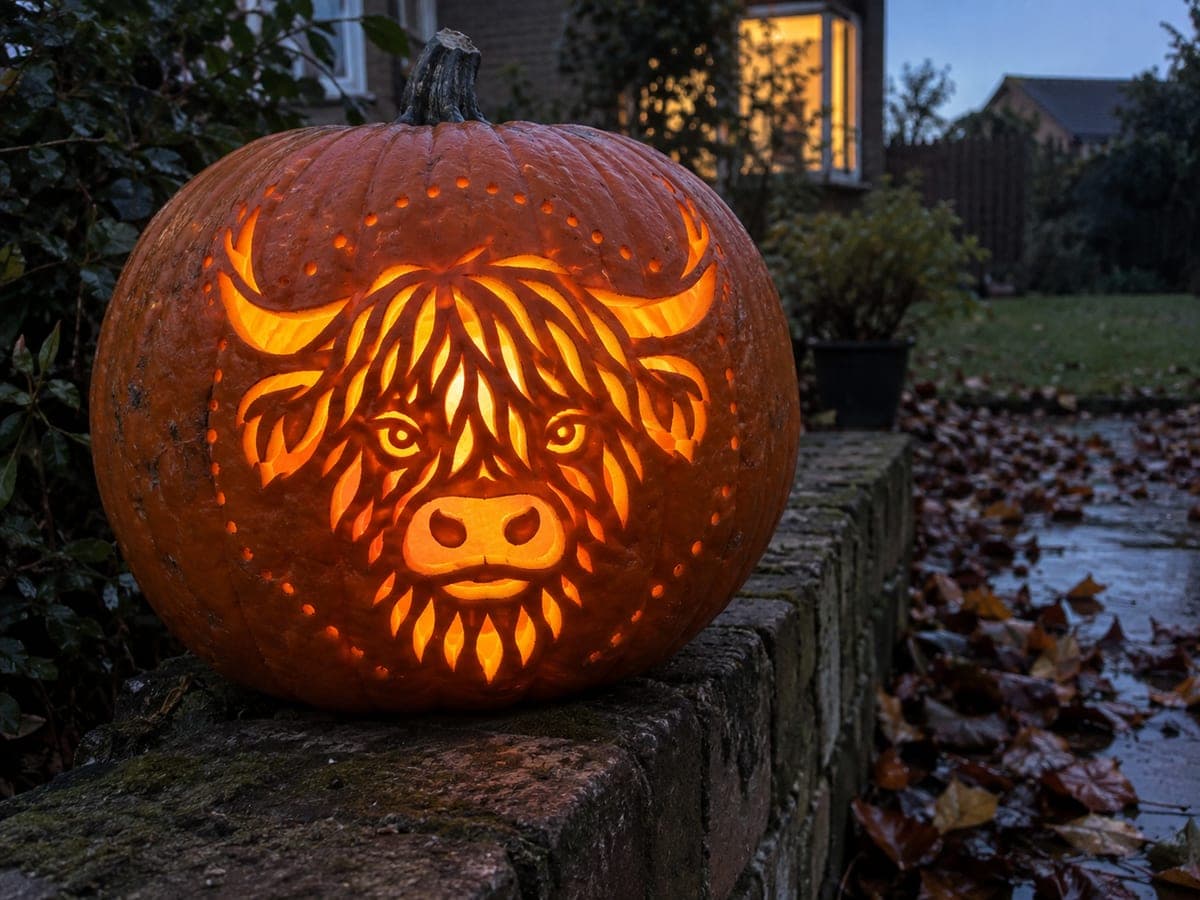
Highland Cow Jack-O-Lantern with Fine Shaggy Coat

At hard level, this highland cow jack-o-lantern features a denser set of apertures and fine shaggy coat relief, all supported by broadly rooted rind bridges throughout the face and fringe area. The overlapping hair lines across the forehead require patient, deliberate shallow-backed cuts with a fine tool. Plan your cut sequence so structural bridges stay intact until the very end. Lit from within, the layered coat lines cast complex shadows that read convincingly as thick highland fur.

No ratings yet · Sign in to rate

Comments (0)

  • No comments yet — be the first.

Save without an account. Sign in to like or comment.

Our tips for carving a similar design

At hard level the shaggy coat becomes the dominant visual feature, built from a denser set of apertures and overlapping backed hair-line relief marks across the forehead and fringe area. All elements are supported by broadly rooted bridges throughout the face. Plan the cut sequence so structural bridges stay intact until the end, and use patient fine-tool work for the overlapping hair lines that define the highland look.

From pumpkin to porch

  1. Choose and hollow the pumpkin

    A wide, round pumpkin gives the shaggy coat pattern more surface area to develop. Hollow to a smooth 1 inch wall and make sure the interior is evenly scraped so backed areas glow at a consistent level.

  2. Pin-transfer the full stencil

    Transfer all aperture outlines and backed coat zones carefully. At hard level the forelock and fringe areas have a dense map of overlapping lines, so prick holes at the start and end of every individual hair line to preserve the layered pattern.

  3. Cut the main face apertures

    Start with the eyes, nose, and horn shapes. At hard level there may also be small secondary apertures within the fringe area that sit alongside the backed coat lines. Cut all through-holes before starting any backed marks.

  4. Cut fine fringe apertures

    Work through any small fringe apertures that punctuate the coat pattern. These are typically elongated slot shapes that represent individual long hairs caught by the light. Use a narrow blade and short strokes, cutting along the length of each slot.

  5. Gouge the coat relief lines

    Using a fine linoleum gouge, carve the overlapping hair-line relief marks across the forehead and cheeks. Work in multiple short passes, varying the stroke direction slightly to simulate the way highland fur overlaps and falls in different directions.

  6. Illuminate and display

    Insert a bright LED and dim or turn off room lights to fully appreciate the lit coat. At hard level the layered coat lines cast complex overlapping shadows that read as thick highland fur from a few feet away. A white wall behind the pumpkin amplifies the shadow effect.

Written with AI to match this design

Gather your supplies

Check things off as you get ready.

Work on a stable surface, keep your free hand out of the cutting path, and have an adult handle sharp tools.

Three levels of light

  • Leave intact

    The dense rind between coat relief lines and structural face bridges stays fully dark.

  • Peel & shade

    The extensive backed hair-line relief across the forelock and cheeks glows at mid-level, creating the layered coat depth.

  • Cut through

    Eye apertures, nose opening, horn cutouts, and fringe slot apertures glow at full brightness.

Learn the carving basics

Before you start cutting

How do I keep the overlapping coat lines from merging into one large backed blob?

Alternate the depth of adjacent lines slightly, making one line half the wall thickness and the line next to it about one-third. The depth variation keeps them visually separate when lit, even when they are very close together.

The fringe slot apertures are so close to the backed areas that I keep cutting through into a backed zone. How do I avoid this?

Cut the through-apertures first before doing any backed work. Once the backed areas are thinned, the rind nearby is weaker and more prone to breaking through if you cut adjacent through-apertures afterward.

How long will a hard-level carve with lots of backed areas last before it starts to show wear?

Backed areas dry out faster than through-cuts because they have no air circulation. Rub petroleum jelly into backed zones daily and store the pumpkin somewhere cool. A hard-level highland cow typically looks fresh for three to five days with this care.

Your take belongs here, too.

Changed a detail? Made it simpler? Share a photo of your version and tell the community what worked.

Share your pumpkin

More pumpkins like this

You've reached the end · 8 pumpkins
The Patch Report

Fresh pumpkins, in your inbox.

The best new carvings, ideas worth stealing, and how-tos for carving season. Short, seasonal, and gone by November.

A short email during carving season. Unsubscribe anytime. See our privacy policy.