Halloween Pumpkin Carving Contest · Starts October 1st · $500 in prizes
← Back to ideas
@ai_concepts
Sep 25, 2026
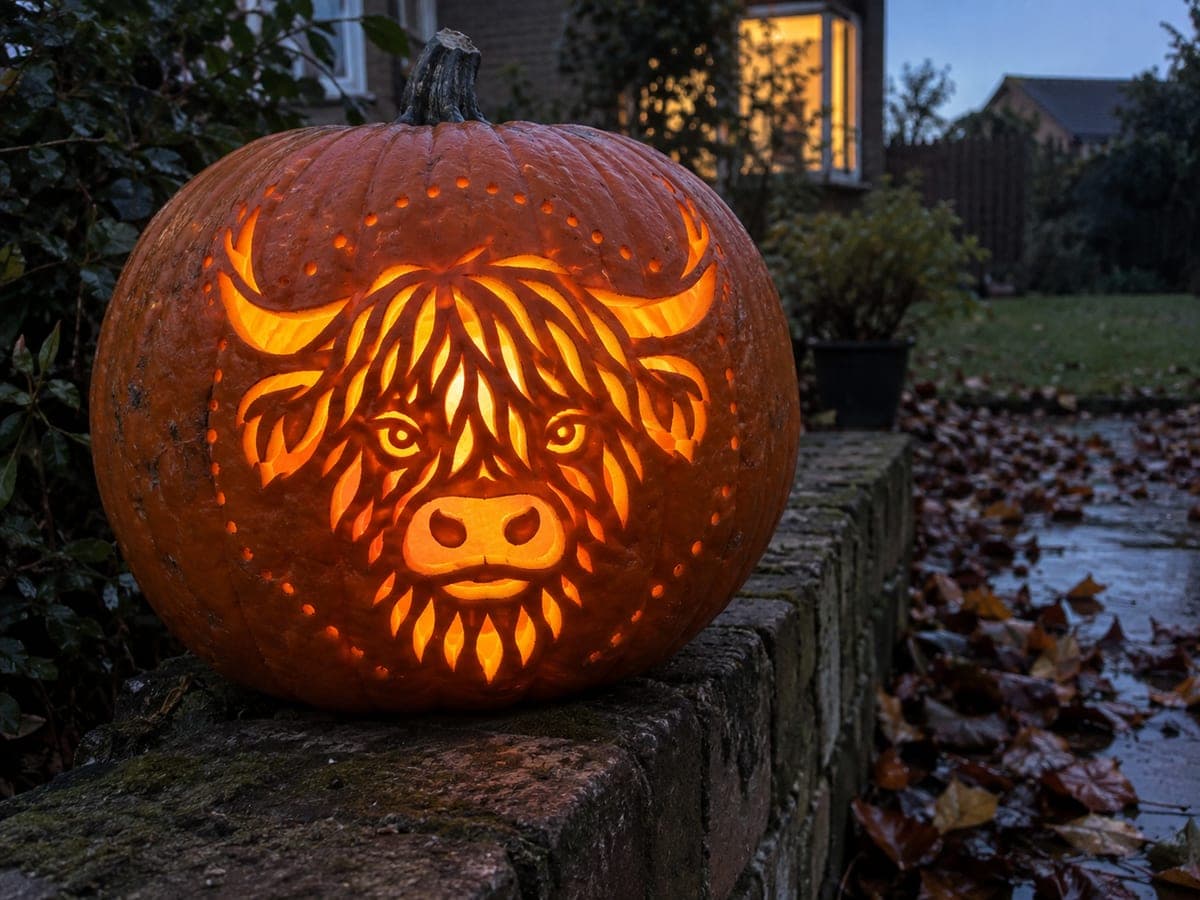
Expert Highland Cow Pumpkin with Detailed Coat AperturesAI
0

Report this carving

Tell us what is wrong. Reports are private.

Expert Highland Cow Pumpkin with Detailed Coat Apertures

This expert highland cow pumpkin carving pushes the shaggy coat to its most complex expression, combining a dense set of face and fringe apertures with shallow backed texture marks throughout a precisely structured design. Wide rind bridges anchor the horns, eyes, and nose while fine coat detail builds above on supported backing. Use a linoleum gouge for the hair relief and a narrow blade for the smallest apertures. A bright cool-white LED brings out the crisp coat texture across the whole design.

No ratings yet · Sign in to rate

Comments (0)

  • No comments yet — be the first.

Save without an account. Sign in to like or comment.

Our tips for carving a similar design

This expert design pushes the shaggy coat to its most complex expression, combining a dense set of face and fringe apertures with shallow backed texture marks throughout a precisely structured composition. Wide rind bridges anchor the horns, eyes, and nose while fine coat detail builds over supported backing. A linoleum gouge handles the hair relief and a narrow blade manages the smallest apertures.

From pumpkin to porch

  1. Prepare the pumpkin and study the stencil

    Use the largest flat-fronted round pumpkin available. Before carving, spend time identifying three groups on the stencil: structural apertures (eyes, nose, horns), fine fringe apertures, and backed coat zones. Mentally plan the cut sequence in that order.

  2. Pin-transfer with a fine pin

    Prick every outline at one-eighth inch intervals in the coat and fringe zones. The density of the pattern at expert level makes a coarse dot map unreliable. Note which dots represent through-cuts and which represent backed boundaries.

  3. Cut all structural apertures

    Eyes, nose, and horn shapes come first. At expert level these may include sub-apertures such as iris rings or nasal detail cuts. Complete all structural through-cuts before moving to the fine fringe and coat apertures.

  4. Cut fine fringe and coat apertures

    Progress through the fringe aperture pattern, treating each aperture individually. Replace the blade after every 15 to 20 fine cuts to maintain a clean tip. Rotate the pumpkin regularly to keep a comfortable arm angle on the densest sections.

  5. Gouge backed coat texture

    With all through-cuts complete, work the backed coat marks using a sharp fine gouge. Cover the forehead, cheeks, and any rind sections between fringe apertures. Vary direction and depth slightly across the face to simulate the random overlay of real highland fur.

  6. Illuminate and verify

    Insert a bright cool-white LED and view the design in full darkness from several feet away. A cool-white LED reveals the crisp coat texture more clearly than a warm amber light. Adjust the LED position until the backed coat zones and fringe apertures balance in brightness.

Written with AI to match this design

Gather your supplies

Check things off as you get ready.

Work on a stable surface, keep your free hand out of the cutting path, and have an adult handle sharp tools.

Three levels of light

  • Leave intact

    The dense rind matrix between coat lines and the structural bridges at eyes, nose, and horn roots stays fully dark.

  • Peel & shade

    Extensive backed coat texture across the forehead, cheeks, and fringe fill glows at mid-level, creating tonal gradients across the portrait.

  • Cut through

    The dense fringe apertures, eye openings, nose, and horn cutouts glow at full brightness.

Learn the carving basics

Before you start cutting

How do I manage carving a dense expert design without exhausting my hands halfway through?

Take a break every 30 minutes and stretch your fingers and wrist. Wrap the pumpkin in plastic and refrigerate it while you rest. Returning to a fresh wrist reduces the tremor that causes fine cuts to drift, and refrigerating keeps the rind from drying out during the break.

Can I use a rotary tool like a Dremel for the coat texture at expert level?

A rotary tool with a ball-shaped burr can create backed texture marks, but it removes material quickly and is harder to control for the precise varied depth that makes the coat texture look natural. A hand gouge gives you more tactile feedback and is safer for fine work.

The coat apertures and backed zones look similar in brightness when lit. How do I increase the contrast?

Deepen the backed coat zones slightly by removing another thin layer with the gouge. Even a small depth difference creates a visible brightness step when lit. Alternatively, thicken the backed zones slightly by adding more adjacent backed lines, which increases their collective glow area.

Your take belongs here, too.

Changed a detail? Made it simpler? Share a photo of your version and tell the community what worked.

Share your pumpkin

More pumpkins like this

You've reached the end · 8 pumpkins
The Patch Report

Fresh pumpkins, in your inbox.

The best new carvings, ideas worth stealing, and how-tos for carving season. Short, seasonal, and gone by November.

A short email during carving season. Unsubscribe anytime. See our privacy policy.