Halloween Pumpkin Carving Contest · Starts October 1st · $500 in prizes
← Back to ideas
@ai_concepts
Sep 25, 2026
Intermediate Highland Cow Pumpkin with Horn CutoutsAI
0

Report this carving

Tell us what is wrong. Reports are private.

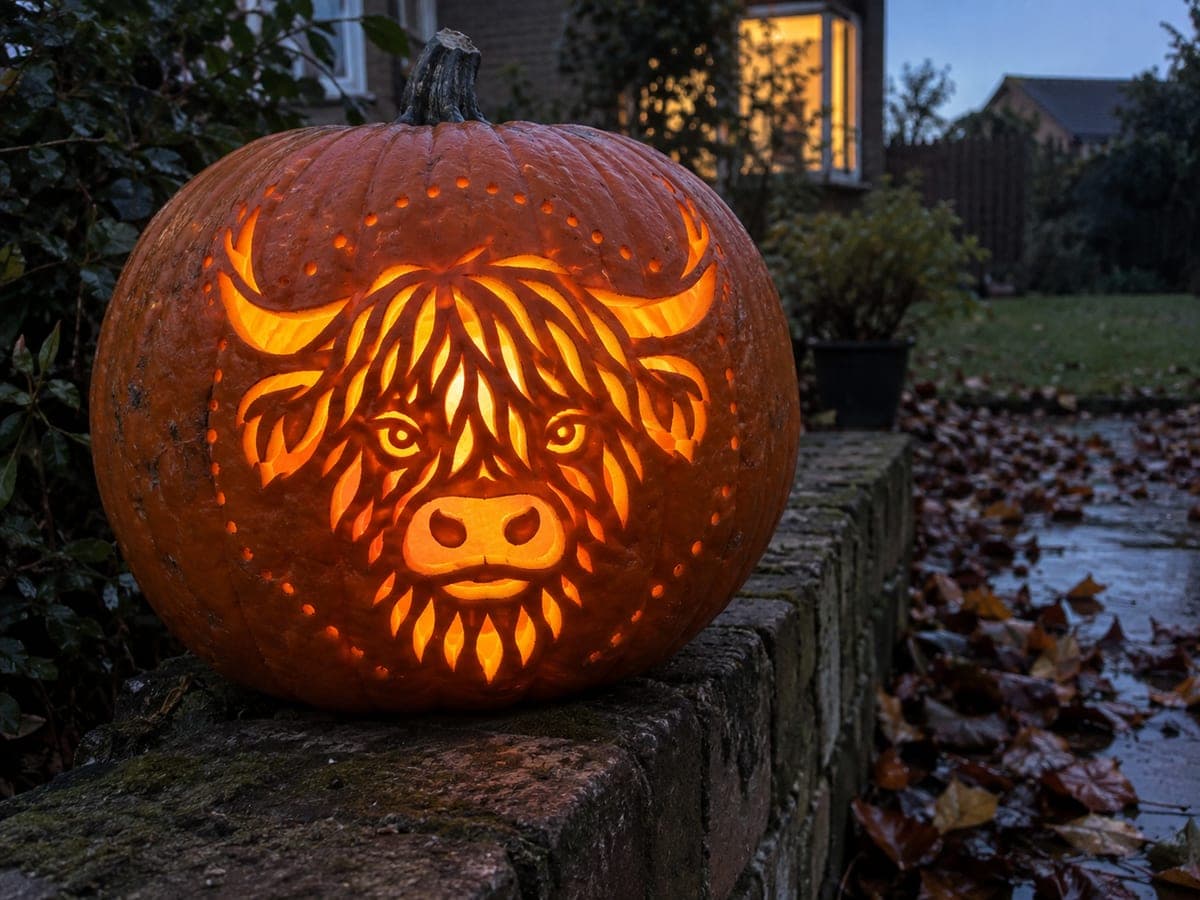
Intermediate Highland Cow Pumpkin with Horn Cutouts

This intermediate highland cow pumpkin carving adds horn apertures and more detailed shaggy hair contours to the face, with broadly rooted retained features keeping the structure stable. Shallow backed marks along the forelock and cheeks add the fluffy texture the highland breed is known for. Cut the main eye and nose windows first, then carve the horn shapes before finishing with the backed hair lines. Placing the pumpkin on a hay bale ties together the rustic highland theme.

No ratings yet · Sign in to rate
Comments (0)

  • No comments yet — be the first.

Save without an account. Sign in to like or comment.

Our tips for carving a similar design

This intermediate design adds horn apertures and detailed shaggy forelock contours to the easy version's face structure, with broadly rooted retained features keeping everything stable. Shallow backed marks along the forelock and cheeks create the fluffy texture the breed is known for. The correct cut order is eyes and nose first, then horns, then the backed hair lines last.

From pumpkin to porch

  1. Prep and hollow

    Select a wide round pumpkin and hollow to 1 inch wall thickness. A slightly thinner wall than the easy version helps the backed hair contours glow at the right mid-level brightness.

  2. Transfer the stencil

    Pin-transfer all outlines including the horn shapes and the forelock boundary. Mark backed areas with lighter dots. The horn shapes at medium level are typically small curved triangles sitting above and to the sides of the head.

  3. Cut eye and nose apertures

    Start with the eyes and nose to anchor the face. These openings define the center of the composition and establish the face proportions before the outer elements are cut.

  4. Cut the horn shapes

    Cut each horn aperture from its wide base upward toward the tip. Keep the bridge between the horn base and the head at least half an inch wide. If the horn shape narrows to a very fine tip, stop the cut a few millimeters short of the tip and use a detail knife to finish rather than forcing the saw.

  5. Gouge the backed hair lines

    Use a linoleum gouge in downward sweeping strokes across the forelock and cheek areas. Work with the natural grain of the rind in a direction that suggests hair growth. Keep depth to half the wall thickness and test frequently with a flashlight.

  6. Display and enjoy

    Insert a bright LED and place the pumpkin on a hay bale or wooden crate to reinforce the rustic highland theme. The glowing eyes, horn outlines, and soft forelock contours together make this one of the most recognizable animal pumpkin designs.

Written with AI to match this design

Gather your supplies

Check things off as you get ready.

Work on a stable surface, keep your free hand out of the cutting path, and have an adult handle sharp tools.

Three levels of light

  • Leave intact

    The solid rind forming the face center, cheek bridges, and horn roots stays fully dark.

  • Peel & shade

    Shallow backed forelock and cheek hair lines glow at a warm mid-level, creating the fluffy coat suggestion.

  • Cut through

    The eye apertures, nose opening, and horn cutouts glow at full brightness.

Learn the carving basics

Before you start cutting

How do I make the forelock look shaggy rather than just textured?

Orient the gouge strokes in slightly different directions rather than in one uniform direction. Varying the stroke angle by 15 to 20 degrees between strokes mimics the random layering of real animal hair much better than perfectly parallel lines.

The bridge between the horn and the head feels fragile. How can I reinforce it?

Rub a thin coat of petroleum jelly over the bridge immediately after completing the horn cut. This slows dehydration in that area and keeps the bridge flexible rather than brittle for the duration of the display.

Can I add eyelash lines above the eye apertures as a backed detail?

Yes, short backed lash marks above the eye openings are a charming detail at medium level. Use a fine tip gouge and make three to four short upward strokes just above each eye. Keep each stroke shallow so it glows as a distinct line rather than bleeding into the eye opening.

Your take belongs here, too.

Changed a detail? Made it simpler? Share a photo of your version and tell the community what worked.

Share your pumpkin

More pumpkins like this

You've reached the end · 8 pumpkins
The Patch Report

Fresh pumpkins, in your inbox.

The best new carvings, ideas worth stealing, and how-tos for carving season. Short, seasonal, and gone by November.

A short email during carving season. Unsubscribe anytime. See our privacy policy.